Operating system based method: OpenSUSE Linux 11
To use the WebDAV service with Linux, the wdfs (WebDAV File System) package must be installed. If you don't know if this package is already installed, you can easily check. Look in the list of installed programs (to be found differently depending on the Linux distribution) for the term wdfs. If the service is already installed, you can continue with point 1.1.1.4. If wdfs is not installed, continue reading from point 1.1.1.3.
Install wdfs
- Open a console window
- Enter su and confirm with Enter.
- Enter your root password and confirm with Enter.
- Type yast and confirm with Enter.
- Navigate to the Software menu item and then to the Software Management subitem and confirm with Enter.
- Press the Alt+F key combination and navigate to the Search menu item.
- Enter the term wdfs in the Search Phrase field and confirm with Enter.
- Highlight the found package wdfs and press Enter.
- Now press the key combination Alt+N
WebDAV setup via console
- Enter the following command in your console line:
wdfs webspeicher.in.uni-weimar.de/fs [Target folder]/ - In the next line, confirm the prompt with y and Enter.
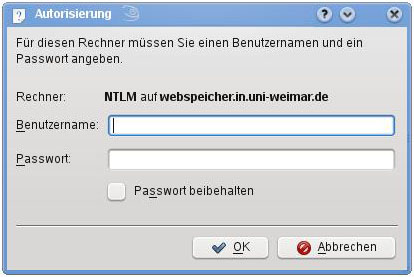
- In the next line you will be asked for your username. Enter this and confirm with Enter.
- Now enter your password last and confirm with Enter.
- You should now be able to access your files in the desired folder.
- Under GNOME, the specified folder is immediately opened in a window.
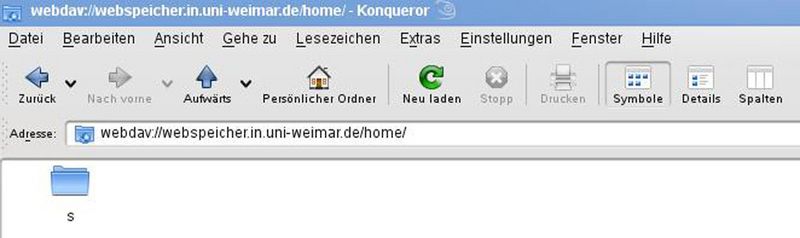
- Under KDE, you must first follow the specified path in the Koqueror to get to your folder.
- After a restart, this folder remains. If you do not want the folder to be displayed, open the console again.
- Now enter su and then your root password and confirm each entry with Enter.
- Next, use the command umount [destination folder]/ and confirm with Enter.
- Now the contents of this folder should no longer exist on your system.
WebDAV setup in KDE via Konqueror
1. Click the Konqueror icon in the taskbar.
2. Now type one of the following address in the address line:
- Home folder:
webdavs://webspeicher.in.uni-weimar.de/fs/home/[your structure]/[your status]/[your username] - Project folder:
webdavs://webspeicher.in.uni-weimar.de/fs/pjg/[your projectfolder]
3. Confirm the entry with Enter.
4. Confirm the certificate with Enter.