Here you will find several manuals for selected programs that will help you to integrate FTP into your workflow.
In our examples we connect to webuser.uni-weimar.de. These descriptions are also valid for server access that has been granted by the SCC. For example Storage space tied to projects you might participate in.
Disclaimer:
These Instructions should be viewed as living documents. We whould like to extend the descriptions to other ftp clients and operating systems. Here we need your help. If you use other clients than the ones described please send us a screenshot and short discriptions so we can further improove the manuals.
Configuration of FTP-Clients
»WinSCP« is a free and open source FTP client, the source code is licensed under GPL. It is available for the Windows operating system.
Installation / Download
»WinSCP« can be distributed on centrally administered computers, otherwise it can be obtained from the manufacturer's website.
Connection setup
Set up session

Directory view

After the connection to the server has been successfully established, you will see the contents of your local computer on the left-hand side of the programme window, and the contents of the remote server on the right-hand side.
Change to the directory public_html. Here you can edit all files (create, change, rename, delete). Drag and drop files with the mouse to transfer them from the local computer to the remote server (and vice versa).
Password security
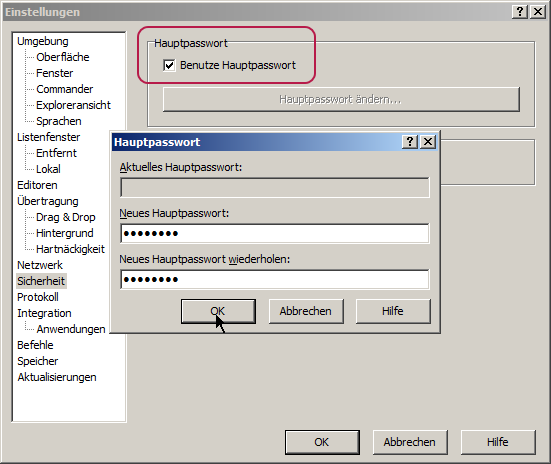
With »WinSCP« you can increase the security with which your password is stored in the connection destination quite easily: To do this, assign a main password.
This is requested only once after the program start (until you restart the program) and is used to encrypt your password.
To do this, go to Tools/Settings in the login screen, then select Security and set the optionUse main password.
Language setting of the program interface
Installation: Upgrade languages


 contains a single language file. Copy this into the WinSCP program directory.")

At the first start, the program interface is set to English; other languages can be added (German in this example):
- Click on Tools/Preferences in the login screen.
- Then select the item Environment/Languages.
Click on the Get more... button. - A browser window opens with the download page for more language files.
Click on the download link for the desired language. - Click on the download link for the desired language. The file you have just downloaded (zip archive) contains a single language file. Copy it into the program directory of »WinSCP«.
- Close the window with the settings and open it again (see point 1.), select the item Environment/Languages – now you can select German here and apply it with OK.
FileZilla is a free opensource FTP Client. The client is available for linux, Mac and Windows.
Should you need the client for a computer administrated by the SCC, please send us a request.
Download
FileZilla Client can be downloaded via SourceForge.
Password security
Attention:
FileZilla is saving your password in PLAINTEXT should you choose to save the connection including the password in the Servermanager. We strongly advice you to NOT use this function!
Alternatives:
- Use a ftp client that uses password encryption (WinSCP for Windows for example)
- In FileZilla use the option „Ask for password“ in the connection settings
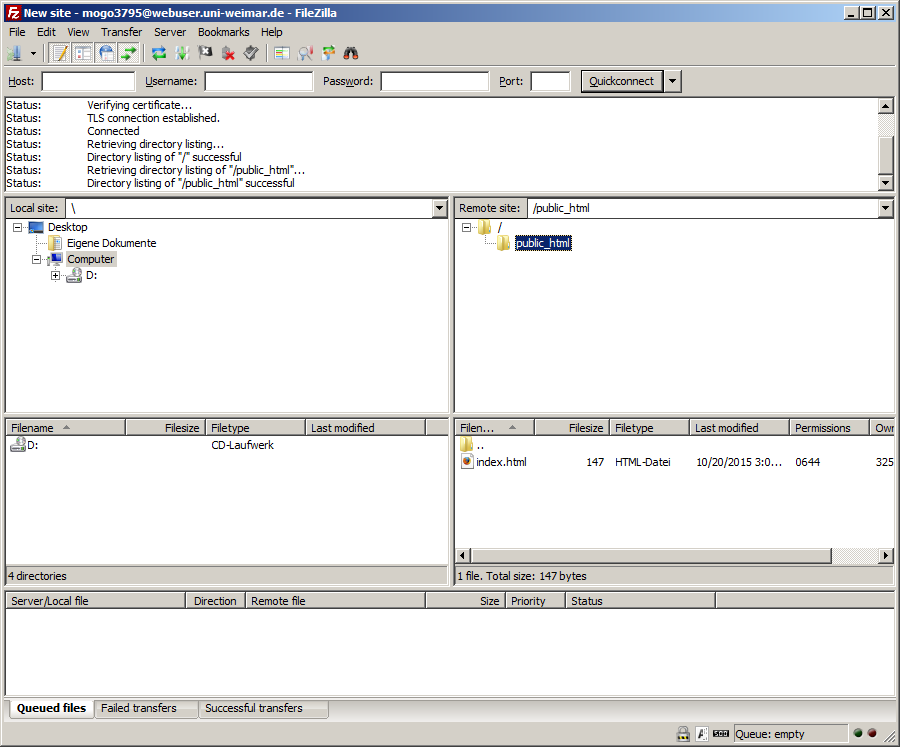
Establishing a connection
One time use

One time use
Enter the required data directly into the »Quickconnect bar«:
- Host: ftpes://webuser.uni-weimar.de
(Important to entert he protocol ftpes:// before the server name!) - Username and Password are your Bauhaus login Data
Using Site Manager
")

Verifying the certificate

Verifying the certificate
During the first connection you will be confronted with a message »The server's certificate is unknown«.
Why? FileZilla can't identify the Root Certificate.
You can check if the certificate is valid using the fingerprints seen on the picture.
Folder structure
Folder structure
After the connection is established filezilla will display the data of your local machine on the left and the data on the server on the right.
Change to the directory public_html. Now you can work with your data ( create, edit, rename, delete ). When you are ready, just drag and drop your data to the desired destination

»WebDrive« is a software available for the operating systems Windows and Mac OS X that integrates remote servers as an additional drive (Windows) or volume (Mac).
Download & Installation
»WebDrive« is licensed for use on official computers of the Bauhaus-Universität Weimar. Use on private computers is permitted as long as the person is affiliated with the Bauhaus-Universität Weimar. The software must be applied for informally by email to software[at]scc.uni-weimar.de.
The installation is carried out according to the instructions for the installation of »Webdrive« under Windows.
Connection setup
Set up session

- open »WebDrive«
- Add a new server connection with the New button

- Select Secure FTP (Secure FTP/SSL connection as the server type.
- continue with Next »

- Enter account information, but do not enter or save your password here for security reasons.
| URL/Address: | webuser.uni-weimar.de |
|---|---|
| Save password | no |
| Username/Password: | Your personal user ID |
| Security Type: | TLS v1.0 'AUTH TLS' |
| Secure data channel | yes |
- then go to further settings with the Advanced settings button
Advanced Settings

At Properties
- on the Connection tab
- as SSL-Protocol Settings
allow only TLS 1.2 [x]
deselect all other with [□]
FTP Settings

FTP Settings
- Enter the following as the root dictionary in the FTP-Settings tab:
./public_html - Security Type and the option Secure Data Channel should be set correctly from the previous step.
- Confirm with OK
Site settings


- Specify a unique site name in the new dialogue.
- Specify a drive that is not yet in use so that the directory can be displayed transparently in the Windows Explorer environment.
- Exit the dialogue with Finish .
- The connection set up is now available in the Server List and can be reused the next time it is used.