Tutorial: How to delete the black frame at the end of a rendered .mp4

For some reason video editing programs tend to place a black frame at the end of the rendered clip. I really don’t know why, but that seems to be the usual thing. In my case that is kind of annoying, due to the fact, that I want to loop the video in unity.

After checking out several editing softwares, I ended up in the Ubuntu terminal:

ffmpeg, a command line video editor helps!

Use the first command to make your .mp4 to thousands of .jpg’s.

ffmpeg -i video.mp4 -qscale 0 scene%05d.jpg

By hand, you can easily delete the last frame…

With the second command, you can take all your frames back into a .mp4.

ffmpeg -framerate 25 -i scene%05d.jpg -c:v libx264 -profile:v high -crf 20 -pix_fmt yuv420p newvideo.mp4

Than you end up with a mp4, without a black frame at the end! Such a nice work-around, Cheers!

Video: Intro/Outro Airplane Footage

Just some free Airplane take off landing videos

Airport

https://www.videezy.com/transportation/4301-dolly-shot-of-a-plane-getting-ready-to-fly-4k-stock-video ([ martin popvski] Videezy.com in credits)

Take off

https://www.videezy.com/transportation/665-airplane-lift-off ([ SuperEzFilms] Videezy.com in credits)

Rising

https://www.videezy.com/travel/6960-stratus-or-stratocumulus-clouds-from-plane-that-is-banking-left ([Brandon Hoe] Videezy.com in credits)

In the air

https://www.videezy.com/transportation/1488-free-airplane-wing-hd-stock-video ([marco puccini] Videezy.com in credits)

epic in the air

https://www.videezy.com/travel/6873-view-of-clouds-and-plane-wing-at-dusk

clouds air

https://pixabay.com/de/videos/flugzeug-flugzeugfl%C3%BCgel-reisen-2283/

landing

https://pixabay.com/de/videos/flugzeug-reise-fenster-bullauge-995/

https://archive.org/details/naAirplanelandingairplane2wmv

https://archive.org/details/pp_landing

https://archive.org/details/youtube-1hEf96ZTssE (14.15, licesne?)

landed: https://pixabay.com/de/videos/asphalt-flughafen-turbine-gep%C3%A4ck-6414/

(not useful, but interesting black and white material: https://www.pond5.com/stock-video-footage/1/airplane.html?free=1#3/18447/pricelt:25,airplane)

Costume experiment and first model

Experimentation with neopixels and optical fiber

In the pictures below we can appreciate the first costume model with a small bag in the back for the feather HUZZAH esp8266 and another one un the arm for the accelerometer.

Here are a couple of videos of our experiments:


Technik: status-update

A short status-update:

the original plan:

Lucas primary developed the BLE(Stage)->Arduino(Costume) part:

We decided to work with the HM-10 modules, or so we thought. After some frustrating hours of not getting stuff to work, I noticed we don’t actually have HM-10 modules infront of us but rather HM-10 CC2541 modules, which are copys of the original. There is a diffrence however, all the At-commands have to end with „\r\n“ and the „?“ ending does not exist.

After figuring that out I looked up all the At-commands that the module offers. Nothing usefull to be found for our project, so I tryed uploading the original HM-10 firm-software to the CC2541. For this I took a look into this repository and the manufecturer site jnhuamao. I got myself the arduino code from the git-repository and uploaded it onto my Arduino Uno R3. Then I downloaded the CCLoader_x86_64.exe. From the manifacturer site I downloaded firmsoftware V540. One can download the latest version V549 and instead of useing the „AT+DISI?“ command to search for Beacons RSSI, you could use „AT+DISA?“ to search for all devices RSSI. For a more specific insight, one should look into the patch loggs, since there were other small but handy changes. Never the less, since I wanted to scann for Beacons, there was no need to get a later version then V540.

Now all thats left is the Hardware aspect. For this I cut the BLE modul out of its case and connected the Arduino VCC to Modules VCC, GND to GND, D6 to DD, D5 to DC and D4 to Reset. Not knowing which pin is which I took a look into the datasheet of the BLE-module. Run the CCloader_x86_64.exe from command line like this:  path/CCLoader_x86_64.exe <COM Port> <path/Firmware.bin> 0. Done, now I had the HM-10 software on the CC2541 with the commands I opted to use.

Now to the actuall task, scanning RSSI of Beacons around. For this the „AT+DISI?“ command is helpful, since it returns 5-parameters, of which the fifth is the RSSI value of the device specified by its MAC-Adress (parameter 4). For this Command to actually work I needed to configure the BLE-Module, by running these commands first: „AT+ROLE1“ asigning Master role, „AT+BAUD0“ setting same baud as both Serial ports, „AT+RESET“ restart to aply changes, „AT+SHOW1“ show name, „AT+IMME1“ set worktyp. For further insight, datasheet is your best friend. Now i am able to run the „AT+DISI?“ command. The resieved answer from the BLE-module now only has to be parsed and filterd (see code) and vola, we now resieve the RSSI values of our specified devices.

For the connection Arduino-BLE module see here. Only diffrence mySerial(2,3) changed to mySerial(12,14).  Change circuit accordingly.

Source code:        Arduino code

Phil focused on the Arduino(Costume)->Unity3D(Computer) part. At first, we intended to use BLE, to achieve a communication between costume and Unity3D. Unfortunately the combination of Unity3D/C#/Windows and BLE seems to be a  kind of unexplored thing. I was not able to find a good solution. There are some libraries to use mobile(android, ios) BLE with Unity3D(which actually cost money), but that does not help us. So I dropped back to the Adafruit Feather and its Wifi-Module. Maybe the costume will be controlled by the Feather as our primary micro controller, or we stick with the Arduino Nano and attach a seperate Wifi-Module. We will decide about this later. The problem with the Feather is the number of analoge pins, exactly 1… Anyway I was able to set up a server in Unity and receive sensor values. The video’s intensity can already be manipulatet by the RSSI values. My next step is, to seperate the video-framerate by the feather’s send-rate. I will consider using an asynchronous connection. Furthermore I have to get the other video-manipulations working. I will probably make use of Video-Textures in Unity3D!

Source code:     Unity3D code

The Feather-client-connection part can be found in Lucas Arduino-sketch.

And some more BLE Links..:

https://blog.bluetooth.com/proximity-and-rssi

https://community.estimote.com/hc/en-us/articles/201636913-What-are-Broadcasting-Power-RSSI-and-other-characteristics-of-beacon-s-signal-

https://shinesolutions.com/2014/02/17/the-beacon-experiments-low-energy-bluetooth-devices-in-action/

https://community.estimote.com/hc/en-us/articles/201302836-How-precise-are-Estimote-Beacons-

Project-Technic-List

Our project technic has to cover all the way from input(sensor) to output (actuator). To give the actor freedom, we need a wireless transmission. For this we chose the following hardware, software and our interaction modle.

Input
Sensors:
  • 4x bluetooth-le-module(HM-10) [as beacon: simple distance(RX or RSSI)](0,0)
  • 1x capacity sensor[to start & end flashback-scene](A:0, D:2)
  • 2x IMU(mpu9250)[proj. speed, color & brightness](A: 0, D:2)
Microcontroller
  • 1x arduino nano(mit A:6 ,D:13)
Transmitter
  • 1x bluetooth-le-module(HM-10)(A:0,D:2)


Output
Receiver+Computation (pc)
  • Win 10, to use unity3D
  • with ble to receive
  • with hdmi to connect to a beamer/projector
Actuators (beamer, speaker)
  • video
  • projection state
  • flashback intensity, speed, brightness, color


Concept:

The interaction idea is as follow. The „play“ is structurable into three parts: (1)Intro, (2)story/flashbacks, (3)Outro. Starting at (1), which is somewhat a basic projection state, all we are going to need is a way to switch to (2).  Herefore a simple capasity sensor would be enough to signal the transition to (2).

Since (2) is the main interaction state or rather more the main objective for sensoric, we are going to have most hardware resulting from here. The basic setup is a rectangle out of BLE-Beacons in which the preformer is allowed to move. These four Beacons  basicly represent the four flashbacks. So we now have a rectangle with a flashback asigned to each corner. For the projection, we are going to have one projectionspace on which we are going to project all flashbacks simultaneously, layering them over eachother so to speak. Since the flashbacks are asociable with a location, we are going to use this for our translation. Thought is, depending on the distance from preformer to flashback, the resulting trensformation of the projection is intensified or lowerd. So if the preformer closes distance to a corner, all his/her actions maniulate this corners falshback more then the others. Now the question would be how and in which way  can the preformer manipulat the projection. Basic effect are going to be transparency, speed, color and brightness. These are going to be measured by onbody sensoric. For speed we are going to use an IMU located at the arm. This is going to be used for acceleration and tilt. The faster the preformer moves his/her arm in a cirtain direction, the faster the playspeed will get, vis versa for slowing down. An other IMU will be located on the back of the preformer. Once again with tilt and accereration to measure. This module will be responsible for color and/or brightness as to how the upperbody is located in space. If the preformer is bended forward(darker) or upright(lighter). In adition to the IMU on the back, we are also  installing our cumpotational unit, the arduino nano plus the BLE-module. The BLE-module is going to be responsible for RSSI resival on comercial frequencies and the transmition of your data to our PC.

Lastly we are going to have to be able to switch to (3). Again our capacity sensor will have to fulfill the task.

Unity: realt-time videomanipulation

Is Unity a solution to manipulate videos in real time?

People used to use Movie Textures, but now the new VideoPlayer is available. So I tried some simple tests.

UNITY-C#-Script

using System.Collections;
using System.Collections.Generic;
using UnityEngine;
using UnityEngine.Video;

public class player : MonoBehaviour {

 //drag & drop costume-controller:
 public GameObject costume;
 //we will use 2 vid-player
 private VideoPlayer videoPlayer1;
 private VideoPlayer videoPlayer2;

 void Start()
 {
 //get Cam
 GameObject camera = GameObject.Find("Main Camera");

 //add to videoplayer
 videoPlayer1 = camera.AddComponent<UnityEngine.Video.VideoPlayer>();
 videoPlayer2 = camera.AddComponent<UnityEngine.Video.VideoPlayer>();

 //select RenderMode
 videoPlayer1.renderMode = UnityEngine.Video.VideoRenderMode.CameraNearPlane;
 videoPlayer2.renderMode = UnityEngine.Video.VideoRenderMode.CameraNearPlane;

 //set alpha
 videoPlayer1.targetCameraAlpha = 0.5F;
 videoPlayer2.targetCameraAlpha = 0.5F;

 //set absolute path
 videoPlayer1.url = "/Users/Hagen/Documents/unity_projekte/video_2d_test/Assets/vidtest.mp4";//DSC8538.MOV";
 videoPlayer2.url = "/Users/Hagen/Documents/unity_projekte/video_2d_test/Assets/airplane2.ogv";//DSC8538.MOV";

 //we want a flashback-loop
 videoPlayer1.isLooping = true;
 videoPlayer2.isLooping = true;

 //start players!
 videoPlayer1.Play();
 videoPlayer2.Play();
}

void Update()
{
 //edit alpha using the costume controller variables:
 videoPlayer1.targetCameraAlpha= costume.GetComponent<controller>().intens_b;
 videoPlayer2.targetCameraAlpha= costume.GetComponent<controller>().intens_a;

 //edit video speed
 videoPlayer1.playbackSpeed= costume.GetComponent<controller>().speed_a;
 videoPlayer2.playbackSpeed= costume.GetComponent<controller>().speed_b;
 }
}

By changing the floats intens_a, intens_b, speed_a and speed_b. The video gets more or less transparent and faster or slower. I used simple archive footage:

https://archive.org/details/Pbtestfilemp4videotestmp4

https://archive.org/details/naAirplanelandingairplane2wmv

It already looks very flashback like. For now, I am quite happy that it is manageable to use Unity to real-time play and manipulate videos. The most important functions work already. Later on I will try to manipulate brightness and color. At the moment there is a small problem with the alpha-transparency. I intended to add all the pixels up, to achieve a symmetrical transparency. So if all loops are played in full intensity, we can see all pictures and the result might be quite bright. At the moment, the video players are layered, so we only see the front-player, due to the fact that its transparency is zero. But I guess we can work around this somehow(Maybe we have to use Movie Textures..) Interesting will be, how high our video resolution can be and how many flashbacks can be played at the same time.

The next step will be connecting the arduino(costume) to Unity.

Initial Post: Memories of a Syrian Student

So this is our initial post, documenting the work of the project: „Memories of a Syrian Student“

0. What happened before?

After the literature and technology research, we had a bit of struggle defining the goal of our project. We knew quit early, that we all wanted to work together as a big team:

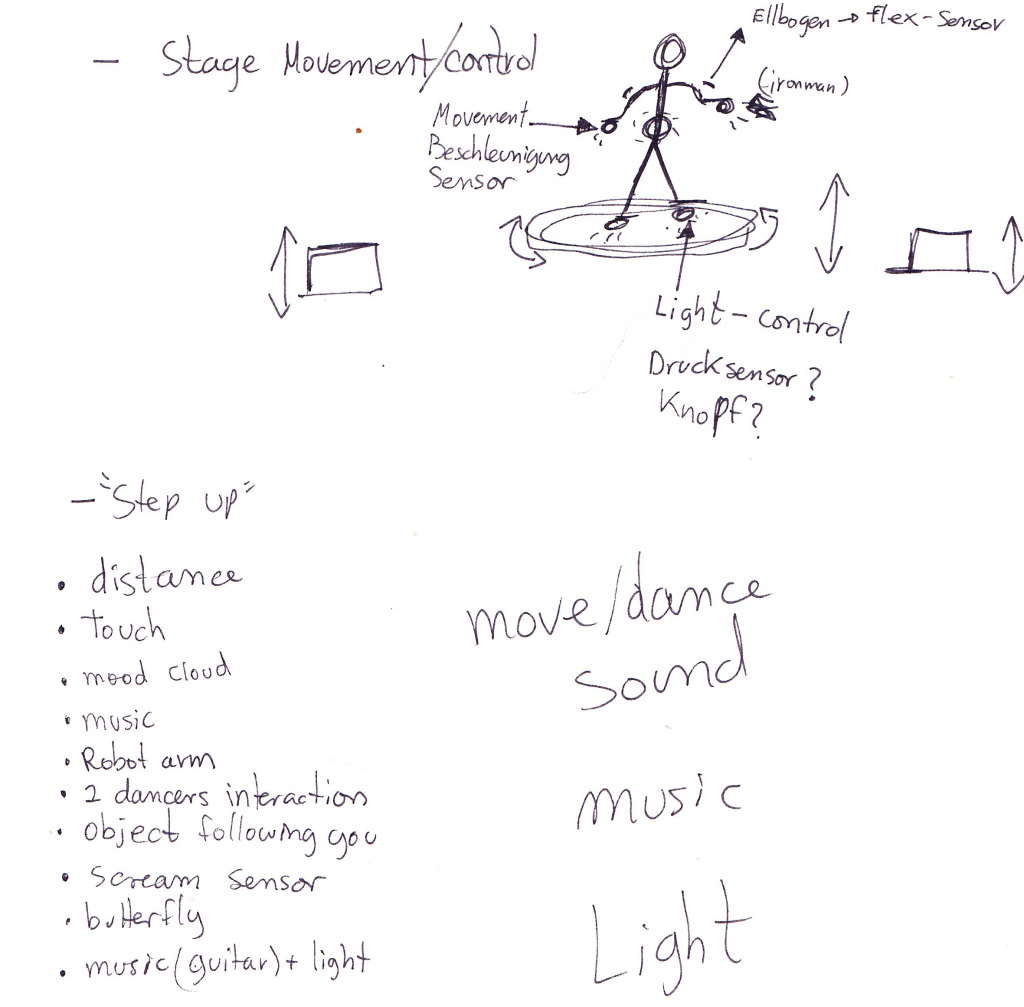
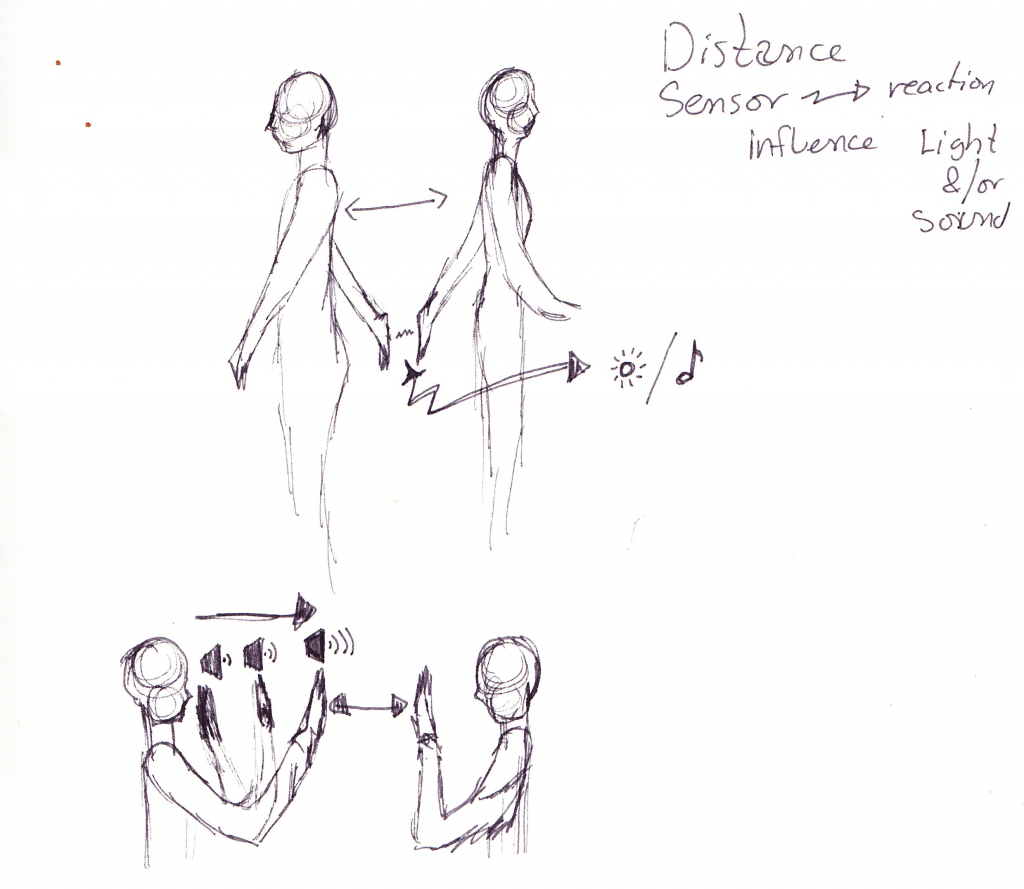
To find the right idea is kind of difficult in such a open project. Clear is, we want a costume with sensors, wearen by a performer, manipulating a stage. Do we want a dance-performance, a theater-scene or another scenario? How can we combine all our skills in the best way? Do we want to craft physical objects, control stage equipments(lights, stage elevator,…) or manipulate audio-visual media?

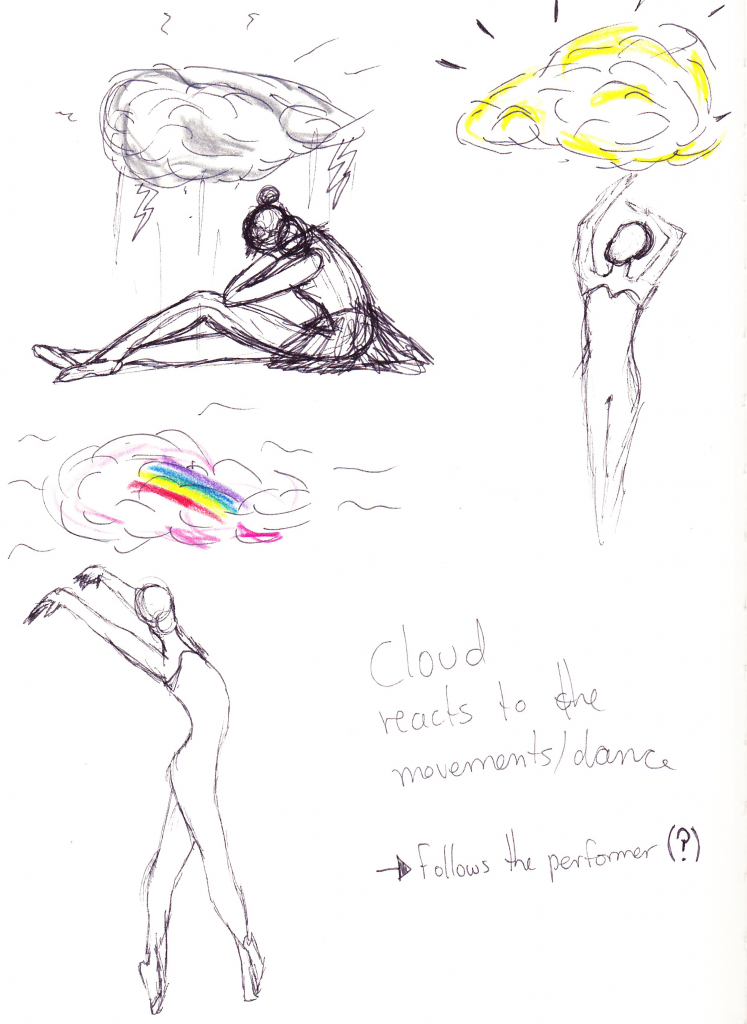
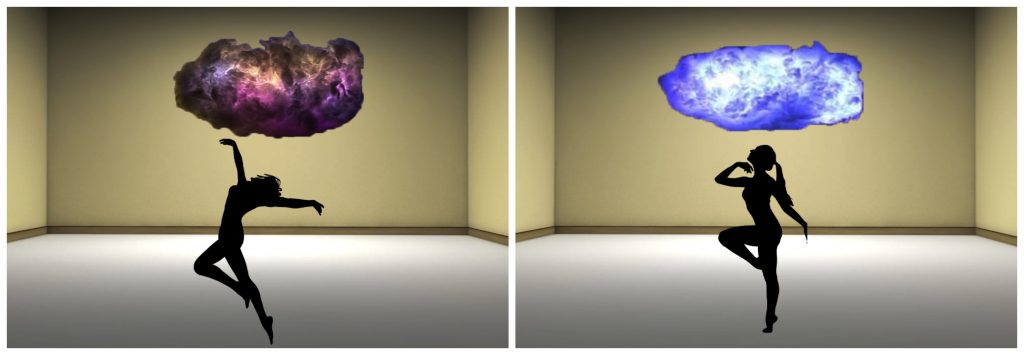
At first we were thinking of a physical object, a cloud flying like a spider cam over the actor, with several interaction features, showing the protagonist’s mood.

Example of SpiderCam System:

After a few weeks of research, we realized, that the top scaffold could be difficult without drilling in the ceiling and that the big step motors would surpass our budget.

Keeping that cloud concept alive, we thought about a full-cloud-ceiling in order to not have to worry about motors.

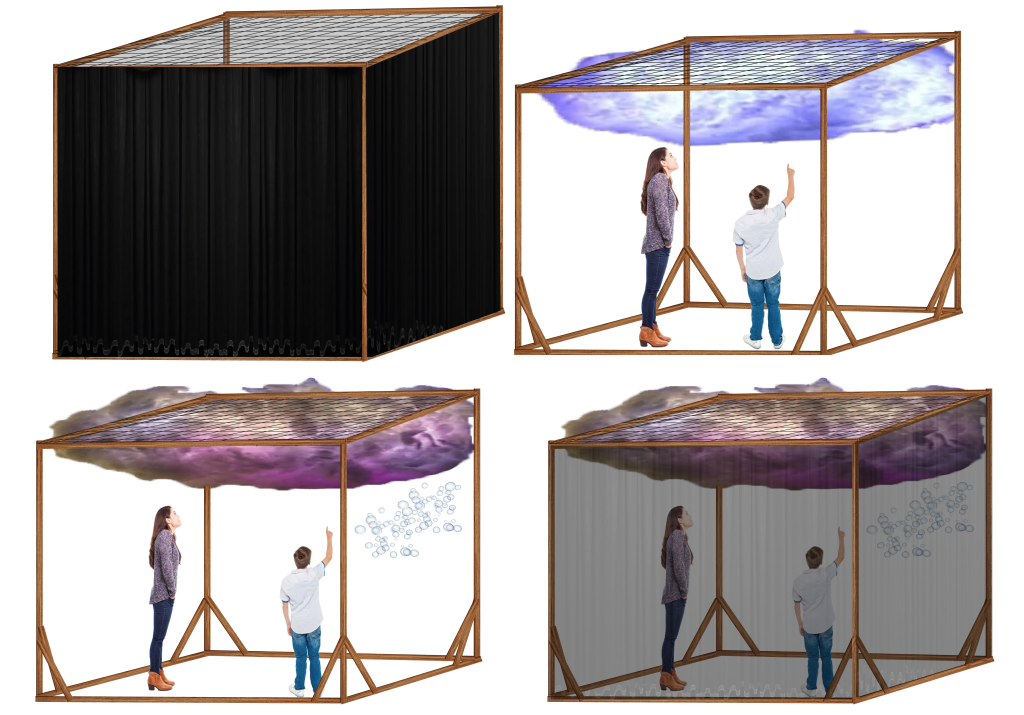
There were several problems too, the system would not be transportable, it would be difficult to find a craft/installation-space, it could be hard to integrate the audience,…

So we came up with new ideas. We took the focus more on costume design and visual projection.

1. What is happening?

Now we have a stage performance art concept with the working title „Memories of a Syrian Student“:

Our Student is just on the flight from Syria to Germany.  Our Scenario covers the time between take off and landing. With a projection, we visualize his memories. The actor walks through his flashbacks(Video-loops). By his movement and acting, he controls/manipulates the projection using his costume.

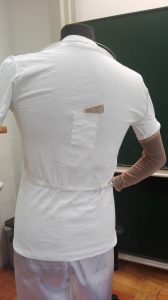
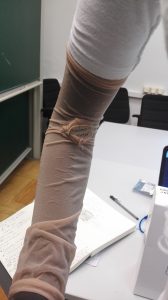
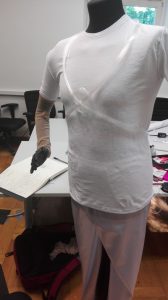
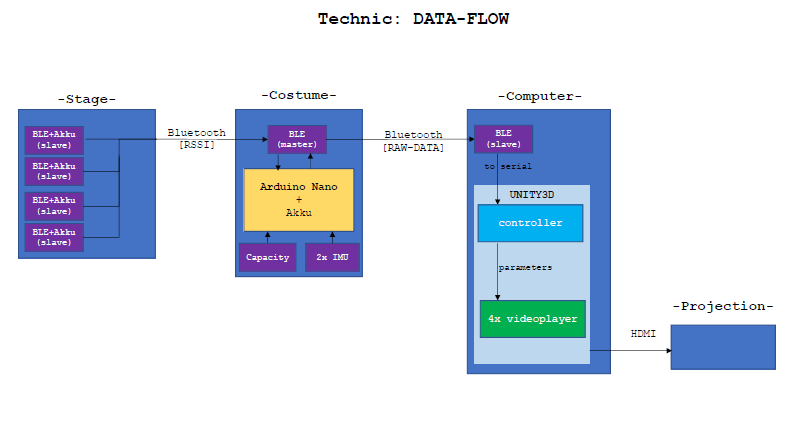
At the moment, Joeng and Phil develop the script. Laura and Joeng develop the stage+costume design and a storyboard. Lucas and Phil set a sensor->actuator list, try to manipulate video-loops and estimate whether Bluetooth communication could serve as an advantage.

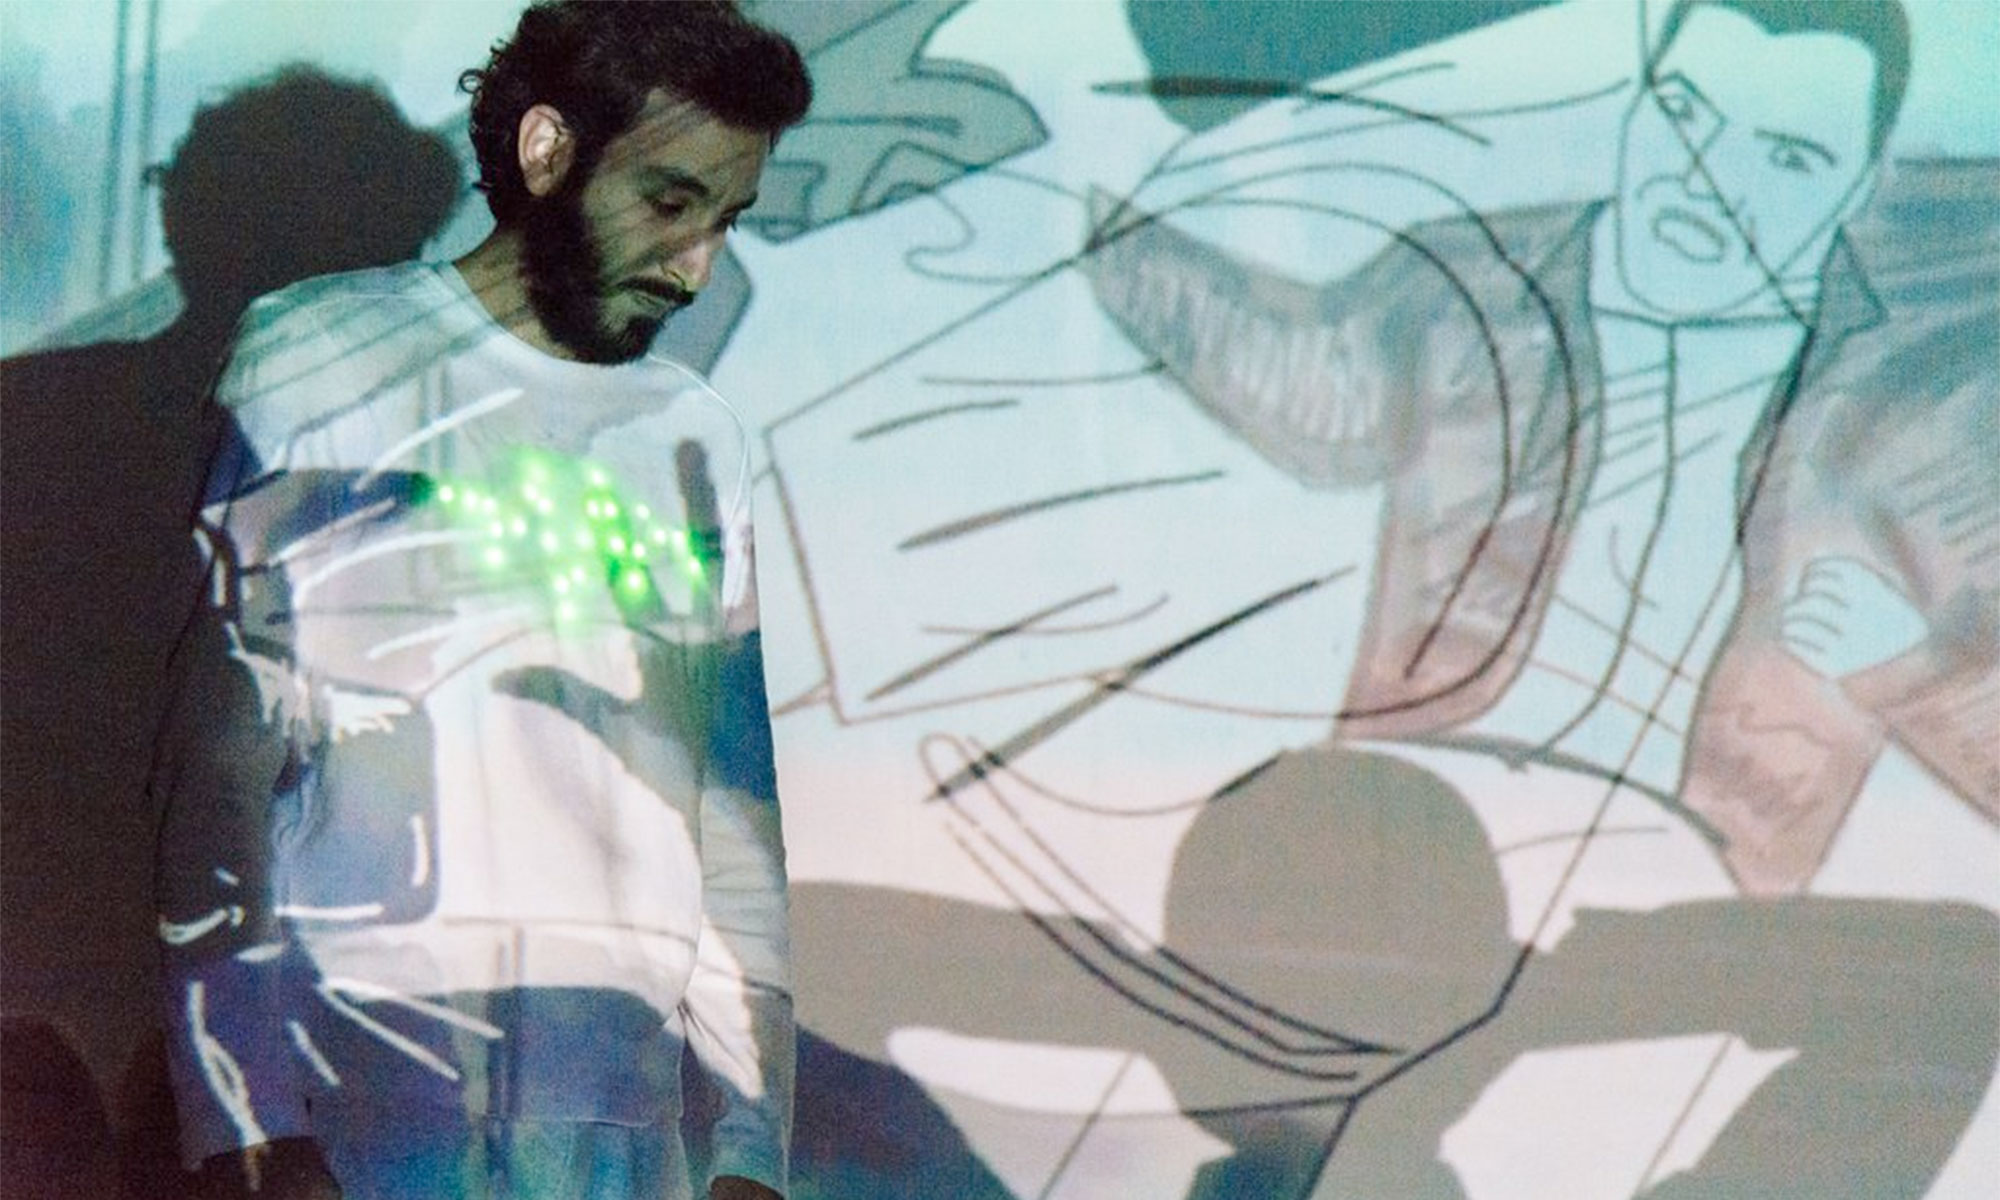
Yesterday I shot some example pictures showing the stage with moody projections:

The old stage-model by Jeong & Laura:

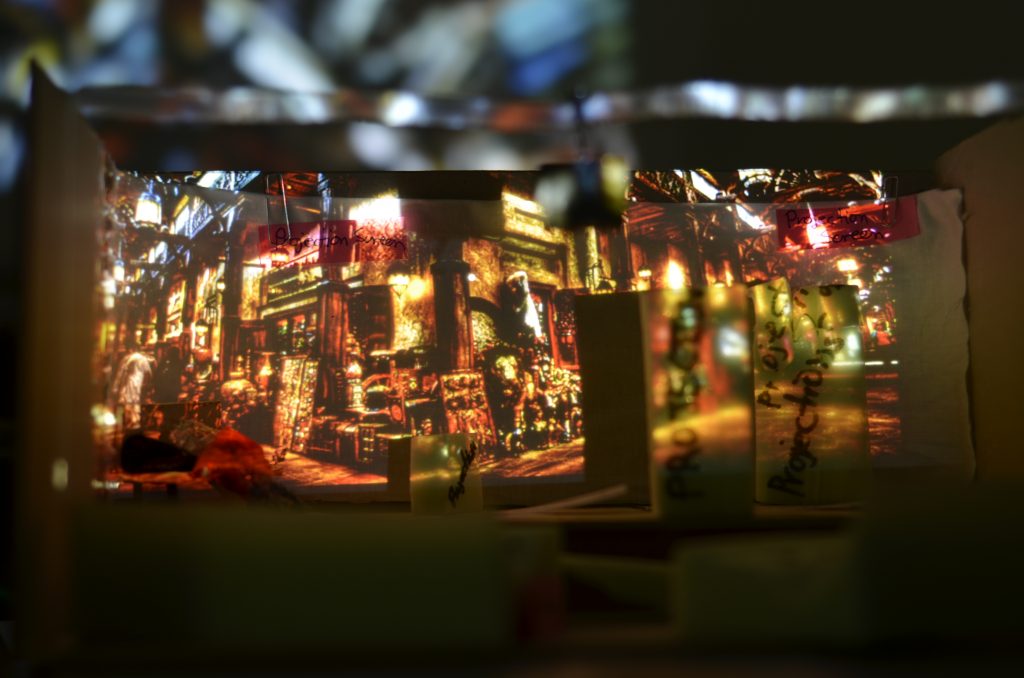
(projection picture found at http://cdnfiles.hdrcreme.com/1805/medium/bazzar.jpg?1426885632)

The new stage-model for projections by Jeong:

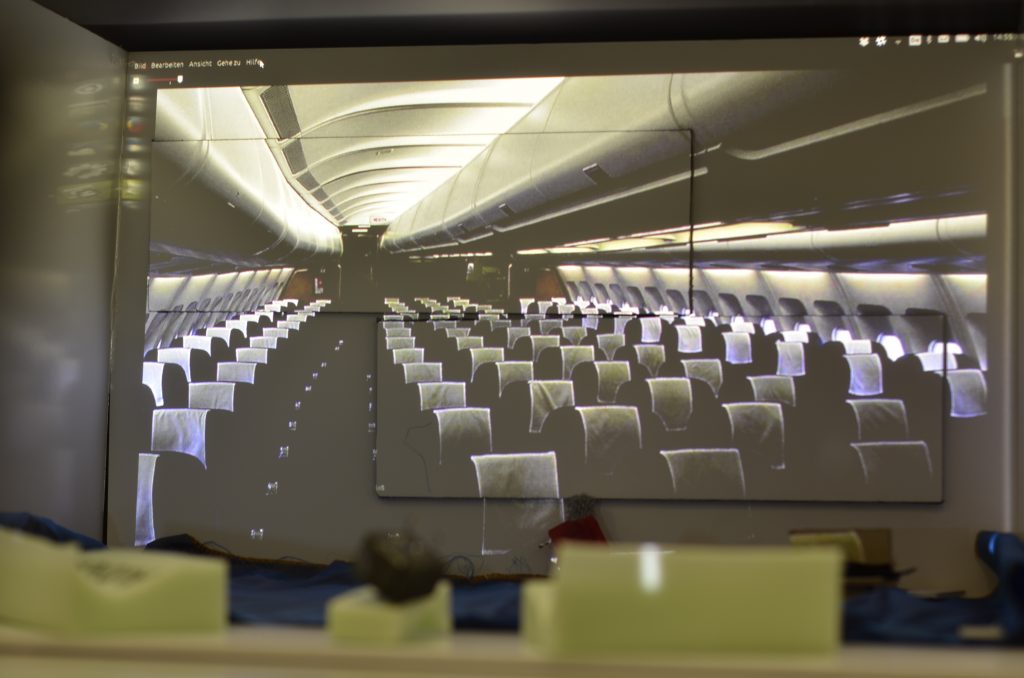
(projection picture found at http://www.liveshoptravel.com/wp-content/uploads/inside-airplane.jpg)

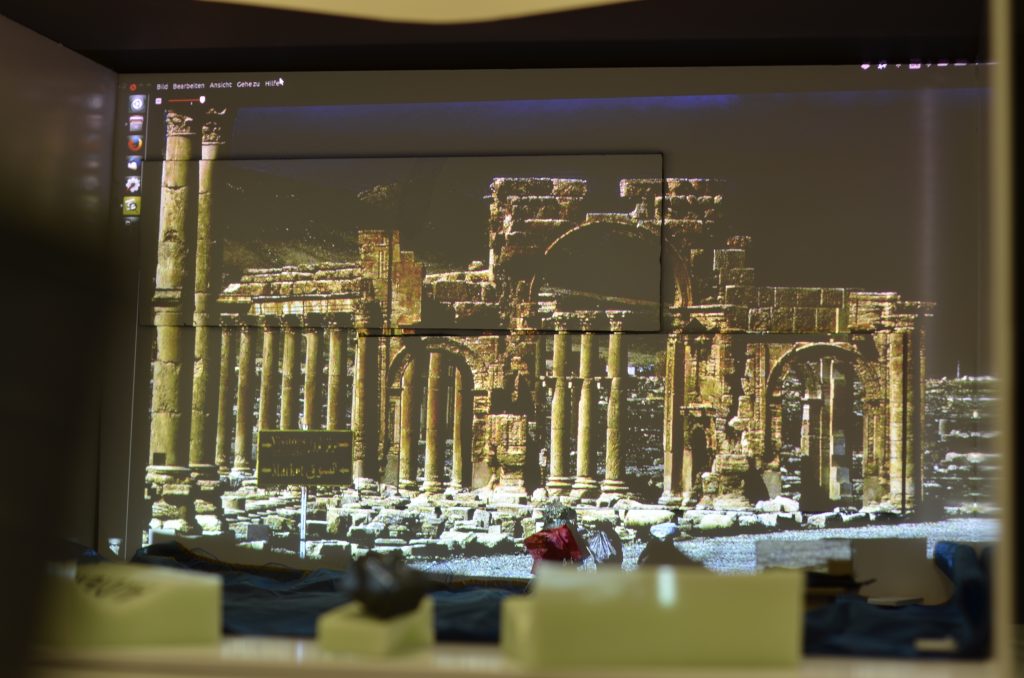
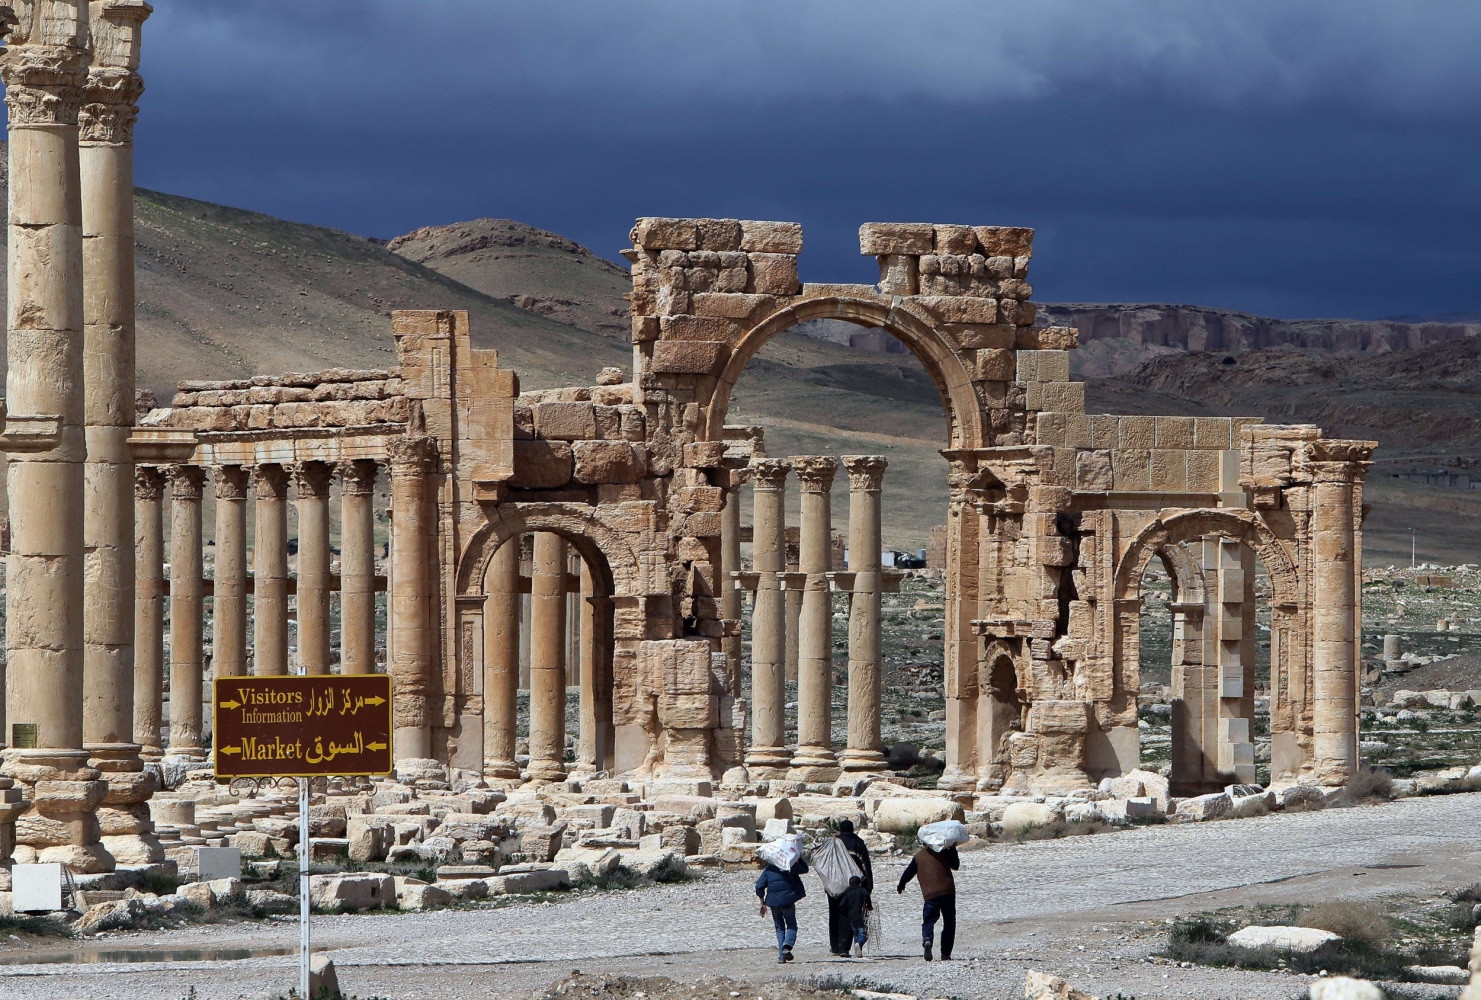
(projection picture found at https://media1.s-nbcnews.com/j/newscms/2015_41/1250486/151006-palmyra-jpo-627a_128818d31c6c46f432a80b57026affb7.nbcnews-ux-2880-1000.jpg)


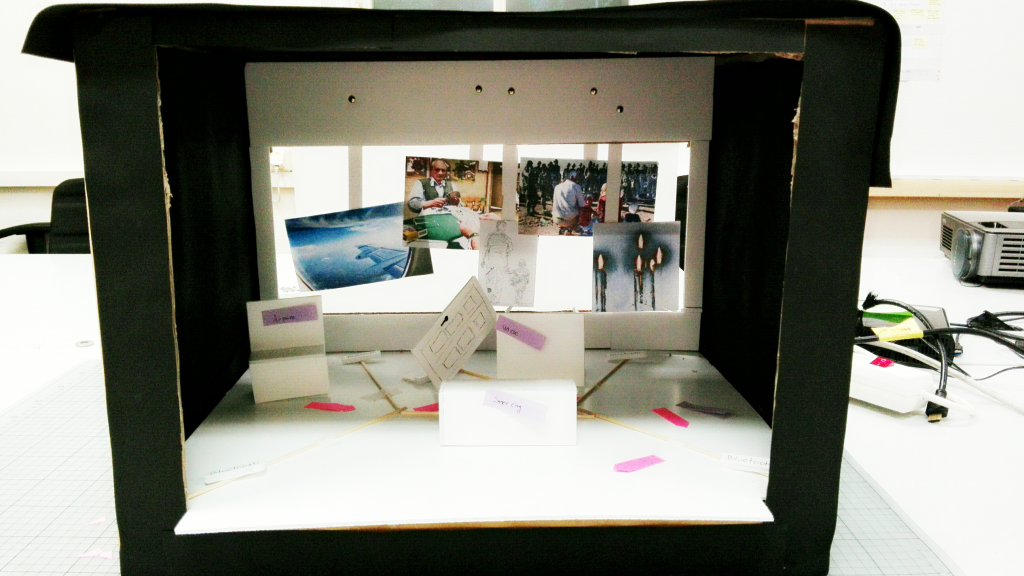
The static stage-model by Laura with all the flashback scenes in the back and possible objects on stage:

2. What will happen?

From now on, each step will be posted in the project-category.

There is obviously still a lot to do, some questions are:

  • Who will be the actor?
  • Who is going to make the off-stage voice?
  • Will the projection be archive-footage, self-made/drawn material or a 3D Animation?