
00-Introduction:
The Adafruit Feather HUZZAH ESP8266 is a simple micro controller. A big point of the Feather is the on board WIFI(no additional Modules+ no Wires needed )! In my case, the motivation is to have a thin and light micro controller to collect data on the costume and send it in real-time wireless to a computer and remote a theater-stage.
In this so called „Tutorial“, I will document my research and steps to establish a real-time server-client-communication(raw data) between the Feather as a WIFI Client and a simple Processing Sketch as a Server. The Feather collects Sensor Data(button press), sends it wireless to the processing server. The Server(Processing Sketch) changes its status and sends feedback to the Feather, which lights a LED after a successful communication.
The research was kind of difficult. There are some tutorials, but unfortunately no real-time communication tutorials. Due to the fact, that I am new to Web-technology, my solution might be a bit unconventional? (You might leave a comment if that is the case). Anyway here is my solution.
01-Step-by-Step-Tutorial:
I used the following components:
BASIC-Hardware
Adafruit Feather HUZZAH ESP8266
A Network(WLAN-Router, WIFI)
A Computer
BASIC-Software:
Arduino IDE
Processing
a)At first, you should set up everything:
Here, we can stick to Adafruit’s Tutorial, it is very detailed. Here are the steps in short:
- solder the feather, to make it easier to plug cables to it
- update the Arduino IDE(http://www.arduino.cc/en/Main/Software) to use the Board Manager
- integrate additional Board Manager(http://arduino.esp8266.com/stable/package_esp8266com_index.json)
- install the ESP8266 package using the Board-Manager
- choose the right board and port in Arduino IDE->Tools(Adafruit HUZZAH ESP8266)
- choose in Tools: CPU Frequenzy(„80Mhz“), Flash Size(„4M (3M SPIFFS)“), Upload Speed(115200 baud)
Now everything should be configured and you might want to check a simple sketch(LED Blink?) and a simple WIFI-Connection? At this point we have to build our own application, without the Adafruit-Server, to get the freedom of our own server.
b) Set-Up the Arduino-Client
I use a simple Button-circuit as a sensor.(Button=1 if pressed) And I can control a LED: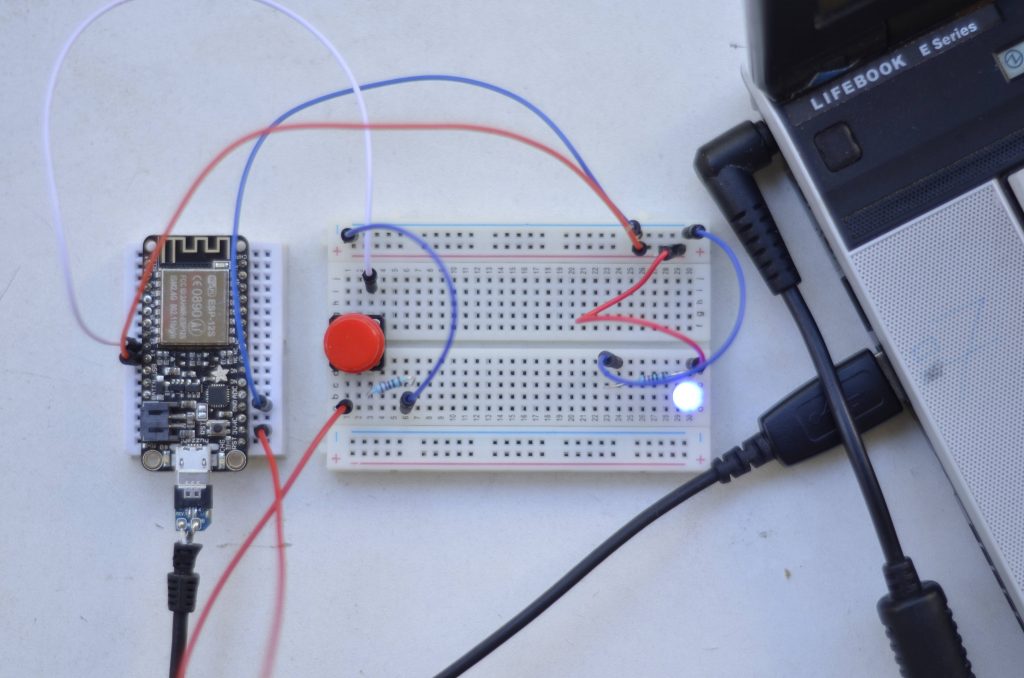
You can use any other sensor instead of a button and any other actuator instead of a LED.
My final code will look like this:
CODE-Arduino
//programm_specific
#include <string> //to use string
int pin_out_LED; //LED
int pin_in_BUTTON; //Button
int pressing; //remembers if button is pressed
int counter; //message_out counter
String msg; //message_out content
String line; //message_in content

//time_calculation
unsigned long time_a; //start_time
unsigned long time_b; //end_time
bool time_check; //are we interested in time?
bool received;

//Configure WIFI:
#include <ESP8266WiFi.h> //Wifi-li brary


//WLAN-Config
const char* ssid = "YOUR_WIFI_NAME_?"; //Your WIFI Name?
const char* password = "YOUR_WIFI_PASSWORD?"; //Your WIFI Password?

//Host&Client
WiFiClient client; //Feather as a client
const char* host = "192.168....IP_AD.."; //My Server(processing) IP Address(Terminal:"ifconfig -a")
const int httpPort = 12345; //Servers port


void setup() {

 Serial.begin(115200); //baud rate
 pin_out_LED = 14;
 pin_in_BUTTON = 12;
 pressing = 0;
 counter = 0;
 time_a = millis();
 time_b = millis();
 time_check = false;
 received = false;
 pinMode(pin_out_LED, OUTPUT);
 pinMode(pin_in_BUTTON, INPUT);

 // We start by connecting to a WiFi network
 Serial.println();
 Serial.print("Connecting to ");
 Serial.println(ssid);

 WiFi.begin(ssid, password); //Connect to WIFI
 digitalWrite(pin_out_LED, HIGH);
 while (WiFi.status() != WL_CONNECTED) {

 delay(500);
 Serial.print(".");
 }
 digitalWrite(pin_out_LED, LOW); //We are connected to SSID
 Serial.println("");
 Serial.println("WiFi connected");
 Serial.println("IP address: ");
 Serial.println(WiFi.localIP());
}

void loop() {

 if (!client.connected())
 {
 if (!client.connect(host, httpPort))
 {
 Serial.println("connection failed");
 delay(500);
 }
 } else {
 //Read Sensor
 if (digitalRead(pin_in_BUTTON)) //if( 1==digitalRead(..)) Button pressed?
 {
 if (pressing == 0)
 {
 counter++;
 if (counter > 100)
 {
 counter = 0;
 }

 msg = String(counter) + ": s \n\r";
 client.print(msg); //SEND to Server

 pressing = 1;
 time_check = true;
 received = false;
 }
 } else {
 pressing = 0;
 }

 while (client.available())
 {
 //READ SERVVVVVVVVVVVVVER
 line = client.readStringUntil('\r'); //READ from Server
 if (line.endsWith("1"))
 {
 digitalWrite(pin_out_LED, HIGH);
 received = true;
 } else if (line.endsWith("0"))
 {
 digitalWrite(pin_out_LED, LOW);
 received = true;
 }
 }

 //To calculate Send_Time
 if (time_check)
 {
 if (received)
 {
 time_b = millis();
 msg = String(time_b - time_a) + "transfer_time";
 Serial.println(msg);
 time_check = false;
 received = false;
 }
 }else
 {
 time_a = millis();
 }
 }

}
1.Include, Declare,..
At first, I declare program-specific variables. To control the LED, I declare „pin_out_LED„, in setup I will set it to 14. To use the Button, i declare „pin_in_BUTTON„, in setup I well set it to 12, because of my feather-circuit. Additional I have to set the pin Modes: „pinMode(pin_out_LED, OUTPUT)“ and „pinMode(pin_in_BUTTON, INPUT)„. To remember whether the the button is pressed, I use „pressing„. A „counter“ counts the messages send by the feather. I use „msg“ and „line“ to send and read messages.
Furthermore I want to check the message-transmission-time with „time_a„, „time_b“ and „time_check„. Later more about this.
Now we have to get the WIFI working. In a) point 4, you should have installed the ESP8266, now we want to include it to our code(„#include <ESP8266WiFi.h>“) to make use of it. Manipulate the ssid by entering your WIFI’s name: const char* ssid = „YOUR_SSID_NAME_?“ and do the same with the password: const char* password = „YOUR_PASSWORD_?„. This will work for a simple WIFI connection, not with a special network, for example the university’s eduroam, where you need a username and password. For further information check here( Jan 07, 2017). For me, a cheap router or my smartphone’s LAN worked fine.. We have to make the Feather as a client: „WiFiClient client“ . You need to know and enter your hosts IP-Address(const char* host = „192.168.1.33“) You need to check it at the computer, where your server(processing sketch) runs. A short research will help to find it. In Ubuntu/Linux, one can simply enter „ifconfig -a“ in Terminal to get it. Later in the processing sketch, we will define a port, through which we will communicate to the server. You can use this one(const int httpPort = 12345).
2.setup()
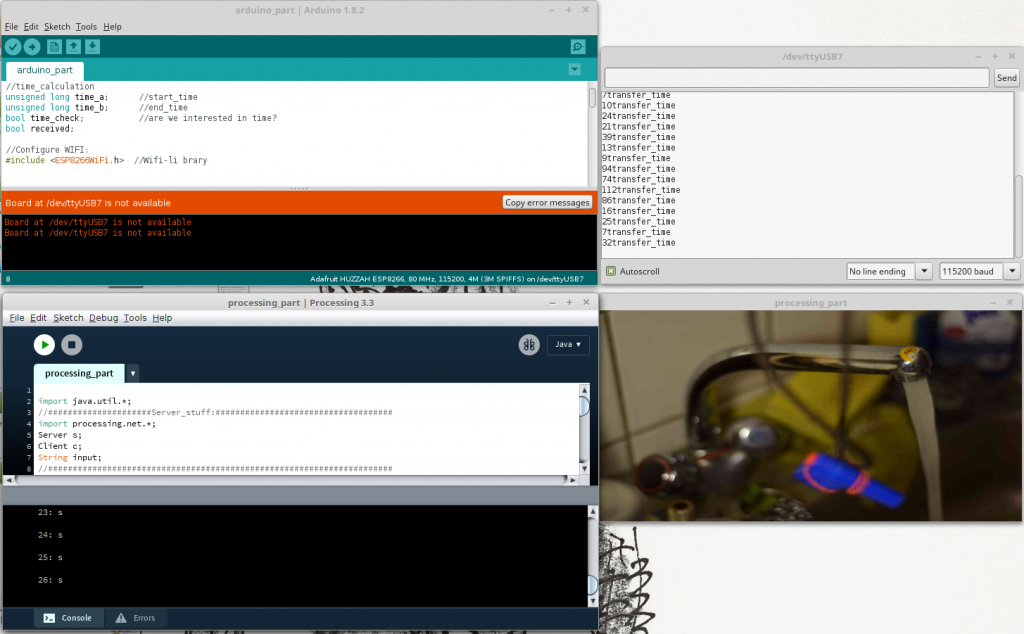
The setup() part is pretty much straight forward. We begin connecting to the WIFI and the LED is High and we print dots in the Arduino-IDE-Serial-Monitor(Ubuntu: STR+Shift+M), while it is connecting.
It should print: „Wifi connected“.
3.loop()
We always check, whether we are already or still connected to the server. „if (!client.connected())“ . There is a great difference towards the next if request: „if (!client.connect(host, httpPort))“ In contrast to the first, the second one always sends a new server connection request! We only need a new connection if we are not connected yet! Usually Client-Server communication uses client.connect(host, httpPort). A client sends a request and closes the connection, but we do not want to close the connection. We stay connected to save time! We don’t use the common HTTP Get Request, we will simply send RAW-Sensor-Data. That should be efficient and therefore better for real-time communication! At first I was not aware of the difference, I was only using the second one. After sending about 500 messages between server and client I received „exception 29″ in the Arduino Serial-Monitor, because of memory overflow. Furthermore processing warned „client got end-of-stream„.
Anyway if we can not connect to the host-server(processing) it will print connection failed. If we are already connected, the procedure can go on!
We only want to send a message, if(if (digitalRead(pin_in_BUTTON))) the Button is newly(if (pressing == 0)) pressed(I press once and hold it pressed, but I only want to send one message!) Whenever that is the case, we send a message(and make counter++, make a time_check,..):
msg = String(counter) + „: s \n\r“;
client.print(msg);
I will always send and receive with a \r at the end of the message, to make it easier to parse! To receive a message, we check whether there is an incoming message with client.available().
line = client.readStringUntil(‚\r‘);
We read the message until ‚\r‘ and check, whether we received a „1“ or „0“ and according to this, we turn the LED HIGH or LOW.
In between, there is some time_checking. You might want to use or improve it? I get 4ms to 100ms transmission time and in average about 15ms.
c)Set Up the Processing-Server
Now I create a simple server on my computer, using processing .I want to receive a message sent by the feather/client to trigger(on and off) a virtual water faucet(older project of mine):
Whenever there is a change, I want to send feedback to the feather/client(feather lights the LED).
My Full-Code will look like this:
CODE-Processing
import java.util.*;
//#####################Server_stuff:####################################
import processing.net.*;
Server s;
Client c;
String input;
//######################################################################

//Bilder:
ArrayList<PImage> bilder_a;
ArrayList<PImage> bilder_b;

int phase; //Aktuelle Bild-Nr
int direc; //An oder Aus?
int mode; //Focus
int pic_anzahl; //Anzahl an Bildern

void setup() {
 //Video:
 //fullScreen();
 size(600, 300);
 frameRate(25);
 orientation(LANDSCAPE); //Bug?!

 //Load Pictures:
 bilder_a=new ArrayList();
 bilder_b=new ArrayList();
 pic_anzahl=9;

 String pic_name;
 for (int i=0; i<=pic_anzahl; i++)
 {
 pic_name="pic_a"+i+".JPG";
 bilder_a.add(loadImage(pic_name));
 pic_name="pic_b"+i+".JPG";
 bilder_b.add(loadImage(pic_name));
 }

 //Setting_UP:
 phase=0; //Wasser Bild 0
 mode=0; //Focus auf Hebel
 direc=-1; //Wasser auschalten

 //#####################Server_stuff:####################################
 s = new Server(this, 12345); // Start a simple server on a port
 //######################################################################
}

void draw() {
 //#####################Server_stuff:####################################
 c = s.available();
 //println(c);
 if (c != null)
 {
 input = c.readStringUntil('\r');
 //input = input.substring(0, input.indexOf("\n")); // Only up to the newline
 println(input);

 if (input.contains("s"))
 {
 if (phase==0)
 {
 phase=1;
 //#####################Server_stuff:####################################
 s.write("1\r");
 } else {
 s.write("0\r");
 //######################################################################
 }
 direc=direc*-1;
 }
 }

 //######################################################################

 if (phase>0) //Wasser läuft
 {
 if (phase>8) //Repeat:
 {
 phase=4;
 }
 phase+=direc; //Up or Down
 }

 //Focus:
 if (mode==0)
 {
 image(bilder_a.get(phase), 0, 0, width, height); //Focus: Hebel
 } else
 {
 image(bilder_b.get(phase), 0, 0, width, height); //Focus: Hahn
 }
}

void mousePressed()
{
 if (mouseX>width/2) //switch foucs: Hebel/Hahn
 {
 mode++;
 mode=mode%2;
 } else //switch Wasser: an/aus
 {

 if (phase==0)
 {
 phase=1;
 //#####################Server_stuff:####################################
 s.write("1\r");
 } else {
 s.write("0\r");
 //######################################################################
 }
 direc=direc*-1;
 }
}
To make the faucet working, you need the whole project with pictures, here.
1.Include, Declare,..
I import processing.net.* to be able to use Server and Client!
2.setup()
I open a Server s = new Server(this, 12345); at port 12345. You can change the port if you like.
3.draw()
To receive a message send by feather/client, we check whether there is an incoming message with c = s.available().
If there is a message( if (c != null)), we read the incoming String until ‚\r‘:
input = c.readStringUntil(‚\r‘);
We check the input, whether it contains(„s“) and change the faucet’s state and transmit the changes back to the feather/client:
s.write(„1\r“);
The rest of the Code contains only my faucet mechanics.
I hope my tutorial helps people getting their real-time feather to processing application working!
02-Some Ideas:
a)Just to answer some study-questions:
- Yes, one can work without Adafruit’s Server(obviously I am using my own server)
- no it is not just a close cloud communication system, I guess the feather is open, to work with like any web-application
b)Just to give some study-questions:
- NodeMCU’s Lua or Arduino IDE to configure Feather?
- How long is the battery lifetime while sending in real-time?
- One could compare latency(time) and range in different Networks? (I only tried a simple router and my smartphone)
- Should one preferably use UDP or TCP?
- Switch roles? Feather as Server and Processing as Client?
- How does our application work, if there is more traffic on the server?
c)Further Ideas:
- You could secure your connection, because everyone can read it the way it is at the moment. It might be interesting to observe the transmission vie TCP DUMP or Wireshark?
- If the application stays that way and you only press the button/send a message once in a long while it might be necessary to send a heartbeat from time to time in order to keep the connection.
- Instead of parsing Strings, we could send simple Bits or Bytes. That would make everything more efficient.
- At the moment I am only sending when I press the button. It also worked, when I was sending ping pong like all the time.