
We are currently trying to establisch a connection between our PC and our Arduino. For this we are trying to use a bluetooth transiever, the HC 05. In our first attempt, we useing the HC 05 as a receiver, which reads input data from our computer.
Hardware:
- Arduino Uno R3
- HC 05 Bluetooth
- Bluetooth capable PC
First things first, we need to setup our devises. Here the resistors are 100 Ohm each. This is due to the TX/RX needing 3.3V. Also keep in mind, that the RX goes to TX and vice versa.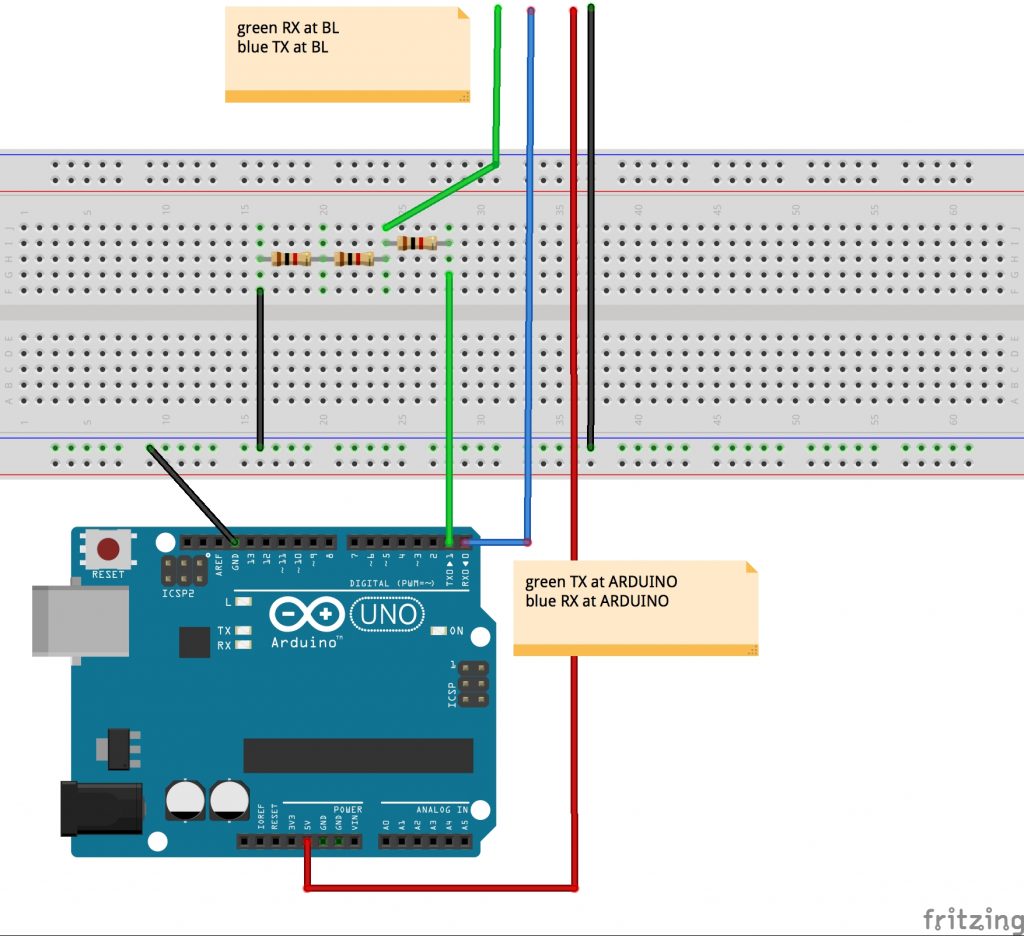
Once we’ve got the setup, its time for the software. Herefor we are useing Processing on PC (Win 10) to send and the Arduino IDE for the recieving arduino. Later on we are going to do it the other way around.
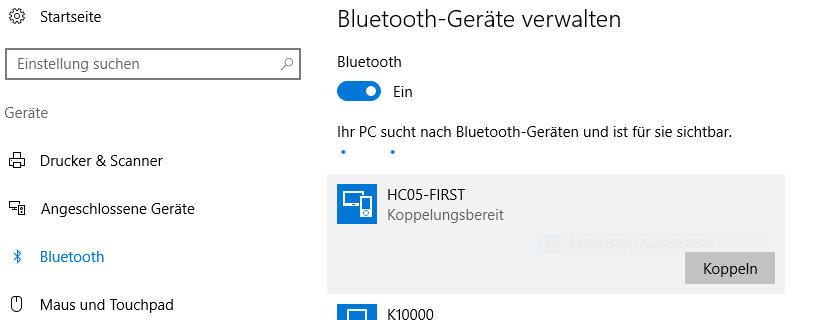
Step two would be pairing with the bluetooth device we just hooked up to the arduino. Under Win10 you can achieve it like follows:
- Step 1: Open your „Options“ pannel and search for „Bluetooth“. Once done, you will get a list of all available devices in your current area. Select the device you are trying to pair with and press „Pair“.
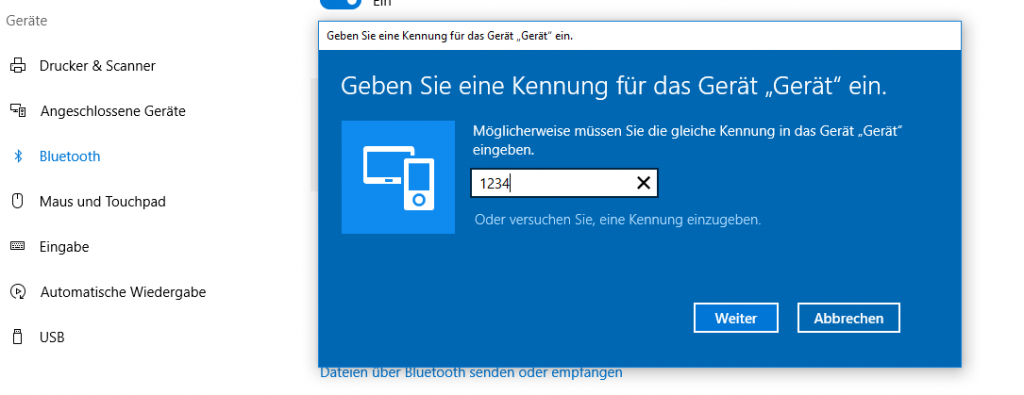
- Step 2: Now the pannel will ask you for a password. If defaul it should be „1234“, if this does not work, you can look up/change the password. (For this you have to enter the AT Command Mode of the device. One can do this as discribed in this post: AT Command Mode )
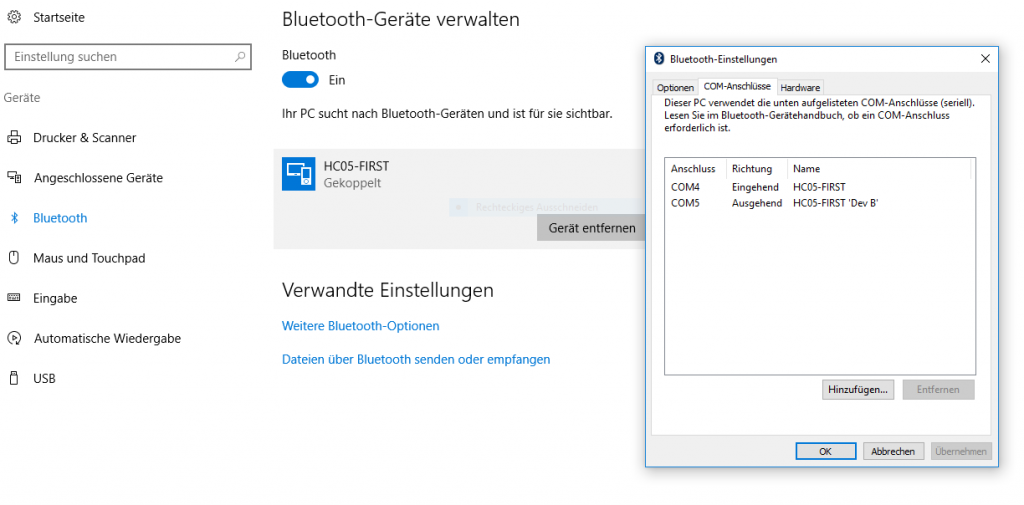
- Step 3: Now that you have paired, all you need to know is on which port. For this click on „Extended Options“. it should list the serial ports of your PC. In our case the „COM5“, because it is outgoing.
Now we have a finnished setup and its time for some code. Since our first objektiv is sending data to our arduino, it needs to be able to recieve it. For this code to work move the TX pin to pin 8 and the RX pin to pin 7!
#include <SoftwareSerial.h>
SoftwareSerial mySerial(7, 8);

void setup() {
  Serial.begin(9600);
  mySerial.begin(9600);
}

void loop() {
  char to_read;

  //while there is a signal from our HC 5
  //print it!
  while (mySerial.available()) {
    to_read = mySerial.read();
    Serial.print(to_read);
  }
}
In the code above, the arduino recieves data via the Serialports und prints it. The counter part would be the PC sending data via Processing. This looks as follows:
import processing.serial.*;

//Serial port object:
Serial arduino;
final int  baudRate   = 9600;
final char delimiter = '\n';

void setup() {
  //list all the available serial ports:
  println("Available Serial Ports:");

  //Choose your Bluetooth port:
  printArray(Serial.list());

  //and enter its position here:        🢃
  final String portName = Serial.list()[2];
  println("\nOpening Serial Port: " + portName);

  //Create instance:
  arduino = new Serial(this, portName, baudRate);

  size(500, 500);
  textSize(16);
}

void draw() {
  background(0);  //window: black
  text(str(mousePressed), mouseX, mouseY);

  if (mousePressed) {
   arduino.write('a');
  }
}
This code was provided by Johannes Deich. What it does is open a window which tracks your current mouse position and when you left-click it writes ‚a‘ to the serialport.
All done, we have now established the connection and are sending information from PC to Arduino!
Now its time for the other direction, PC recieves data sent by the Arduino. The setup is exactly the same, only that now we have an incomming port, „COM4“ (See picture „Step 3“). Connect PC to bluetooth device as shown above and keep the current Bluetooth circuit. Again we are going to work with the Arduino IDE and Processing, since it would be nice being capable to merge both communication ways, since the only diffrence is the sofware code aspect. Here the arduino code looks as follows:
//We are only going to print on
//our Serialport, nothing else

void setup() {
  Serial.begin(9600);
}

void loop() {
  for(int i=0; i<9; i++){
    Serial.print("data ");
    Serial.print(i);
    Serial.print('\n');
  }
  delay(100);
}
On the arduino side of things, we only have to print what we want to send on the Serialport. In Processing it looks a little different:
import processing.serial.*;


Serial arduino;
final int baudRate   = 9600;
final char delimiter = '\n';

String serialStringFromArduino = null;

void setup() {

  //list all the available serial ports:
  println("Available Serial Ports:");
  printArray(Serial.list());

  //look on which port your divice is running
  //and enter it here                   🢃
  final String portName = Serial.list()[2];
  println("\nOpening Serial Port: " + portName);

  //create instance:
  arduino = new Serial(this, portName, baudRate);
  arduino.bufferUntil(delimiter);

  size(500, 200);
  textSize(16);
}


void draw() {
  background(0);

  //render String as text in window
  if (serialStringFromArduino != null) {
    text(serialStringFromArduino, 20, 40);
  }
}


void serialEvent(Serial arduino) {
  //read string:
  serialStringFromArduino = arduino.readString();

  //remove amongst other things whitespace and carriage return
  serialStringFromArduino = trim(serialStringFromArduino);
}
Once again we have nearly the exact same code (from Johannes Deich), manly since 95% of it are for the selection of the right port. If one already knows the port on which the Bluetooth device is running, one doesn’t need that part of the code. The rest of the code is just parseing the recieved data String. Vola, all set and done for basic Bluetooth communication.
In contrast to Xbee, WIFI-Feather and NRF technology, the Bluetooth technology makes it easier to connect to the computer(if the computer has Bluetooth). We don’t need a USB-Xbee Shield, a LAN-Router or another NRF-Module+Arduino->connected to the computer.