Category Archives: Technology

Kinect it!

At first we had to set up the Kinect with Ubuntu. The tutorial from www.kdab.com came in very handy for a first try. Later we decided to use the openframeworks toolkits. It is an awesome collection of libraries and it contains the “ofxKinect” addon, which comes with some basic examples fitting perfectly for our purposes. Furthermore it’s written in C++ and it is open source.
We used the basic example for ofxKinect and adapted it.

first_try
Example of ofxKinect Addon

For our design we need to track the actors on the stage in a defined area (in front of the projection). Therefore we decided to mount the Kinect to the ceiling, to leave the stage open to every possible design and keep the view from the audience to the stage clear.
To track just the actors we implemented a possibility to define the minimum rectangle one can draw around a blob the actor builds. This way we can set the height and width of this rectangle so it won’t track incorrectly the screen or a prop on the stage. It’s not working perfectly save now, because if a person touches an element of the stage it’s blob connects with the contour of the element. Then the new blob is mistakenly tracked as an actor and the tracked values are wrong.

mistaken_blob
A wrong tracked blob

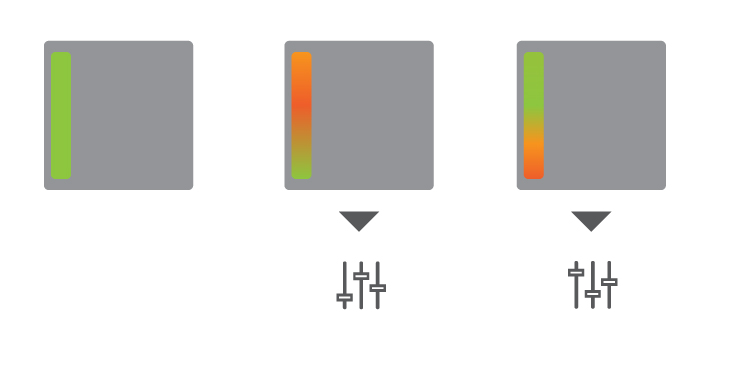
The example came with the possibility to define the nearest and farthest threshold the Kinect is detecting. Of course we kept this feature and made it, with the others too, easy accessible through a graphical user interface, build with the help of the addon “ofxGUI”.
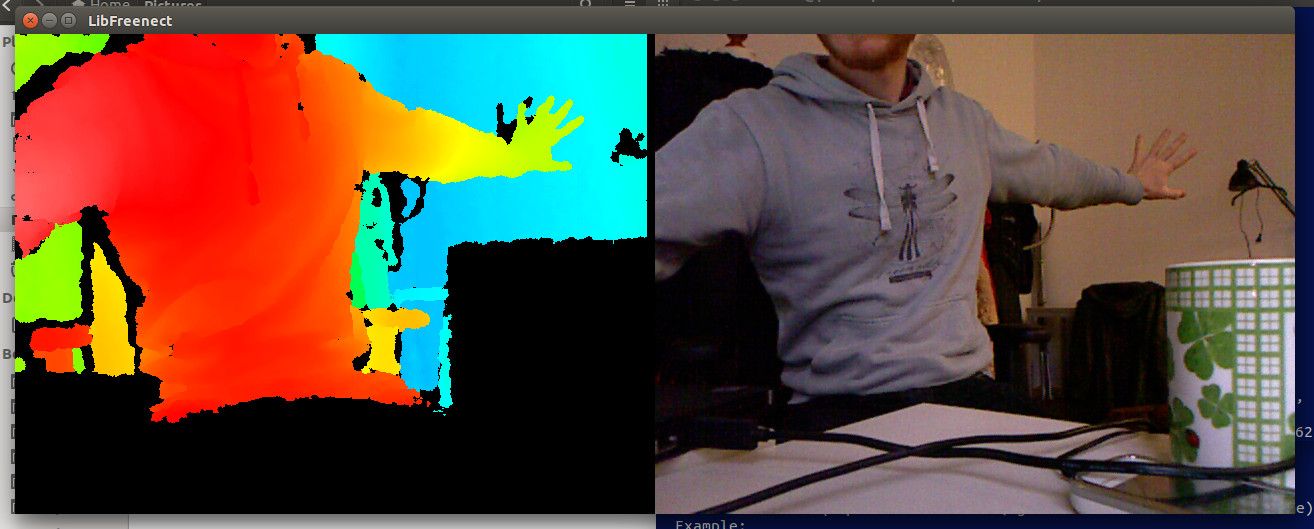
For the feature to draw with hands into the projection we used the possibility of Kinect to get the depth of every pixel the picture holds. We can set a range in which the height (we’re still beneath the ceiling) of the closest point to the projection plane (the upper range of the screen) of the blob is measured. Because humans tend to stretch their arms for drawing gestures, it was the easiest way to assume that the nearest point is the crucial and important one.

A drawing scene
A drawing scene

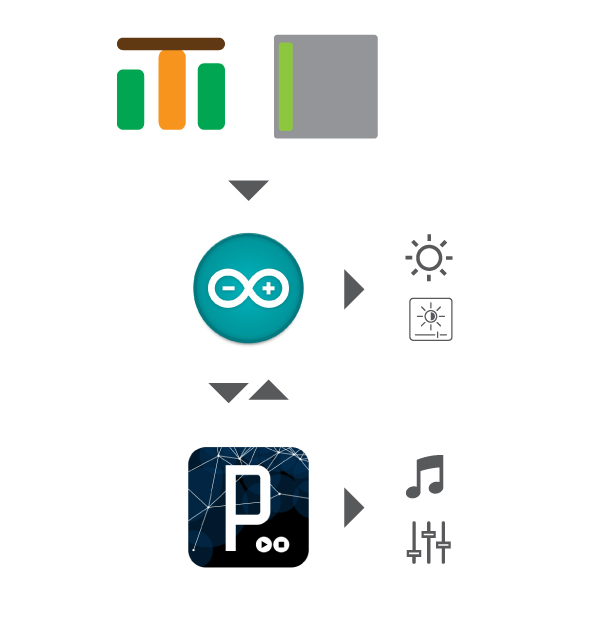
For the task of visualisation and projection it seemed to be good to use processing. It is easy to handle, has a lot of examples to mess around with and most designers like it. To use the data Kinect has tracked in processing , we decided to send messages containing our data via OSC. OSC is also easy to set up and you can design your messages at your wish. Right now we just have to send some float values, like the centre values of the actor and the x-/y-value of the closest point the actor gives, but of course we can send a lot more data if we want to. Because we use OSC for sending messages we are also able to set up the tracking on one laptop and give the projection task to another, faster one.
The processing sketches are basically drawing rectangles or ellipses on a beautifully designed background-image.

Storyboard – Kinect Use in “Dusk”

Kinect, Shadow and Light – Design

Realization with panStamp and pulse sensor

Following the Food for “Thought” , we continued to discuss our ideas. A good thing is that the script was out, so based on it,  we get a general concept of how things will be. As for technical side, panStamp and pulse sensor were chosen for the next phase

PanStampIMG_20150122_131355

We need to send information from the sensor on the stage to the computer. That is where PanStamp comes in

The PanStamp battery board is our sender- read signal from the sensor and pass it to the PanStick. A bit of soldering work is done on the battery board, mainly for the mobility of using sensor- instead of fixing the sensor, we can remove it at will.

While the energy source is 1.5V AA battery, PanStamp battery board itself can amplify it to 3.3V.

The PanStick reads wireless transmission from PanStamp battery and pass it to the computer via Serial protocol.

Pulse sensor

IMG_20150122_131444

Pulse sensor uses the principle of light-sensing in order to calculate the heartbeat. It is assumed that when the heart beats, there is some kind of shockwave throughout our body. From that perspective, the beat-per-minute (BPM) and interval -between-heartbeat(IBM) can be measured.

It was kind of a fun journey with the pulse sensor. At the beginning, the result was unstable , but after a while of tinkering, this pulse sensor does what it is supposed to do. Still, low power supply usage can be quite deceptive since the sensor “appears” to be working fine , but instead, you will need to change the code–or to wire it differently.

The guide for it can be found here: Guide for Pulse-sensor

The Pulse sensor ,in our project, shall be wired to the PanStamp battery board.

Model of our approach

The model of our approach


Soapy Heart of Soap

Soapy Shape of Soap
Soapy Storyboard of Soap

Section I: Distance Sensor HC-SR04 (Input)

After discarding several ideas for the input – e.g. infrared remote controls, magnetic wristbands, etc. – we decided to use an simple distance sensor for the interaction input of our soap.

Our choice was the HC-SR04, a distance sensor which is common and wide-spread in combination with an Arduino Uno. This kind of sensor uses ultrasonic transmitters for the range calculation, which is in favor for the usage on stage where light-based solution would have problems. It can measure objects with no direct contact in front of it within a range from 2cm up to 400cm and an angle of 15°, so in this case it also fulfills our requirements of triggering the soap. For the test setup i energized it via the 5V connection on the Arduino board.

The test setup includes:

  • 1x HC-SR04, the distance sensor itself
  • 2x LED (green and red)
  • 2x 560Ω resistor
  • several jumper wires
Test setup for the HC-SR04

So while nothing interferes in the predefined range (i set it to 4cm for testing purposes), the green LED will be on. In the moment a object will undercut this range, the green LED goes off and the red LED lights up.

IMG_20150107_172753
Object not in range, green LEDs is on
IMG_20150107_172802
Object in range, red LED is on

Section II – Soap Bubble Gun (Output)

As the first interaction output we asked ourselves how we can present the imagination of a soap although it doesn’t has the appearnance of it. We almost immediately thought about soap bubbles. This suggestion went through the whole concept phase and was getting elaborated quickly. We decided to use a common soap bubble gun. It was dismantled by its case and powerd by a seperate 4.5V power supply. The basic idea was to put it into the middle of of our soap and let it being triggered by the distance sensor thus soap bubbles will rise in the air when it gets activated. When activated the DC servo motor in the gun will fulfill two tasks. On the one side it will pump the soap liquid through little elastic tubes to the emmision ring of the gun. On the other side, the motor will run a little ventilator which will blow air through the mentioned ring. This is how soap bubbles are born!

For a first test setup controlling a DC motor i used:

  • 1x DC motor, a seperate one from an Arduino Experimantation Kit
  • 1x transistor (PN2222), has the function of an electronic switch
  • 1x 1kΩ resistor
  • 3x 1.5V power supply
  • several jumper wires
Test setup for the motor control via Arduino


2nd setup, using the soap bubble gun this time:


3th Setup, seperate DC motor with the HC-SR04:


4th Setup, soap bubble gun with the HC-SR04:

Currently we have an issue with the estimated 4.5V regularly dropping to a less amount when connecting the soap bubble gun to the circuit. This strange behaviour only occurs with the DC motor of the gun, not with the seperate one. This problem has to be investigated further and prevents the soap bubble gun from prototyp status.

Section III – LED Strand WS2801 (Output)

As the second output we want to use RGB LEDs. As the soap bubble gun they should light up the case of the soap when the distance sensor is triggered.  We used the LED Strands WS2801 and LPD6803 as first hardware subjects and used the tutorial provided from Adafruit. For my case the strand has to charged mobile via battery. Since the strand needs a working voltage of 5V and we only had a 3 Cell 11.1V battery available, i had to use a simple voltage converter to reduce it to the needed amount. The strand uses 4 wires – power supply, ground, data and clock. The final aim is to let them flash in foam-like colors e.g. white and different kinds of blue.

IMG_20150120_155418
LED Strand WS2801
The soap enlightened in foamy colors

Currently we have the issue that we can power up the strand propably with 5V but can’t control it. Still after double checking the connections and wires, basic examples e.g. flashing the strand with a single color won’t work although color examples will flash the LEDs uncontrolled. We worked with different libraries with no success. We assume that the wires don’t match as stated in the tutorial and/or are broken. We consider to work with another one from now on, so work-in-progress…

BenchTech!

A bench can serve many purposes! Any one can sit on it, can lay down or stand on it, nevertheless, touch it. For an interactive theatre show, it is a very prop which can be interacted in many ways. To get inputs from a bench, we should consider how an actor interact with it according to the script. According to our chosen script, three actors will sit on it followed by different sitting gestures. To get inputs from the bench, we can see that in different sitting gestures the actors produce different pressure on a bench as well as touching the surface. So, from a technical perspective to get inputs from bench, we considered two different method of inputs, one is pressure and second one is touch.

img01


Image 1: Showing different sitting gestures  and interaction

Photo Credit: Bahar

To measure the pressure we put three switches under the sitting surface on the bench. If one switch is connected, we can detect that someone is sitting on it, if more than one switch connects, we can assume that more pressure is applied. Therefore, we put three different switches under the surface to measure three different pressure on the bench. This inputs will produce some outputs that are necessary to make an theatre show interactive. Thus, we have decided to produce two major influencer in a show, lights and sounds. The following diagrams will give a brief idea about the interaction.

img02

Image 2: Three switches on a single bench to trigger lights and sounds

If a person sits on a bench, it will trigger illumination of the bench, as well as playing a music. Moreover, depending on different sitting gesture (which will increase or reduce pressure), two other switches will be triggered which can be programmed to influence lights and music depending on the storyboard of the play.

The second input can be achieved from the touch. The following diagram will provide an idea about the interaction.

img03

Image 3: Capacitive plate on the bench surface that can influence the music.

A conductive strip on the bench surface can be touched by the actors which can influence the sounds and lights according to the storyboard.

Switch:

We are going to produce 9 switches ( 3 for each bench) using copper tape which can be attached under the sitting surface of the bench specially designed by the designer team of our project. If two copper tapes are connected, it will send a signal to the microprocessor which will be counted as a input signal followed by an immediate output: turning on the lights attached inside the bench and playing a pre recorder music from the soundbox.

Photo 22-01-15 16 56 26

Image 4: Copper tape used as switch

Capacitive Touch Sensor using Graphite:

A simple pencil drawing can be used as a capacitive touch plate which can measure how long it takes for a conductive material to go from a ground state to a high potential state when its been pulled up to that high state through a resistor. It takes longer to reach the higher state  if the capacitance of the material is high. We will influence the pre recored music using this easy, simple, cheap technology. The actor can drag their finger along the surface to increase the tempo of the music or reduce it.

Lights:

To lit up the bench we started working with RGB Lights which can produce multiple colors using a single LED.

As we need multiple LEDs, it would be more complex to use single RGB LEDs to produce a LED Matrix to illuminate the benches. Thus, we started working with RGB Led Strips which are designed and produced dedicatedly for the purpose we are working on. It will give a complete control on the lights, can produce any color, high luminance as well as cheap. We considered WS2801 and LPD6803 then we moved on to the more convenient product from adafruit, analog RGB Led strips.

Connections:
We are using Arduino based microcontroller using Arduino IDE for the circuit connections and using Processing to  play music. Following diagram will show the idea.

img04

Technical Difficulties we need to overcome:

  1. Proper “Serial handshaking” between arduino and processing
  2. Working with Analog RGB Led strips
  3. Working with switch matrix
  4. Working with capacitive touch sensor.

The sense of sensors

Tilt Sensor

A tilt sensor can measure the tilting in often two axes of a reference plane in two axes. In contrast, a full motion would use at least three axes and often additional sensors. One way to measure tilt angle with reference to the earths ground plane, is to use an accelerometer. (Source: Wikipedia)

Tutorials

Accelerometer & Gyroscope

An accelerometer is a device that measures proper acceleration (“g-force”). Proper acceleration is not the same as coordinate acceleration (rate of change of velocity). For example, an accelerometer at rest on the surface of the Earth will measure an acceleration g= 9.81 m/s2 straight upwards. (Source: Wikipedia)

A gyroscope (from Greek γῦρος gûros, “circle” and σκοπέω skopéō, “to look”) is a device for measuring or maintaining orientation, based on the principles of angular momentum. Mechanical gyroscopes typically comprise a spinning wheel or disc in which the axle is free to assume any orientation.  (Source: Wikipedia)

Photo sensor

A photoelectric sensor, or photo eye, is a device used to detect the distance, absence, or presence of an object by using a light transmitter, often infrared, and a photoelectric receiver. They are used extensively in industrial manufacturing.

Motion sensor

A motion detector is a device that detects moving objects, particularly people. A motion detector is often integrated as a component of a system that automatically performs a task or alerts a user of motion in an area. (Source: Wikipedia)

Pressure sensor

A pressure sensor measures pressure, typically of gases or liquids. Pressure is an expression of the force required to stop a fluid from expanding, and is usually stated in terms of force per unit area. A pressure sensor usually acts as a transducer; it generates a signal as a function of the pressure imposed. For the purposes of this article, such a signal is electrical. (Source: Wikipedia)

Thermal flashlight (temperature sensor + RGB lights)

Thermal Flashlight