Werkmodul/Fachmodul
Lecturer: Max Neupert
Credits: 6 ECTS, 4 SWS
Date: Monday, 9:30 until 12:30 h
Venue: Marienstraße 7b, Room 204
First meeting: 2012-10-15
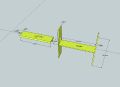
Selection of images from the documentation
For the complete documentation of the individual microscopy projects click on the names in the list of works.
- Hacking
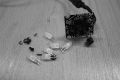
Disassembling
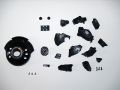
Fragments
Hacking the camera
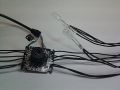
LEDs now external


- Planning
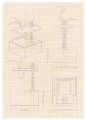
Draft
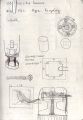
Sketches
Construction
Illustrating


- Model making
Adrianas cardboard model
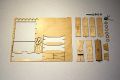
Amels Lasercut
Brians rapid prototype
Nils 3D Printed microscope


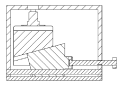
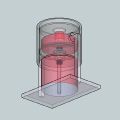
- 3D construction
Amels microscope in 3D
Han's 3D Model
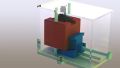
Rendering
- Error creating thumbnail: convert convert: Unrecognized option (-layers). Error code: 1
Mechanics


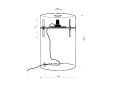
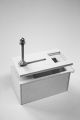
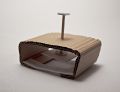
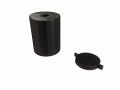
- Some of the microscopes
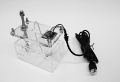
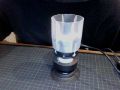
The acrylic microscope
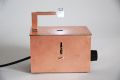
The copper microscope
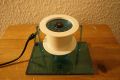
The recycling microscope
The futuristic microscope


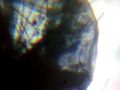
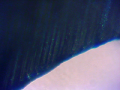
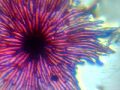
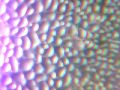
- Still images taken with the microscope
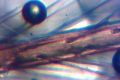
spider leg
Spider
Knife blade

Red Berries
Silberbeere
Soil Sample
Window cleaner sample
Onion skin


For videos please check the list of works.
Report
Do-it-yourself microscopy has proven to be a perfect medium for dipping into a couple of key concepts, fundamental methods and relevant discourses with new media students. In my class at the Bauhaus-Universität Weimar during the winter term 2012/2013 the given task was to build a cheap (affordable would be an understatement) microscope. The task also included using this microscope subsequently for an artistic project. While we were building it we got exposure to other subjects which were necessarily on the path to our goal (and are applicable for many other tasks in different contexts). We learn to deconstruct technology, to think about how it works and let our explorative curiosity win over the fear of breaking something.
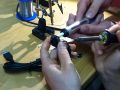
We got into soldering, tinkered with the electronics and hacked the cheap hardware, adapting it to our needs. We made sketches and drafted scale models from cardboard, meanwhile discussing construction principles and mechanics. We created digital models in 3D and used various tools in the workshop – including rapid prototyping and digital fabrication devices like the laser cutter and the 3D-printer – to build individual designs.
This way, building a digital microscope yourself is not only a rewarding experience, it is also an opportunity to experience a variety of technologies and apprehend a range of new practical skills. Those skills are elementary for the practice of media artists, designers and in the maker community.
Every one of the ten students has built her/his own microscope with an individual design and even making use of various mechanical principles. True to the academic and open source spirit it was part of the assignment to publish a how-to, allowing to copy and build upon the design. Laser-cutting templates and 3D-files can be downloaded from the project website.
Right at the beginning of the project we suffered a setback: one of the four legs supporting the 3D printer gave in, making it unstable. While continuing to print, the printer started “walking” due to its imbalance and eventually fell off of the table. Since essential parts broke it could not be repaired quickly. In light of this accident we directed our efforts towards our models for which we could use the laser cutter instead.
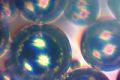
A field-trip to the Optical Museum in nearby Jena suggested itself. The museum hosts a reconstruction of Carl Zeiss' workshop and features the scientific breakthroughs of his business partner Ernst Abbe. Abbe's apochromatic lens was an invention to overcome the blur you get using regular lenses due to the differences in refraction of light throughout the wavelengths of the spectrum. The exact problem we also encountered, 145 years later, because we are using the optics of the webcam in reverse instead of Abbe's apochromatic lenses used in optical microscopes today. In the images taken with our microscopes you can sometimes see a rainbow coloured halo around the edges, that is the afore mentioned effect.
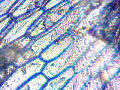
As soon as the microscopes were built we searched in and outdoors for material for close inspection. Leaves, feathers, blossoms, onion skin, spider legs, hair, the wings of a fly, have all been amazing subjects. Glass, soil, spit, saw dust, salt, sugar and even solid objects like a knife's blade reveal fascinating shapes under the microscope. However, the classic brine shrimp (used to feed fish) and a popular microscopy subject in school, surprisingly were way too big for the magnification of our microscopes, exceeding its field of view. Pond water and hay infusions contained some species that are too small to see with the plain eye but perfect for our microscope. Paramecia have just the right size. The curiosity of the students didn't stop there: sperms turned out to be a few pixels big, but clearly visible and possible to count.
The most challenging assignment was the final one: to use the self made microscope as a tool to implement a creative concept. My students were intuitively seeking narrative structures from the material by using the microscopic world. The patterns became the source material for an interpretation and visualisation. While some were using the images as texture for a silhouette animation, another student created non-linear interactive scenes in html5. Impressive and convincing were also the sonified microscopic videos. Using the analysis of histogram, brightness and motion detection algorithms to generate sound.
DIY-microscopy isn't only a vehicle to teach tools, techniques and theories – it also fits nicely to a substantial body of research and teaching conducted at Prof. Ursula Damm's chair of Media Environments related to bio-art, microscopy and synthetic biology. It is likely that I will offer this class another time, building upon theses results.
What this class is about
Aim of the class is to develop a creative practice within a the digital images of a microscopic world. To achieve this we will hack a USB Webcam to deliver microscopic video. The microscopy stage will be constructed with the help of our rapid prototyping machine GMU:RapMan and simple 3D modeling tools. Lastly video editing and realtime manipulation techniques will be explored and applied. This course ideal for students who want to explore a broad set of skills and different aspects of technological driven playful artistic research. Costs of 20,- € must be paid, you will keep your microscope. Course language will be English.
Worum es dabei geht
Ziel des Kurses ist es einen gestalterischen Umgang mit den digitalen Bildern einer mikroskopischen Welt zu entwickeln. Um dies zu erreichen werden wir eine USB Kamera umbauen, so dass diese mikroskopisches Video ausgibt. Die Mikroskop-Bühne wird mit Hilfe unseres 3D Druckers GMU:RapMan und einfachen 3D Modellierungswerkzeugen entwickelt. Um die gestalterischen Projekte umzusetzen werden grundsätzliche Video-Schnitttechniken und Echtzeit Manipulationsmethoden erprobt und angewandt. Dieser Kurs ist ideal für alle Studenten die in eine breite Auswahl von Fertigkeiten Einblick gewinnen möchten und verschiedene Aspekte einer durch Technologie bestimmten spielerischen künstlerischen Forschung kennen lernen möchten. Kosten von 20,- € müssen bezahlt werden, das Mikroskop ist eures. Kurssprache ist Englisch.
Syllabus
- 12-10-22 Electronics Tinkering, Hardware Hacking → Max
- 12-10-29 3D Modelling (with Blender, SketchUp, MeshLab) → Jakob
- 12-11-05 3D Printing GMU:RapMan and Laser cutting → Matthias Breuer,
- 12-11-12 Microscopy → Adriana
- 12-11-26 Light in photography, Light Microscopy, → Amel, Brian, Nils
- 12-12-03 No class!
- 12-12-04 Excursion to the optical museum in Jena. 13:07 train is leaving in Weimar
- 12-12-10 Construction
- 12-12-17 Sonification Workshop
- 13-01-07 Contemporary Art practice, Hackteria, Bioart → Maria
- 13-01-14 Consultations
- 13-01-21 Consultations
- 13-01-28 Final Presentation
- 13-01-31 Submission of Documentation (deadline)
Evaluation
- Active participation, graduates teach 20%
- presentation (artistic examination) 40%
- documentation 40%
- edits in the wiki (not related to the class) extra +10%
Eligible participants
Undergraduates and graduates enrolled in the Faculties of Media, Gestaltung and in the MediaArchitecture program
Works
- Images (general images)
Abandoned
Choosing the right webcam
Any webcam which works with your computer will also work as a microscope. It is recommended to choose a webcam that isn't only working on one platform with special drivers and/or is restricted to the software of the vendor. A good choice is a USB Video Class compliant (short: UVC) camera. Often this isn't explicitly said in the specifications, but if it says driver free, plug and play or Mac compatible it is an indicaton that the camera might be of the UVC type. If you can find one which is easy to disassemble (screws instead of melted or glued parts) you got an advantage. Wikipedia has an incomplete list of UVC Webcams. A longer list of supported UVC cameras is to be found on the Linux UVC driver page.
Looking for a High Definition UVC compatible? Try those and report back here: Genius UVC webcams
Magnification and Resolution
To find out how big the surface is we are looking at, we are capturing a piece of a screen/display and count the pixels. We tried an iPod Touch 4th generation which has a widescreen with the following specs:
- resolution is 960 x 640 pixels
- physical size is 75 x 50 mm

Hence we can calculate the pixel density of the device:
- 0,078125 mm per pixel (or 12,8 pixels per mm)

On our screen capture through the microscope we see approximately 5,8 x 4,2 pixels of the screen (one pixel consists of a triplet of red, green and blue). Now we know that we are looking at a surface of ~ 0,45 x 0,33 mm.
To calculate the magnification factor the pixel density of the display must be taken into account.
Capturing from the Webcam
Windows
A basic (you must have installed .NET Framework 4) application for capturing images from your webcam: File:Microscopy-WebcamCapture.zip
Usage: Spacebar: Save image to file, R: Start/stop recording, N: Give name, Escape: Exit the application
OS X
You may use Apple QuickTime or Photo Booth to record video from the webcam on OS X.
Linux
Links
- Mailinglist DIY-Microscopy
- Laser Cutting Guide
- Lichtmikroskopie
- hackteria.org, Hackteria wiki DIY Microscopy
- instructables.com - Description of how to photograph through a microscope using a deconstucted webcam. It may be helpful.
- Arducam