| Line 47: | Line 47: | ||
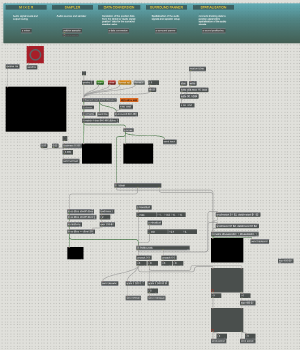
The patch opens in presentation mode by default, showing all the buttons, sliders and objects you need to run the installation. This gives us a much simpler interface to work on. | The patch opens in presentation mode by default, showing all the buttons, sliders and objects you need to run the installation. This gives us a much simpler interface to work on. | ||
[[File:Bildschirmfoto 2020-11-09 um 10.28.32.png| | [[File:Bildschirmfoto 2020-11-09 um 10.28.32.png|700px]] | ||
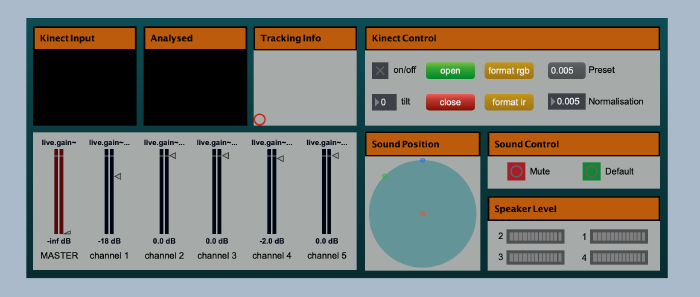
On the top left corner of the interface you can see tree screens (jit.pwindow). The one on the right shows the normal, unchanged RGB/infrared signal from the Kinect, the one in the middle shows the analysed signal and the "screen" on the left (actually a "pictslider" object) shows the position of the tracked person in the room. You can also use the pictslider object to simulate a tracked movement without having to connect a Kinect-Camera. | On the top left corner of the interface you can see tree screens (jit.pwindow). The one on the right shows the normal, unchanged RGB/infrared signal from the Kinect, the one in the middle shows the analysed signal and the "screen" on the left (actually a "pictslider" object) shows the position of the tracked person in the room. You can also use the pictslider object to simulate a tracked movement without having to connect a Kinect-Camera. | ||
Revision as of 09:44, 9 November 2020
Introduction
The goal of the semester project was to write a Max Patch for an interactive sound installation. The installation was about connecting the movement of an individual in a defined space or room to the acoustic environment in this certain area.
The main idea behind this action was to give the person a certain amount of control over the parameters of sounds, that would be played and positioned in the room, without the person necessarily being aware of the interaction. The goal of the installation is not to create a new environment or to make the installation speak for itself alone. It's meant to enhance and augment the given surrounding, giving the recipient the ability to interact with his environment.
This required an interface that wasn't visible or touchable from the beginning on, so the installation used video tracking, scanning the movement of the person in the room.
The data, that's gained from the video tracking is used to influence the parameters of the sound as well as the spatialisation of the sound, meaning its position in the room. This already offers quite a lot of potential to give the recipient a feeling of influence on his environment.
Artistic Statement
The whole process of planning, building and testing the installation happened during the first online semester and Covid-19 pandemic. Most of the life of an ordinary student such as me happened in a small room. Wether it’s working, sleeping, resting, meeting a few friends or just spending free time, everything that normally happened in quite different spaces was now forced and compressed into a small room. That naturally created different areas and spaces with very different meanings, actions and emotions connected with them. They often clashed, yet it wasn’t that easy to separate them from each other. These smaller areas are the basis for the sound composition.
Actually, this relation and connection between the sound installation and the room during the lockdown wasn’t planned from the beginning, but evolved during the semester. The reason therefore was that working on the project perfectly showed the problematic of these different areas and actions colliding due to the lack of space. For example when I set up a 4 speaker surround system in my room, to try connecting the tracking data to the spatialisation of the sound material, one speaker had to stand on my bed to be in the right place, so I had to sleep elsewhere for a few nights. This slowly had me thinking that the installation had to be about this problem, as it fits the original idea of the installation so well. As a result you could say, the installation itself deals with the struggles and problems of its own creation.
This also meant, that the installation was meant to be placed in a normal bedroom of a students flat, instead of a studio room. On one hand this meant that a speaker setup had to be placed in this room, on the other hand it meant that the sound quality wouldn't be as nice as in a professional surround studio. Yet, the environment wouldn't be fitting the context and idea of the installation, if it was placed in an "artificial" surrounding like a surround studio.
The Setup
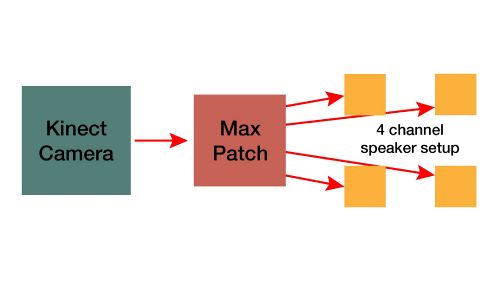
To be independent from the light condition in the room, an infrared camera was used. The most practical, and especially cheapest way to do this was using a Kinect 360 camera.
In order to position the sounds in the room and change these positions, it was necessary to have a setup of multiple speakers. In this case, a surround speaker setup of four speakers was used.
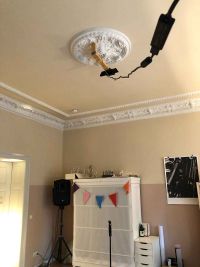
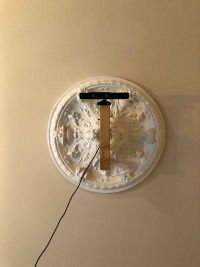
As you can see on the pictures above, the kinect camera was hung to the ceiling facing downwards.
Video Documentation
Right here you can find a video documentation of the final installation prototype. The audio signal will be explained, recorded and converted to stereo. Like this the audio isn't spatialized, but at least you are able to hear it.
The Video is divided into three parts: Introduction, Demonstration and Explanation.
00:17 - 10:00 Introduction
10:00 - 18:40 Demonstration
18:40 - End Explanation
Patch Walkthrough and Setup Tutorial
The patch of course is the heart of the whole installation. It processes the live video input from the Kinect, tracks the movement of the recipient visible on the video, connects the tracking data to the sound parameters and the spatialisation of the sounds. It also samples the sound material and routes the sound to the different speakers.
The patch opens in presentation mode by default, showing all the buttons, sliders and objects you need to run the installation. This gives us a much simpler interface to work on.
On the top left corner of the interface you can see tree screens (jit.pwindow). The one on the right shows the normal, unchanged RGB/infrared signal from the Kinect, the one in the middle shows the analysed signal and the "screen" on the left (actually a "pictslider" object) shows the position of the tracked person in the room. You can also use the pictslider object to simulate a tracked movement without having to connect a Kinect-Camera.
On the top right corner you can find a panel called "Kinect Control". This contains everything you need to control and adjust the Kinect and the video signal. At first you can turn on the Kinect with the toggle object saying "on/off". To adjust the position angle of the camera, use the "tilt"-object. To allow the signal flow from the Kinect, or to pause it, use the green and red buttons saying "open" and "close". The two yellow buttons let you choose if you also want to receive an RGB-signal or an infrared-signal. The normalisation adjusts how exact the Kinect signal tracking focusses on the nearest object. You can try around by changing the value. To change the normalisation back to default, you can the "Preset"-button.
On the bottom left you can find the mixer panel. Here you can adjust the master volume, and also the volume of each sound.
In the bottom center, you see a big blue circle, visualising the position of the sounds in the room. On the bottom right you can find volume meters displaying the signal levels going to each speaker. Above that there's a red "mute"-button, in case you need to turn the master volume down as quickly as possible, and also a green "default"-button, that brings all the channel volume sliders back to their original value.
This interface is made for a setup of four speakers. In case you want to add more speakers, and to see their signal level, you would have to manually add more volume meters to the interface.
If you leave presentation mode, the main page of the patch is divided into two parts. At the top of the patch you can see a blue headline, containing all other subpatchers and explanations of those. You can see this as an index or table of contents. It also contains the mixer patcher (a "bpatcher") and a visualisation object that shows the position of the sounds in the room.
Right below this table of contents you can find the tracking process patch. That's the part of the main patch that collects the Kinect video input, tracks the movement of the recipient in the video and sends the tracking data to wherever it's being further processed in the rest of the patch.
At the beginning you can find the "freenect.jit.grab" object. This is an external, that collects the live video input from the Kinect. It only works with the first version of the XBOX Kinect 360, model type 1414, and only with Max 7 on below.
The freenect object can be operated with different input messages. First, as you can see, it needs a "qmetro" object to collect the video input. The freenect object can be switched on and off with an "open" and "close" message box. You can choose if you want to work with the RGB or infrared video output with the "format RGB" or "format ir" messages. With a "tilt" object you can adjust the angle of the Kinect Camera Module.
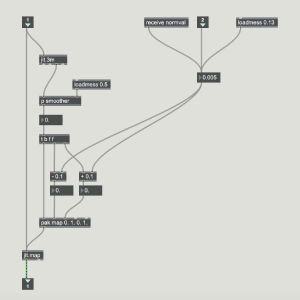
First, the live video output of the freenect is run through a subpatcher called "p normalize". The Kinect automatically detects the distance of the objects that are visible on the video from the Kinect itself. Here in he patcher you can choose how "far" the Kinect is supposed to look. You can adjust the maximum distance in which the Kinect is supposed to scan objects.
This normalisation patcher is taken from a Kinect tutorial. Some parts are added to the patcher, to adjust the normalisation value with a send object. You can find the source in Tutorial number 2.
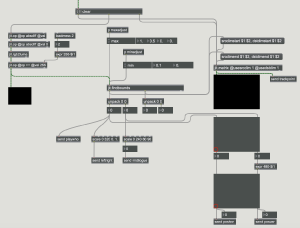
After the normilasation, the signal runs through multiple filters, and into a "jit.findbounds" object. The objects that interact with this "jit.findbound" can be found in the help patch of the object itself. This process determines the position of the object thats visible on the video in relation to the video frame.
So, if you put up the camera on the ceiling and shoot from above, the normalisation will only allow the Kinect to record the object that's the closest, in this case the head of the person in the room. The "jit.findbound" then only sees the head on the video, and determines its position in realtime. Like this you can track the position of the recipient in the room.
Resources
SOUND MATERIAL
HARDWARE
Kinect 360 sensor https://www.amazon.de/Microsoft-LPF-00057-Xbox-Kinect-Sensor/dp/B009SJAIP6 (pretty expensive... but you can easily get used ones for less than 40€ on ebay-kleinanzeigen.de)
Kinect 360 Adapter https://www.amazon.de/gp/product/B008OAVS3Q/ref=ppx_yo_dt_b_asin_title_o04_s00?ie=UTF8&psc=1
To output audio to multiple external speakers, you'll most likely need a
SOFTWARE
ICST Ambisonics Plugins free download https://www.zhdk.ch/forschung/icst/icst-ambisonics-plugins-7870
Argot Lunar plugin http://mourednik.github.io/argotlunar/
TUTORIALS
1: Color Tracking in Max MSP https://www.youtube.com/watch?v=t0OncCG4hMw&list=PLG-tSxIO2Jkjj0BthZ_y0GRkWRjAvL1Uo&index=4&t=310s (Part 1 of 3)
2: Kinect Input and normalisation https://www.youtube.com/watch?v=ro3OwWnjfDk&list=PLG-tSxIO2Jkjj0BthZ_y0GRkWRjAvL1Uo&index=5
Conclusion and future works
The project so far is finished and came to an end. Yet, the patch, and the installation context will be developed further, as there is a huge potential in this instrument.
This far, the control worked just by changing the position values. It's planned to add for exemple blob tracking to the patch, to control parameters by a certain movement, no matter where in the room it may happen. This would make the whole sound sculpture more diverse and flexible.
A huge and very important addition, that may happen during the next semester, is a visual dimension. This means the sensor data will also be used to control the for example light environment in the room. That's why it's important not to use a simple camera, but a Kinect360 with an infrared camera.
Also, the patch this far only scratches the surface of all the things the Kinect camera is capable of. For example it can be possible to let the installation be visited by more than one person at the time. To explore the given sound situation together, or even compose the sounds as a group.
