Turn a plant into an instrument

Idea
During our course, we have tried some plant sensing circuit from Martin Howse, Leslie Garcia and Miya Masaoka. From their examples, I find it quite interesting to be able to capture the reaction of the plant in an electronic way. With the analog signals we get from the plants, we can convert them into other forms, which will be more perceivable and interactive to us human.
As we all know, there are lots of languages of flower that we human write for them. For example, Daisy: Innocence and Tulips: Love, Fame,etc. So, these words and sentences are created by man and why not let the flowers speak for themselves ?
So, my initial idea is to use the circuit of plant sensing, which involves arduino, to set up a installment consisting of different types of flowers. So when they are touched by people, they can speak for their own. I am curious to see, if they are speaking the same language or not. And I also want to see how the languages change from the bud to wilting. I will record the whole process and the data, and make a time-lapse video combining with the sound produced by the circuit. Here below is a inspiration for this concept.
Time-Lapse: Watch Flowers Bloom Before Your Eyes [1]
But as my experiments with different parts of plants with different structures, it is fascinating to discover the different outcomes when I play with it. So, I decide to change my idea and make a interactive plant instrument for people to play with. The old idea is still meaningful and interesting, but it requires more time and less interactive for audience.
Circuit
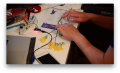
I use another circuit different from the ones we have seen in the course to amplify the signals, but the basic principle is the same. The NPN transistor will help us to amplify the signal we get from the planet. A passive speaker will be attached to the breadboard, so this installment has no need to rely on the external speaker or to connect to a computer. In this way, you can carry your circuit anywhere and play with it right away.
Components
- 1 Arduino board
- 1 Breadboard
- 1 USB cable
- Jumper wires
- 1Passive buzzer
- 1 Resistor(10KΩ)
- 1 NPN Transistor S8050
- Plants
Above is the shopping list for this instrument set-up. For my current experiments, the plants I use are just bought from the local supermarket as a bouquet of flowers for decoration. You can replace them with other plants. I also have tested with potted plants, but because they are too small with very short branches and stems, it's bit hard to interact with them and the result is also not as good as the ones with longer stems.
By using the electronic components above, we can connect them according to the graph below. The flower icon is where you will connect the wire with your plants.

Step 1
Connect all the components in the way as the picture above.

Step 2
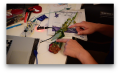
Connect your plants on flowers to the circuit.
Here is an example of mine. One side of the wire is attached to the flower and the other side is connected to the end of the stem.
Step3
Upload the code to the arduino.
Below is the code for Ardunio, so the circuit will actually work. The data from the plant will be used to change the frequency and the duration. In this way ,the buzzer is able to produce different sounds.
Arduino code

Step4
Touch your plants and hear the sound from buzzer, play with your instrument.
My experiments with plants
(with video links)
Tests with the rose
Tests with the freesia
Tests with the leaves


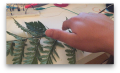
1. Rose
I connected the circuit with the rose to see the conductivity of a single twig and how the sound would change based on which part i touched. One side is attached to the end of the stem, and the other side is connected to the flower bud. Below are two videos showing the results.
According to my experiments, the stem part works like a slide rheostat.
2. Freesia
Different sections of the flower can be different notes.
3. Leaves
By experimenting with the branch, I found something interesting with it. When you touch the under part of the leaves or stems, the signal is almost same and sound is heavy. But when you touch the leaves with green and smooth side, you can get dramatical signal change.
Conclusion
When use this circuit and multiple buzzers or other different outputs, you can create a band consisting of plants with a live performance. Playing with the plants is like we are opening a channel to the plants. Although here we just use the simplest way of detecting the electronic signals to interact with the plants, but with more advanced sensors, we can have more chemical data combining with the electronic signals to have a deeper understanding about the plants' behaviors and come up with more ideas of interactions.
About Transistor
The transistor I used is NPN Transistor S8050. It's quite cheap costing only 0,05 € on reichelt.de[7] Comparing with AD620 Amplifier costing around 5 euro which is used in Martin Howse's circuit, it's amazingly cheap. So it saves money when you want to build up a set of amplifying circuit. Meanwhile, it's so small that is better for some compact circuits.
References
1.Martin Howse - | INTER-SPECIES COMMUNICATION PLATFORM
2.Leslie Garcia - | Pulsu(m) Plantae
3.Miya Masaoka - | Miya Masaoka's Pieces for Plants #7, NYU
4.Mads Hobye - | Singing plant. Make your plant sing with Arduino, touche and a gameduino
5. Reference:Bipolarer Transistor [8]