No edit summary |
No edit summary |
||
| (11 intermediate revisions by the same user not shown) | |||
| Line 71: | Line 71: | ||
* scale each picture to 100x100 pixels | * scale each picture to 100x100 pixels | ||
https://raw.githubusercontent.com/bitcraftlab/Processing-im-Park/master/lecture-01/park_grid-screenshot.jpg | |||
[ | Source code: [https://github.com/bitcraftlab/Processing-im-Park/blob/master/lecture-01/park_grid/park_grid.pde park_grid.pde] | ||
=== ''Interactive Park'' Sketch === | |||
Our very second program ;) | |||
* Load two images from our data folder | |||
* Switch between the images every second frame | |||
* Learn about the power of ''%'' a.k.a. modulo a.k.a. division with rest | |||
* Learning to use ''Flow control'' (the ''if else'' command) | |||
https://raw.githubusercontent.com/bitcraftlab/Processing-im-Park/master/lecture-01/interactive_park-screenshot.gif | |||
Source code: [https://github.com/bitcraftlab/Processing-im-Park/blob/master/lecture-01/interactive_park/interactive_park.pde interactive_park.pde] | |||
=== Homework 1 === | |||
* Create a sketch that loads 9 images | |||
** (feel free to recycle code from our first program) | |||
* Make the sketch flip through all nine images to create a slideshow / animation | |||
** Feel free to take inspiration from our second program | |||
==== Solution ==== | |||
Solution to the homework in progressive steps of abstraction: | |||
* [https://github.com/bitcraftlab/Processing-im-Park/blob/master/homework-01/animated_park_1/animated_park_1.pde animated_park_1.pde] | |||
* [https://github.com/bitcraftlab/Processing-im-Park/tree/master/homework-01/animated_park_2/animated_park_2.pde animated_park_2.pde] | |||
* [https://github.com/bitcraftlab/Processing-im-Park/tree/master/homework-01/animated_park_3/animated_park_3.pde animated_park_3.pde] | |||
* [https://github.com/bitcraftlab/Processing-im-Park/tree/master/homework-01/animated_park_4/animated_park_4.pde animated_park_4.pde] | |||
== Cut-Ups and Collages == | |||
This part was about how to create cut-ups, interactive photo puzzles and collages. | |||
=== Cut-Ups === | |||
In this part we will learn how to: | |||
* use arrays to work with lots of images | |||
* use loops to let the computer do repetetive tasks | |||
* create image collages | |||
** cut up images into stripes and squares | |||
** rearrange stripes and squares | |||
==== Simple Tiles Example ==== | |||
We are cutting the original image into 9 tiles and rearrange them. | |||
https://raw.githubusercontent.com/bitcraftlab/Processing-im-Park/master/lecture-02/simple_tiles-screenshot.jpg | |||
Source code: [https://github.com/bitcraftlab/Processing-im-Park/blob/master/lecture-02/simple_tiles/simple_tiles.pde simple_tiles.pde] | |||
==== Final Tiles Example ==== | |||
Here's the final version, that uses variables, arrays and loops to allow for arbitrary number of tiles: | |||
https://raw.githubusercontent.com/bitcraftlab/Processing-im-Park/master/lecture-02/tiles-screenshot.jpg | |||
Source code: [https://github.com/bitcraftlab/Processing-im-Park/blob/master/lecture-02/tiles/tiles.pde tiles.pde] | |||
=== Homework 2 === | |||
* Pick an image from the link section below | |||
* Write a step by step instruction detailing the algorithm | |||
* Create a processing sketch that applies the algorithm to one of your photos. | |||
Things to keep in mind: | |||
* Don't tweak my sketch, start from scratch | |||
* Use comments, to explain your intention | |||
==== Solution ==== | |||
=== Links === | |||
[[ | ==== Collages ==== | ||
* [http://a-gerace.com/ Portfolio of Anthony Gerace] with lots of sliced and diced photos | |||
** [http://a-gerace.com/index.php/collage/there-must-be-more-to-life-than-this/ Diced Collages] | |||
** Sliced collages can be found [http://a-gerace.com/files/gimgs/17_006%20%28368%29_v2.jpg here] and [http://a-gerace.com/files/gimgs/17_006%20%28368%29_v2.jpg here] | |||
** Sliced and Diced: [http://a-gerace.com/files/gimgs/17_img002_v2.jpg here], [http://a-gerace.com/files/gimgs/17_img002_v2.jpg here] and [http://a-gerace.com/files/gimgs/17_img001_v2.jpg here] | |||
* [http://cargocollective.com/inserirefloppino/G-series Sliced Collages] by Marco Migani | |||
* Grid Collages (inspired by Chuck Close) | |||
** [http://www.incredibleart.org/lessons/middle/larry-valuegrid.htm Value Grid] | |||
** [http://artprojectsforkids.org/chuck-close-self-portrait/ Art Project for Kids] | |||
* Cut-Out Collages | |||
** [https://www.behance.net/gallery/11405205/Natural-Act Natural Act] by Merve Ozaslan | |||
** [http://www.boredpanda.com/paper-cutout-art-fashion-design-architecture-shamekh-bluwi Paper Cut-Outs] by Shamekh Bluwi | |||
** [http://www.boredpanda.com/animals-cutouts-natural-landscapes-nikolai-tolsty/ Animal-Cutouts] by Nikolai Tolsty | |||
* Joiner Collages | |||
** [http://www.shootingfilm.net/2013/01/joiners-polaroid-collages-by-david.html Polaroid Collages] by David Hockney | |||
** [http://www.tkellner.com/ Film Mosaics] by Thomas Kellner | |||
** [http://www.mauriziogalimberti.it/?tag=venezia Polaroid Mosaic Portraits] by Maurizio Galimberti | |||
== Drawing with Images == | |||
In this lecture we will learn how to draw with images. | |||
=== Examples === | |||
==== Sprite Brush 1 ==== | |||
https://raw.githubusercontent.com/bitcraftlab/Processing-im-Park/master/lecture-03/sprite_brush_1-screenshot.jpg | |||
==== Sprite Brush 2 ==== | |||
https://raw.githubusercontent.com/bitcraftlab/Processing-im-Park/master/lecture-03/sprite_brush_2-screenshot.jpg | |||
==== Sprite Brush 3 ==== | |||
https://raw.githubusercontent.com/bitcraftlab/Processing-im-Park/master/lecture-03/sprite_brush_3-screenshot.jpg | |||
==== Sprite Brush 4 ==== | |||
=== | https://raw.githubusercontent.com/bitcraftlab/Processing-im-Park/master/lecture-03/sprite_brush_4-screenshot.jpg | ||
== | ==Recording im Park== | ||
... | |||
==Intro to the Wiki== | |||
... | |||
==Pixel Pushing== | |||
Latest revision as of 12:16, 21 January 2016
Image Basics
In the first part of this course you will learn the basics of working with images in your computer. Forget Photoshop and illustrator. You 've got the power!
Working with Images
Collecting Images
- Pick a topic from the big topic tombola
- Go to the Ilm-Park and take 100 photos in 45 minutes
- ???
- Profit
Programming Crash Course
Syntax
- Processing uses Java Syntax
- A Syntax Error means you got the spelling wrong, or you need to take some grammar lessons.
- Processing is picky about missing semicolons.
- Add a semicolon to the end of every line and you're fine (;
Functions
- Function Calls:
- function calls can take one or more function arguments given in round braces
- function calls result in a value (or void)
- functions can have side effects for example: drawing something on screen.
- loadImage("park_001.png"); – calling a function to load an image
- image(i, 0, 0); – calling a function to display an image
- Examples
- Functions Definitions:
- define what argument a function takes (and which types those arguments have)
- define what a function does
- define what a function returns (and what type)
- void draw() – tell the computer what to do to draw a single frame
- void setup() – tell the computer what to do to set everything up.
Expressions
- Any combo of numbers and mathematical operators
- return a result
- Can be used as argument to a function
- can be assigned to a variable
Variables
- In typed languages like Java every variable has a type
- use variable declaration to tell the computer the variable exists
- example: int i;
- use variable definitions to assign a value to a variable
- example: i = 1;
- you can combine variable definition and declaration
- example: int i = 1;'
Types
- Number Types:
- float – floating point (Real Numbers), i.e. 0.1, 1e10
- int – Integer (Whole Number), i.e. 1, -100, 20000
- byte – 8 bits (Number between -128 and +127)
- Text Types
- String – String (Sequence of Characters) i.e. "Processing im Park"
- char – a single character, i.w. 'A' or 'a' or ' '
If this is all mumbo-jumbo to you, you better be quick, and start learning to code. Here is how to survive:
- If you love watching TV check out Dan Shiffmans Vimeo, or go to hello.processing.org (its just 1 hour!) – Highly recommended!
- If you prefer to learn by example check out OpenProcessing.org and Sketchbook.cc
- If you prefer to read a book, check out the Processing books.
Park Grid Sketch
Let's create our very first program!
- Loads nine images from our data folde
- display them in a 3x3 grid on screen
- scale each picture to 100x100 pixels
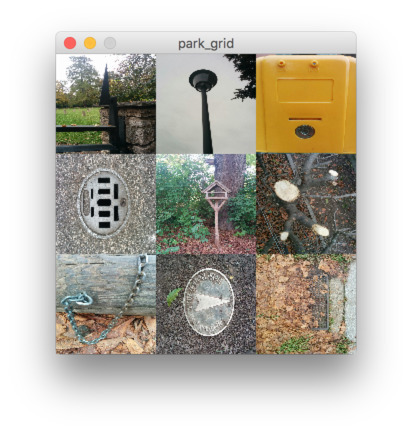
Source code: park_grid.pde
Interactive Park Sketch
Our very second program ;)
- Load two images from our data folder
- Switch between the images every second frame
- Learn about the power of % a.k.a. modulo a.k.a. division with rest
- Learning to use Flow control (the if else command)

Source code: interactive_park.pde
Homework 1
- Create a sketch that loads 9 images
- (feel free to recycle code from our first program)
- Make the sketch flip through all nine images to create a slideshow / animation
- Feel free to take inspiration from our second program
Solution
Solution to the homework in progressive steps of abstraction:
Cut-Ups and Collages
This part was about how to create cut-ups, interactive photo puzzles and collages.
Cut-Ups
In this part we will learn how to:
- use arrays to work with lots of images
- use loops to let the computer do repetetive tasks
- create image collages
- cut up images into stripes and squares
- rearrange stripes and squares
Simple Tiles Example
We are cutting the original image into 9 tiles and rearrange them.
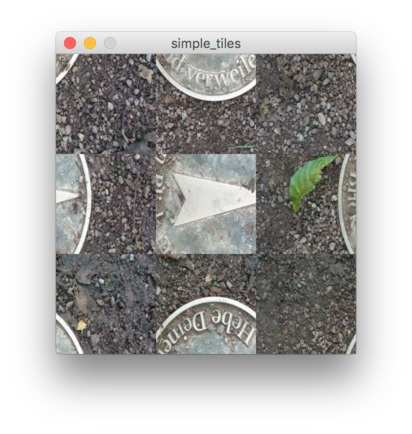
Source code: simple_tiles.pde
Final Tiles Example
Here's the final version, that uses variables, arrays and loops to allow for arbitrary number of tiles:
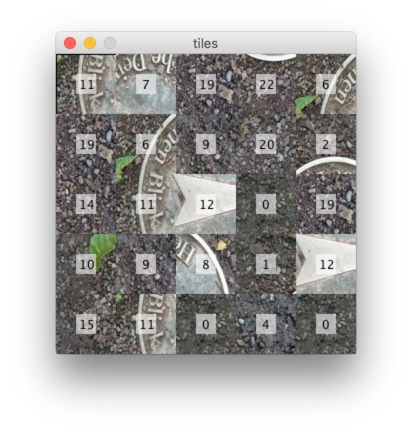
Source code: tiles.pde
Homework 2
- Pick an image from the link section below
- Write a step by step instruction detailing the algorithm
- Create a processing sketch that applies the algorithm to one of your photos.
Things to keep in mind:
- Don't tweak my sketch, start from scratch
- Use comments, to explain your intention
Solution
Links
Collages
- Portfolio of Anthony Gerace with lots of sliced and diced photos
- Sliced Collages by Marco Migani
- Grid Collages (inspired by Chuck Close)
- Cut-Out Collages
- Natural Act by Merve Ozaslan
- Paper Cut-Outs by Shamekh Bluwi
- Animal-Cutouts by Nikolai Tolsty
- Joiner Collages
- Polaroid Collages by David Hockney
- Film Mosaics by Thomas Kellner
- Polaroid Mosaic Portraits by Maurizio Galimberti
Drawing with Images
In this lecture we will learn how to draw with images.
Examples
Sprite Brush 1
![]()
Sprite Brush 2
![]()
Sprite Brush 3
![]()
Sprite Brush 4
![]()
Recording im Park
...
Intro to the Wiki
...