Google Muscle
Project
We are getting involved with technology each day as if the tools of technology almost became our limbs. We also have great knowledge and skill to use these tools, maybe even more skillfully than our actual limbs and muscles. Although this seems like a dark and dystopian world, our bodies have been evolving in a way that our fingers have more importance than the other limbs.
The electricity which flows through our muscles is detected by an Ardunio and turned into numbers. Depending on the range of the numbers, Max produces a combination of a maximum of 5 or 6 letters and searches these on Google Images. The idea is to show the first image of the search result. This way a language between the computer and our body can be defined and performance can be demonstrated.

How To Set Things Up
This setup allows the user to make a google image search which is triggered by the signals coming from the muscles. The idea behind is to show the connection between our boddies and technology. Every device we have act as a limb for us now. Life without internet and instant communication is not possible. There is a strong bound which is getting stronger as we continue our lives with these technologies.
It is possible to cycle through different search options such as "God", "Human" and "Computer". Each of these options requires a different level of signal. For example in order to trigger the "God" option, connected muscle should produce the input level of 300. This level increases to reach the "Computer" option.
Components
- Arduino
- 9v Batteries x2
- EMG Muscle Sensor with the electrode cable
- Battery Sockets (Optional) x3
- 2 Jumper Cables
- Breadboard
The first thing we need in order to make this setup work is the EMG muscle sensor which can be found online. Then we need to place the sensor on the breadboard. Then two cables should be connected to pins that says SIG and GND. SIG cable goes to any anolog input on our Arduino, in this case it's A0. GND cable goes to any GND input on our Arduino.


Second part is connecting the batteries. The batteries should be put in the sockets as it appears in the photo. The cable from the + side, which is the red one should be connected to +Vs pin of the sensor. The cables in the middle both red and black should be connected to GND pin of the sensor. Lastly, the cable which is coming from the - of the battery should be connected to -Vs pin of the sensor.

Our circuit should look like this in the end.

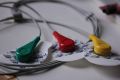
Last step is to connect our electrode cable and place the electrodes on our muscles to make them get the signals properly. Place one electrode in the middle of the muscle body, connect this electro to the R (RED) snap connector. Place one electrode at one end of the muscle body, connect this electro to the F (GREEN) snap connector. Place a third electrode on a bony or non-muscular part of your body near the targeted muscle, connect this electrode to the L(YELLOW) snap connector.
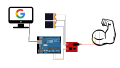
Google Muscle Scheme


Now we are done with the circuit, we should continue with plugging our Arduino cable in and loading our code.
This is the code I used. This recieves the data coming from the sensor and prints it as a sensor value which allow us to send this data to Max/MSP. On my sensor I was getting the signal levels roughly from 100 to 400.

Finally, we can use our max patch after some arrangements. The usb port used by the Arduino should be defined in the object where it says "serial d 9600". In my computer I was using the d serial port, the one you are using should be written here. The patch can be started by clicking the toggle button above. The signal level can be observed from the graphic.


Conclusions
First thing to figure out was to how to get data from google in order to display the images of the search results. I came up with this simple patch. It's altering the image search link by adding another word at the end with append object.
