m (Miga moved page GMU:Intro to BioArt/Cloning to GMU:BioArt WS16/Cloning) |
|||
| (35 intermediate revisions by the same user not shown) | |||
| Line 11: | Line 11: | ||
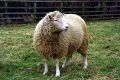
===Dolly the Sheep=== | ===Dolly the Sheep=== | ||
“Dolly, a Finn-Dorset ewe, was the first mammal to have been successfully cloned from an adult somatic cell. Dolly was formed by taking a cell from the udder of her 6-year old biological mother. Dolly's embryo was created by taking the cell and inserting it into a sheep ovum. .. The embryo was then placed inside a female sheep that went through a normal pregnancy. She was cloned [in 1996] at the Roslin Institute in Scotland.”(wikipedia, https://en.wikipedia.org/wiki/Cloning) | |||
“Dolly was publicly significant because the effort showed that genetic material from a specific adult cell, programmed to express only a distinct subset of its genes, can be reprogrammed to grow an entirely new organism. Before this demonstration, it had been shown by John Gurdon that nuclei from differentiated cells could give rise to an entire organism after transplantation into an enucleated egg.”(wikipedia, https://en.wikipedia.org/wiki/Cloning) | |||
“Reproductive cloning generally uses "somatic cell nuclear transfer" (SCNT) to create animals that are genetically identical. This process entails the transfer of a nucleus from a donor adult cell (somatic cell) to an egg from which the nucleus has been removed, or to a cell from a blastocyst from which the nucleus has been removed.”(wikipedia, https://en.wikipedia.org/wiki/Cloning) | |||
<gallery> | |||
12-Dolly(SideView).jpg| | |||
how-dolly-was-cloned-the-guardian.png|The Guardian | |||
</gallery> | |||
Paper reporting that there are no ageing problems in among SCNT clones (“Healthy ageing of cloned sheep”, http://www.nature.com/articles/ncomms12359) | Paper reporting that there are no ageing problems in among SCNT clones (“Healthy ageing of cloned sheep”, http://www.nature.com/articles/ncomms12359) | ||
| Line 34: | Line 45: | ||
“Somatic-cell nuclear transfer, known as SCNT, can also be used to create embryos”(https://en.wikipedia.org/wiki/Cloning) | “Somatic-cell nuclear transfer, known as SCNT, can also be used to create embryos”(https://en.wikipedia.org/wiki/Cloning) | ||
"somatic cell nuclear transfer (SCNT) is a laboratory strategy for creating a viable embryo from a body cell and an egg cell"(https://en.wikipedia.org/wiki/Somatic_cell_nuclear_transfer) | |||
===Organism cloning=== | ===Organism cloning=== | ||
“Organism cloning (also called reproductive cloning) refers to the procedure of creating a new multicellular organism, genetically identical to another.”(https://en.wikipedia.org/wiki/Cloning) | “Organism cloning (also called reproductive cloning) refers to the procedure of creating a new multicellular organism, genetically identical to another.”(https://en.wikipedia.org/wiki/Cloning) | ||
==DNA== | |||
<gallery> | |||
File:1-dna-polymerase.jpg | |||
File:2-dna-structure.jpg | |||
File:3-what.jpg | |||
File:4-how.jpg | |||
</gallery> | |||
==Enzymes for the preparation of protoplasts== | ==Enzymes for the preparation of protoplasts== | ||
| Line 58: | Line 79: | ||
|} | |} | ||
==Workshop 1 (DNA | ==Workshop 1 (Molecular/DNA cloning)== | ||
See also https://www.uni-weimar.de/kunst-und-gestaltung/wiki/GMU:BioArt/Sebastian_Kaye#DIY_PCR | |||
*1. cutting out DNA samples from different flesh sorts (sausage) | *1. cutting out DNA samples from different flesh sorts (sausage) | ||
*2. putting samples into Eppendorf reaction tubes (Epi) | *2. putting samples into Eppendorf reaction tubes (Epi) | ||
*3. adding buffer (1000 ul) enzyme (100 ul) in a bigger epi tube in order to prepare mix for dissolving samples | *3. adding buffer (1000 ul) enzyme (100 ul) in a bigger epi tube in order to prepare mix for dissolving samples (See 3-11: [[:File:DNeasy-IMG_3514.JPG]] for more info) | ||
*4. divide 200 ul of mix into tubes with samples so it dissolves all other proteins and leaves only dna | *4. divide 200 ul of mix into tubes with samples so it dissolves all other proteins and leaves only dna | ||
*5. putting samples into heating/cooling block for one hour with 56C | *5. putting samples into heating/cooling block for one hour with 56C | ||
*6. transfer liquid to the bigger epic tubes | *6. transfer liquid to the bigger epic tubes | ||
*7. adding 200 ul of | *7. adding 200 ul of solvent buffer to the dissolved samples. brakes the walls of the cell (functions as washing medium) | ||
*8. adding 200 ul 100% ethanol in order to get DNA out | *8. adding 200 ul 100% ethanol in order to get DNA out | ||
*9. transferring the liquid into the adapter tubes with powder (Ionenaustauschchromatographie) | *9. transferring the liquid into the adapter tubes with powder (Ionenaustauschchromatographie) | ||
*10. | *10. centrifuge/dremelFuge | ||
*11. 3 centrifuge cycles with different buffer; the last one with water in order to have dna in the final sample | *11. 3 centrifuge cycles with different buffer; the last one with water in order to have dna in the final sample | ||
*12. polymerase master mixer (half of the | *12. polymerase master mixer (half of the 2x master mix, 12,5ul + 12,5ul distilled water) + sample (10ul) + primer forward (2,5ul) + primer reverse (2,5ul). https://www.neb.com/protocols/2012/08/29/protocol-for-q5-high-fidelity-2x-master-mix-m0492 | ||
*PCR multiplication HOWTO: | |||
a) We start at 95C two strands divides, hydrogen bonds will break at this temperature; DNA is accessible | |||
<br>b) Annealing: primers bind to the targets Roughly at the 65C | |||
<br>c) 72C polymerase start elongation of dna. Copies into one direction. It is called TAQ polymerase; comes from specific species called /thermus aquaticus/; lives in gazers and very stable; For every 1000 base pairs you need to copy we need around 60s. | |||
<gallery> | |||
File:pcr-IMG_4694.JPG | |||
File:pcr-IMG_4695.JPG | |||
File:LocustPcr_wo_quarz_Steckplatine.png | |||
File:pcr-IMG_4702.JPG | |||
File:pcr-IMG_4706.JPG | |||
File:pcr-IMG_4711.JPG | |||
File:pcr-IMG_4713.JPG | |||
File:pcr-IMG_4716.JPG | |||
File:pcr-IMG_4728.JPG | |||
File:0-kit.jpg | |||
</gallery> | |||
==Workshop 2 (Gel electroforese chamber)== | ==Workshop 2 (Gel electroforese chamber)== | ||
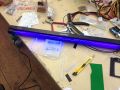
*1. cutting out from plastic box | *1. cutting out from plastic box (Fig. 1.) | ||
*2. preparing screws | *2. preparing screws to be put into the chamber (Fig. 2.); screws will be connected later to the power supply blue (-12V) and yellow (+12V) cables | ||
*3. preparing 1% agarose (agarose, | *3. preparing 1% agarose (agarose, TAE, distilled water); for 100ml solution use 1g agarose, 2ml 50x TAE buffer and 98ml distilled water | ||
*4. pouring agarose solution into the chamber | *4. pouring agarose solution into the chamber and adding SERVA DNA Stain G (1,5ul for 100ml solution) and mixing around so it spreads. | ||
*5. cutting out endings of agarose for screws (screws get hot when letting electricity through and therefore it needs liquid outside) | *5. cutting out endings of agarose for screws (screws get hot when letting electricity through and therefore it needs liquid outside) | ||
*6. pouring the liquid (distiled water + the solution; no agarose) | *6. pouring the liquid (distiled water + the solution; no agarose) | ||
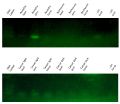
*7. pipetting dna ladder for measurements into the first gel pocket | *7. pipetting dna ladder for measurements into the first gel pocket. https://www.addgene.org/plasmid-protocols/gel-electrophoresis/ | ||
*8. pipetting samples with colouring (instead of colour one could use 40% glicerol so the samples sink into the gel pockets) into the remaining gel pockets | *8. pipetting samples with colouring (instead of colour one could use 40% glicerol so the samples sink into the gel pockets) into the remaining gel pockets | ||
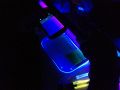
*9. | *9. let 24V flow through the chamber for 40 min (power supply blue+yellow cables) | ||
<gallery> | |||
File:pcr-IMG_4700.JPG|Fig. 1 | |||
File:electrophoresis-IMG_4736.JPG|Fig. 2 | |||
File:electrophoresis-IMG_4741.JPG | |||
File:electrophoresis-IMG_4751.JPG | |||
File:electrophoresis-IMG_4752.JPG | |||
File:electrophoresis-IMG_4757.JPG | |||
File:electrophoresis-IMG_4764.JPG | |||
File:electrophoresis-IMG_4769.JPG | |||
File:electrophoresis-IMG_4775.JPG | |||
File:electrophoresis-IMG_4782.JPG | |||
File:Ielectrophoresis-MG_4785.JPG | |||
File:electrophoresis-IMG_4821.JPG | |||
File:electrophoresis-IMG_4825.JPG | |||
File:20160815_KitchenLab_Electrophoresis_RESULTS.jpg | |||
</gallery> | |||
==Workshop 3 (Plant cloning)== | |||
man kann von einer Pflanze Millionen klonierten Pflanzen züchten. das wichtigste ist eine Zelle zu haben. | |||
*pflanzen Blätter ins Enyzm geben (Cellulase Macerozyme) | |||
*Enzyme kommen von microorganismen, sie teilen die Zellen (fressen Zellenwände) | |||
*Zellverband zerstören und auflösen damit wir einzelne Zellen naher haben | |||
*wenn das Milieu lebend/gut/günstig ist, können wir diese Zellen durch Teilung vermehren | |||
*am Anfang sieht man Callus (undifferenziertes pflanzen Gewebe) | |||
*man braucht bestimmte Pflanzenhormonmischung um daraus Mehrstoff | |||
*um ein Richtiges/siehtbares Pflanzen zu haben braucht man schon ein paar Monate. Und dafür sollte bestimmtes PH, Temperatur, Licht usw stehen | |||
*Wenn da zu viele Zellen sind, muss man erst zentrifugieren/waschen damit die Zellen vereinzelt werden könnten. Um das Milieu (=Umwelt / Nährlösung / Licht Temperatur / Belüftung) | |||
<gallery> | <gallery> | ||
File:plants-IMG_4416.JPG | |||
File:plants-IMG_4421.JPG | |||
File:plants-IMG_4422.JPG | File:plants-IMG_4422.JPG | ||
</gallery> | </gallery> | ||
Latest revision as of 11:34, 6 January 2018
Related projects
spike jonze
Being John Malkovich (8/11) Movie CLIP - Malkovich Inside Malkovich (1999) HD https://www.youtube.com/watch?v=Q6Fuxkinhug
Daisuke Takakura
loose polyhedron (2016-), http://www.casane.jp/loose-polyhedron
Klaus Fritze
Genlaboratorium (since 2001), ARCADIA 2.0: In vitro plants in Laboratory for improved breeding of Poplars (2015/2016), https://www.khm.de/~fritze/indexzwo.html
Dolly the Sheep
“Dolly, a Finn-Dorset ewe, was the first mammal to have been successfully cloned from an adult somatic cell. Dolly was formed by taking a cell from the udder of her 6-year old biological mother. Dolly's embryo was created by taking the cell and inserting it into a sheep ovum. .. The embryo was then placed inside a female sheep that went through a normal pregnancy. She was cloned [in 1996] at the Roslin Institute in Scotland.”(wikipedia, https://en.wikipedia.org/wiki/Cloning)
“Dolly was publicly significant because the effort showed that genetic material from a specific adult cell, programmed to express only a distinct subset of its genes, can be reprogrammed to grow an entirely new organism. Before this demonstration, it had been shown by John Gurdon that nuclei from differentiated cells could give rise to an entire organism after transplantation into an enucleated egg.”(wikipedia, https://en.wikipedia.org/wiki/Cloning)
“Reproductive cloning generally uses "somatic cell nuclear transfer" (SCNT) to create animals that are genetically identical. This process entails the transfer of a nucleus from a donor adult cell (somatic cell) to an egg from which the nucleus has been removed, or to a cell from a blastocyst from which the nucleus has been removed.”(wikipedia, https://en.wikipedia.org/wiki/Cloning)
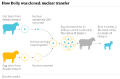
The Guardian
.jpg)

Paper reporting that there are no ageing problems in among SCNT clones (“Healthy ageing of cloned sheep”, http://www.nature.com/articles/ncomms12359)
Cloning
“The traditional technique for gene cloning involves the transfer of a DNA fragment of interest from one organism to a self-replicating genetic element, such as a bacterial plasmid. This technique is commonly used today for isolating long or unstudied genes and protein expression. A more recent technique is the use of polymerase chain reaction (PCR) for amplifying a gene of interest. The advantage of using PCR over traditional gene cloning, as described above, is the decreased time needed for generating a pure sample of the gene of interest.”(http://www.bio-rad.com/en-us/applications-technologies/introduction-gene-cloning-analysis) And “The fundamental difference between the two methods is that molecular cloning involves replication of the DNA in a living microorganism, while PCR replicates DNA in an in vitro solution, free of living cells.”(https://en.wikipedia.org/wiki/Molecular_cloning)
Natural Cloning
“Cloning is a natural form of reproduction that has allowed life forms to spread for more than 50 thousand years. It is the reproduction method used by plants, fungi, and bacteria.”(https://en.wikipedia.org/wiki/Cloning) (See for example here: http://www.instructables.com/id/Clone-a-tomato-plant-and-fill-your-garden-for-FRE/?ALLSTEPS)
Molecular cloning
“Commonly used to amplify DNA fragments containing whole genes, but it can also be used to amplify any DNA sequence such as promoters, non-coding sequences and randomly fragmented DNA.”(https://en.wikipedia.org/wiki/Cloning)
“Cloning of any DNA fragment essentially involves four steps:
- fragmentation - breaking apart a strand of DNA
- ligation - gluing together pieces of DNA in a desired sequence
- transfection - inserting the newly formed pieces of DNA into cells
- screening/selection - selecting out the cells that were successfully transfected with the new DNA”
Cell cloning
“Cloning a cell means to derive a population of cells from a single cell. In the case of unicellular organisms such as bacteria and yeast, this process is remarkably simple and essentially only requires the inoculation of the appropriate medium. However, in the case of cell cultures from multi-cellular organisms, cell cloning is an arduous task as these cells will not readily grow in standard media.”(https://en.wikipedia.org/wiki/Cloning)
“Somatic-cell nuclear transfer, known as SCNT, can also be used to create embryos”(https://en.wikipedia.org/wiki/Cloning)
"somatic cell nuclear transfer (SCNT) is a laboratory strategy for creating a viable embryo from a body cell and an egg cell"(https://en.wikipedia.org/wiki/Somatic_cell_nuclear_transfer)
Organism cloning
“Organism cloning (also called reproductive cloning) refers to the procedure of creating a new multicellular organism, genetically identical to another.”(https://en.wikipedia.org/wiki/Cloning)
DNA


Enzymes for the preparation of protoplasts
Enzymes accelerate, or catalyze, chemical reactions
Protoplasts refer to the entire cell, excluding the cell wall
“Cell walls are made of a variety of polysaccharides. Protoplasts can be made by degrading cell walls with a mixture of the appropriate polysaccharide-degrading enzymes:”(https://en.wikipedia.org/wiki/Protoplast)
| Type of cell | Enzyme |
|---|---|
| Plant cells | Cellulase, pectinase, xylanase |
| Gram-positive bacteria | Lysozyme (+EDTA) |
| Fungal cells | Chitinase |
Workshop 1 (Molecular/DNA cloning)
See also https://www.uni-weimar.de/kunst-und-gestaltung/wiki/GMU:BioArt/Sebastian_Kaye#DIY_PCR
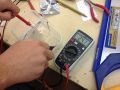
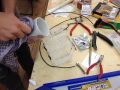
- 1. cutting out DNA samples from different flesh sorts (sausage)
- 2. putting samples into Eppendorf reaction tubes (Epi)
- 3. adding buffer (1000 ul) enzyme (100 ul) in a bigger epi tube in order to prepare mix for dissolving samples (See 3-11: File:DNeasy-IMG_3514.JPG for more info)
- 4. divide 200 ul of mix into tubes with samples so it dissolves all other proteins and leaves only dna
- 5. putting samples into heating/cooling block for one hour with 56C
- 6. transfer liquid to the bigger epic tubes
- 7. adding 200 ul of solvent buffer to the dissolved samples. brakes the walls of the cell (functions as washing medium)
- 8. adding 200 ul 100% ethanol in order to get DNA out
- 9. transferring the liquid into the adapter tubes with powder (Ionenaustauschchromatographie)
- 10. centrifuge/dremelFuge
- 11. 3 centrifuge cycles with different buffer; the last one with water in order to have dna in the final sample
- 12. polymerase master mixer (half of the 2x master mix, 12,5ul + 12,5ul distilled water) + sample (10ul) + primer forward (2,5ul) + primer reverse (2,5ul). https://www.neb.com/protocols/2012/08/29/protocol-for-q5-high-fidelity-2x-master-mix-m0492
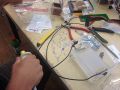
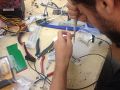
- PCR multiplication HOWTO:
a) We start at 95C two strands divides, hydrogen bonds will break at this temperature; DNA is accessible
b) Annealing: primers bind to the targets Roughly at the 65C
c) 72C polymerase start elongation of dna. Copies into one direction. It is called TAQ polymerase; comes from specific species called /thermus aquaticus/; lives in gazers and very stable; For every 1000 base pairs you need to copy we need around 60s.


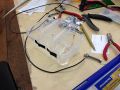
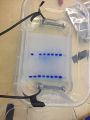
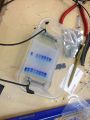
Workshop 2 (Gel electroforese chamber)
- 1. cutting out from plastic box (Fig. 1.)
- 2. preparing screws to be put into the chamber (Fig. 2.); screws will be connected later to the power supply blue (-12V) and yellow (+12V) cables
- 3. preparing 1% agarose (agarose, TAE, distilled water); for 100ml solution use 1g agarose, 2ml 50x TAE buffer and 98ml distilled water
- 4. pouring agarose solution into the chamber and adding SERVA DNA Stain G (1,5ul for 100ml solution) and mixing around so it spreads.
- 5. cutting out endings of agarose for screws (screws get hot when letting electricity through and therefore it needs liquid outside)
- 6. pouring the liquid (distiled water + the solution; no agarose)
- 7. pipetting dna ladder for measurements into the first gel pocket. https://www.addgene.org/plasmid-protocols/gel-electrophoresis/
- 8. pipetting samples with colouring (instead of colour one could use 40% glicerol so the samples sink into the gel pockets) into the remaining gel pockets
- 9. let 24V flow through the chamber for 40 min (power supply blue+yellow cables)
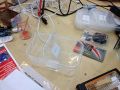
Fig. 1
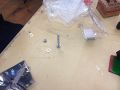
Fig. 2
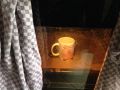


Workshop 3 (Plant cloning)
man kann von einer Pflanze Millionen klonierten Pflanzen züchten. das wichtigste ist eine Zelle zu haben.
- pflanzen Blätter ins Enyzm geben (Cellulase Macerozyme)
- Enzyme kommen von microorganismen, sie teilen die Zellen (fressen Zellenwände)
- Zellverband zerstören und auflösen damit wir einzelne Zellen naher haben
- wenn das Milieu lebend/gut/günstig ist, können wir diese Zellen durch Teilung vermehren
- am Anfang sieht man Callus (undifferenziertes pflanzen Gewebe)
- man braucht bestimmte Pflanzenhormonmischung um daraus Mehrstoff
- um ein Richtiges/siehtbares Pflanzen zu haben braucht man schon ein paar Monate. Und dafür sollte bestimmtes PH, Temperatur, Licht usw stehen
- Wenn da zu viele Zellen sind, muss man erst zentrifugieren/waschen damit die Zellen vereinzelt werden könnten. Um das Milieu (=Umwelt / Nährlösung / Licht Temperatur / Belüftung)


