(Created page with "'''Making VFX Assests with Pysarum Polycephalum''' Whats struck me the most when I first saw slime mold was its look. The fine details and the seemingly chaotic structure whe...") |
No edit summary |
||
| (7 intermediate revisions by one other user not shown) | |||
| Line 1: | Line 1: | ||
'''Making VFX Assests with | '''Making VFX Assests with Physarum Polycephalum''' | ||
== Concept == | |||
Whats | Whats immediately striking about slime molds is their unique look. The fine details and the seemingly chaotic structure are simply enchanting. So the question is: Is it possible to transform images of slime mold into usable assets for VFX works? And to be precise: The goal is not to recreate, but to use actual footage. So what needs to be done is to make keyed versions of timelapse footage of physarum growing, that can then be reapplied in changed perspective to other surfaces in vfx software such as Adobe After Effects. | ||
== | == Experiments == | ||
Normaly, keying is done by shooting objects against a green background. However, since Physarum tends to | Normaly, keying is done by shooting objects against a green background. However, since Physarum tends to be a green-yellow color, blue seems to be a better alternative. It offers both greater color- and luminance-contrast. | ||
Secondly, in order to see the finest details | Secondly, in order to see the finest details it is necessary to shoot as high resolution as possible. To maximize any cameras resolution, it is best to let Physarum grow on square plates (best in 4:3 ratio) to use the whole sensor. | ||
A quick test was done with single photos. | |||
[[File:P1310563.JPG|400px]] | [[File:P1310563.JPG|400px]] | ||
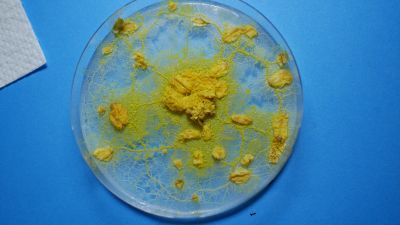
A good looking specimen was photographed in front of a cyn (sadly not blue) piece of cardboard. | |||
[[File:Keylight_00000_00000.jpg|400px]] | [[File:Keylight_00000_00000.jpg|400px]] | ||
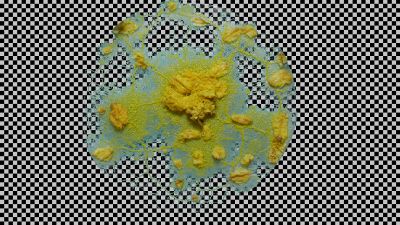
Sadly, using standard keying software, the diffusion of the medium and the fine veins of Physarum left a big cyan border. Its not unusable but would need a lot of work to be up to standards. | Sadly, using standard keying software, the diffusion of the medium and the fine veins of Physarum left a big cyan border. Its not unusable but would need a lot of work to be up to standards. | ||
This posed the need for a different keying method: The blue channel was extracted from the image and its inverse was used as a luma matte. | |||
[[File:BlueChannel_00000_00000.jpg|400px]] | [[File:BlueChannel_00000_00000.jpg|400px]] | ||
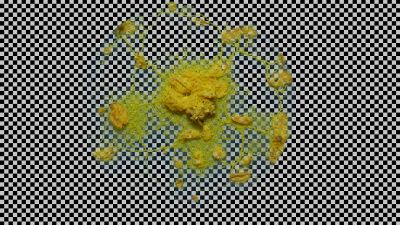
The upside of this method is that it results in translucent parts of the image. Most keying software ( | The upside of this method is that it results in translucent parts of the image. Most keying software (in this case Keylight, which is built in to After Effects) only produce images that have either completely transparent or completely opaque parts. Physarum naturally transmits a lot light that passes through it. The thicker the veins, the more opaque they get. In image-terms you could "measure" the thickness / opacity by looking at how yellow Physarum is. In the picture you can see quite well that some veins are more translucent than others. The issue with this method is that white (as in specular highlights) clips the blue channel as well. So not only does the background get keyed out, but also each reflection. Sadly, Physarum is very shiny, so in any lighting setup, where lights are above it, there will be reflections. | ||
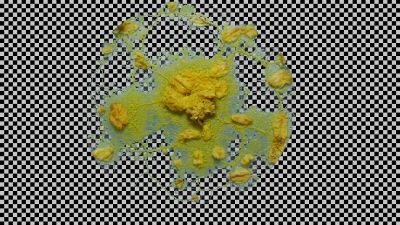
In order to avoid that, | In order to avoid that, a third method of keying was used. For this, Adobes color grading software Lumetri was used. In there, a HSL-selection was added to target the cyan background. This gives much better control of the result, as it is possible to set specific ranges of saturation and luminance and thus control the translucency. | ||
[[File:LumetriHSL_00000_00000.jpg|400px]] | [[File:LumetriHSL_00000_00000.jpg|400px]] | ||
Still, | Still, an optimal keying-solution needs to be found. In the current figuration, Physarum casts too much shadow onto the background. | ||
In order to improve my results and to film the real-deal-timelapses, | In order to improve my results and to film the real-deal-timelapses, it is needed to look into the following things: | ||
1. | 1. A light setup is needed that doesn't create as harsh highlights. A big source. However, its not very economical to leave a big LED running over night, if pictures are only taken every 10 minutes or so. Maybe an arduino-solution? | ||
2. Physarum casts shadows. There are two possible ways to avoid this. Either | 2. Physarum casts shadows. There are two possible ways to avoid this. Either the distance to the background must be increased (by e.g. filming vertically instead of top-down), or maybe physarum would grow on a blue medium. Having seen the issues other students had with food-coloring, using small amounts of pure pigment or acrylic based paint should be a better option. | ||
3. | 3. With these test-shots, the resolution was not sufficient to see the finest veins. The original plan was to use 20x40cm plexiglas sheets, but maybe 2x4cm makes more sense. This would also diminish filming times maybe to the point where it makes sense again to just leave LEDs on the whole time. | ||
== Implementation == | |||
Previous tests have shown, that a medium that had synthetic ultramarine blue pigment in it, inhibited the growth of physarum. As a workaround, the timelapse-medium had a thick layer of blue medium and on top on that approximately a millimeter of normal, clear medium. With that, a test timelapse was shot overnight (about 10 hours of time). The camera used, was a blackmagic pocket cinema camera 4k, which had the unique advantage of the option to be cable-powered without any accessories. The timelapse was shot in BRAW 12:1 and 3840 by 2160 px and the resulting video was 3 minutes and 16 seconds long. | |||
Because oat flakes in the shot would give away the true scale of the image, a bedding of E. coli bacteria was grown and prepared on the plate. The shot was lit by a continuously running LED-Panel with a power of 15w. | |||
Sadly, the specimen of physarum was not very strong and grew only very little during the interval and what grew hat only a very faint yellow tint. | |||
[[File:TimelapseRAW.png|400px]] | |||
This wasted a lot of resolution but might still be usable, depending on the shot size and intended use case. | |||
The cropped and keyed image had a size of roughly 800x800 pixels. | |||
[[File:KeyResult.png|400px]] | |||
To see if it would be usable, a test shot was filmed, 3D Tracked, the footage composited in and graded. The oatflake was masked out to make the slime mold appear larger in size. | |||
In order to hide the bad resolution and make the Physarum more alien-like, a vector blur was applied. | |||
Latest revision as of 15:43, 15 December 2021
Making VFX Assests with Physarum Polycephalum
Concept
Whats immediately striking about slime molds is their unique look. The fine details and the seemingly chaotic structure are simply enchanting. So the question is: Is it possible to transform images of slime mold into usable assets for VFX works? And to be precise: The goal is not to recreate, but to use actual footage. So what needs to be done is to make keyed versions of timelapse footage of physarum growing, that can then be reapplied in changed perspective to other surfaces in vfx software such as Adobe After Effects.
Experiments
Normaly, keying is done by shooting objects against a green background. However, since Physarum tends to be a green-yellow color, blue seems to be a better alternative. It offers both greater color- and luminance-contrast. Secondly, in order to see the finest details it is necessary to shoot as high resolution as possible. To maximize any cameras resolution, it is best to let Physarum grow on square plates (best in 4:3 ratio) to use the whole sensor.
A quick test was done with single photos.
A good looking specimen was photographed in front of a cyn (sadly not blue) piece of cardboard.
Sadly, using standard keying software, the diffusion of the medium and the fine veins of Physarum left a big cyan border. Its not unusable but would need a lot of work to be up to standards. This posed the need for a different keying method: The blue channel was extracted from the image and its inverse was used as a luma matte.
The upside of this method is that it results in translucent parts of the image. Most keying software (in this case Keylight, which is built in to After Effects) only produce images that have either completely transparent or completely opaque parts. Physarum naturally transmits a lot light that passes through it. The thicker the veins, the more opaque they get. In image-terms you could "measure" the thickness / opacity by looking at how yellow Physarum is. In the picture you can see quite well that some veins are more translucent than others. The issue with this method is that white (as in specular highlights) clips the blue channel as well. So not only does the background get keyed out, but also each reflection. Sadly, Physarum is very shiny, so in any lighting setup, where lights are above it, there will be reflections.
In order to avoid that, a third method of keying was used. For this, Adobes color grading software Lumetri was used. In there, a HSL-selection was added to target the cyan background. This gives much better control of the result, as it is possible to set specific ranges of saturation and luminance and thus control the translucency.
Still, an optimal keying-solution needs to be found. In the current figuration, Physarum casts too much shadow onto the background. In order to improve my results and to film the real-deal-timelapses, it is needed to look into the following things: 1. A light setup is needed that doesn't create as harsh highlights. A big source. However, its not very economical to leave a big LED running over night, if pictures are only taken every 10 minutes or so. Maybe an arduino-solution? 2. Physarum casts shadows. There are two possible ways to avoid this. Either the distance to the background must be increased (by e.g. filming vertically instead of top-down), or maybe physarum would grow on a blue medium. Having seen the issues other students had with food-coloring, using small amounts of pure pigment or acrylic based paint should be a better option. 3. With these test-shots, the resolution was not sufficient to see the finest veins. The original plan was to use 20x40cm plexiglas sheets, but maybe 2x4cm makes more sense. This would also diminish filming times maybe to the point where it makes sense again to just leave LEDs on the whole time.
Implementation
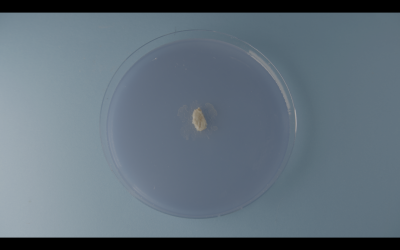
Previous tests have shown, that a medium that had synthetic ultramarine blue pigment in it, inhibited the growth of physarum. As a workaround, the timelapse-medium had a thick layer of blue medium and on top on that approximately a millimeter of normal, clear medium. With that, a test timelapse was shot overnight (about 10 hours of time). The camera used, was a blackmagic pocket cinema camera 4k, which had the unique advantage of the option to be cable-powered without any accessories. The timelapse was shot in BRAW 12:1 and 3840 by 2160 px and the resulting video was 3 minutes and 16 seconds long. Because oat flakes in the shot would give away the true scale of the image, a bedding of E. coli bacteria was grown and prepared on the plate. The shot was lit by a continuously running LED-Panel with a power of 15w. Sadly, the specimen of physarum was not very strong and grew only very little during the interval and what grew hat only a very faint yellow tint.
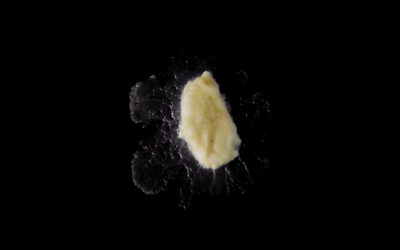
This wasted a lot of resolution but might still be usable, depending on the shot size and intended use case. The cropped and keyed image had a size of roughly 800x800 pixels.
To see if it would be usable, a test shot was filmed, 3D Tracked, the footage composited in and graded. The oatflake was masked out to make the slime mold appear larger in size. In order to hide the bad resolution and make the Physarum more alien-like, a vector blur was applied.
