Printing, copying and scanning is possible at various public locations on the Campus Weimar. Multifunctional devices (so-called "MFGs") are available to all users who meet the basic requirements. After successful authentication using »thoska« or personal user ID, the devices can be used for printing, copying and scanning or files provided from outside can be output for printing.
Printing, copying and scanning at the »MFGs«
The public printers (so-called »MFGs«) are mostly Triumph-Adler devices. The following functions are available to users on the devices:
| Printing | Scanning | Copying |
|---|---|---|
| Printing from USB | Scan2Email | Copying B/W Copying colour Copying with special settings |
Make files available for printing regardless of location
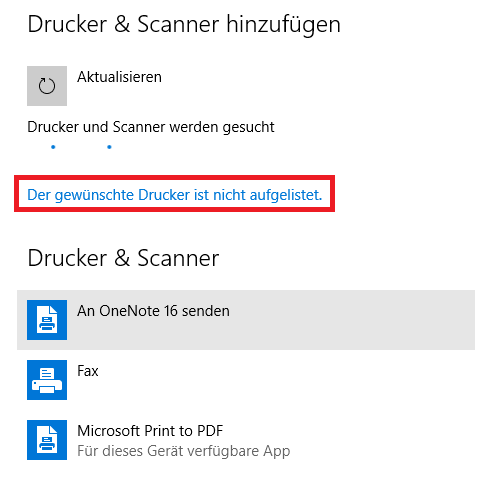
It is possible to make files available for printing at a later date regardless of the location of the units(»Print via web interface«). This is possible from anywhere, i.e. you do not have to be at a workstation at the university, but can provide the print jobs from your home workstation, for example. Printing can then be done at a later time at one of the multifunctional devices on the campus of the university.
Requirements for the location-independent provision of files
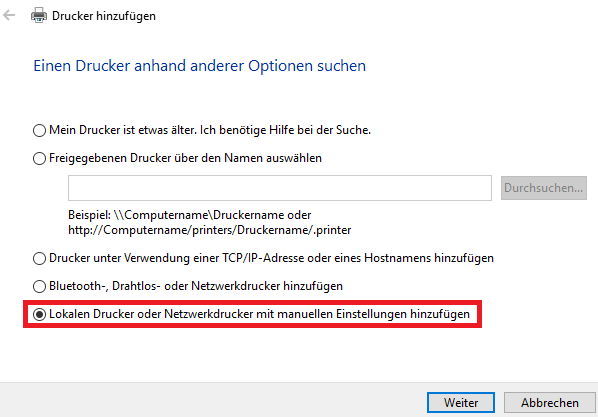
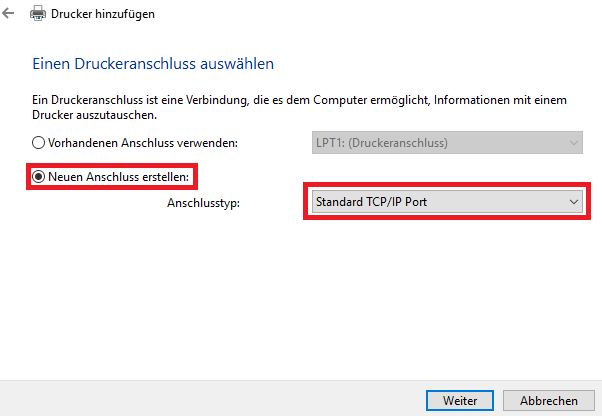
- Printing via the web interface requires the installation of the public »MFGs« on your own client. For this you need the appropriate driver software for your operating system. You can find this in the download area on this page. You will also find installation instructions for the respective operating system on this page.
- Files must be in PDF format.
- The devices must be connected to the »FollowMe service« in order to retrieve personal print jobs. This is the case for most public printers and copiers on the campus of Bauhaus-Universität.
- To successfully submit a print job, an active VPN connection is required.
- Printing on the multifunction device is only possible for the person who provided the file. This is done by authorisation on the device using «thoska» or personal user ID.
- Print jobs and local scans are stored in the personal account for up to 72 hours. The jobs must be output within this period. After the 72 hours have elapsed, they are deleted. Favourites are excluded from this.
- Bauhaus-Universität Weimar uses the print cost accounting system »aQrate« to charge printing costs. In addition to the possibility of charging costs depending on the user, personal settings, jobs, credits and reports can be managed independently here via the user's own print account. For more information on individual functions and on using the print account, see »Notes on using the web interface« on this page.
Locations of the »MFGs« at the Campus Weimar
General
At the moment, some of the locations mentioned below are not accessible or only accessible with restrictions (user group via »thoska«). Please note the daily updated information at the individual locations.
Locations of the multifunctional devices
| A-Dürerstr. 2 | 1. Floor | Hallway | ||
| Amalienstr. 13 | 3. Floor | Hallway | ||
| Bauhausstr. 7b | 2. Floor | Hallway | ||
| Bauhausstr. 7b | 1. Floor | Hallway | ||
| Bauhausstr. 9c | GreenHouse | 2. Floor | Hallway | |
| Bauhausstr. 11 | Ground floor | Hallway | ||
| Bauhausstr. 15 | Ground floor | Hallway | ||
| Belvederer Allee 1 | 1. Floor | Hallway | ||
| Belvederer Allee 1a | 3. Floor | Hallway | ||
| Belvederer Allee 1b | 1. Floor | Hallway | ||
| Belvederer Allee 4 | Basement | Hallway | ||
| Belvederer Allee 5 | K007 | Basement | ||
| Belvederer Allee 6 | Hallway | |||
| Berkaer Str. 1 | Ground floor | R101 | ||
| Coudraystr. 7 | 2. Floor | Hallway | ||
| Coudraystr. 7 | 3. Floor | Hallway | ||
| Coudraystr. 7 | Ground floor | Subsidiary library | ||
| Coudraystr. 11c | 1. Floor | Hallway | Hallway | |
| Coudraystr. 13a | 1. Floor | Hallway | ||
| Geschw.-Scholl-Str. 6 | Prellerhaus | 2,5 Floor | ||
| Geschw.-Scholl-Str. 7 | R004 | Passageway | ||
| Geschw.-Scholl-Str. 7 | R004 | Passageway | ||
| Geschw.-Scholl-Str. 8 | 2. Floor | Hallway | ||
| Geschw.-Scholl-Str. 15 | Ground floor | |||
| Marienstr. 1a | Altbau | 2. Floor | Hallway | |
| Marienstr. 5 | 2. Floor | Hallway | ||
| Marienstr. 7b | 1. Floor | Hallway | ||
| Marienstr. 9 | 1. Floor | Hallway | ||
| Marienstr. 13a | Connector hallway | |||
| Marienstr. 13c | 1. Floor | Hallway | ||
| Marienstr. 15 | 1. Floor | Hallway | ||
| Steubenstr. 6g | Level -1 | G1K01 | ||
| Steubenstr. 6 | Level -2 | F2K01 | ||
| Steubenstr. 6 | Level 1 | G211 | ||
| Steubenstr. 6 | Level 1 | G113 | ||
| Steubenstr. 6 | Level +1 | F102 | Glass box middle | |
| Steubenstr. 6 | Level -1 | F1K01 | ||
| Steubenstr. 6 | Level +1 | F102 | Glass box right | |
| Steubenstr. 6 | Level +1 | F102 | ||
| Steubenstr. 8 | 4. Floor | Photo studio | ||
| Steubenstr. 8 | Basement | RK03 | ||
| Steubenstr. 8 | Limona | 1. Floor | Gallery |
Operating instructions for the public »MFGs«
Operating instructions German
![[Translate to English:] Bedienungsanleitung Deutsch](/fileadmin/_processed_/d/4/csm_Kurzbedienungsanleitung_V3_Deutsch_a7767b85f8.gif)
Operating instructions English
![[Translate to English:] Bedienungsanleitung Englisch](/fileadmin/_processed_/c/f/csm_Kurzbedienungsanleitung_V3_Englisch_560fa0c78d.gif)
Installing the public »MFGs« on your own client
Preliminary note
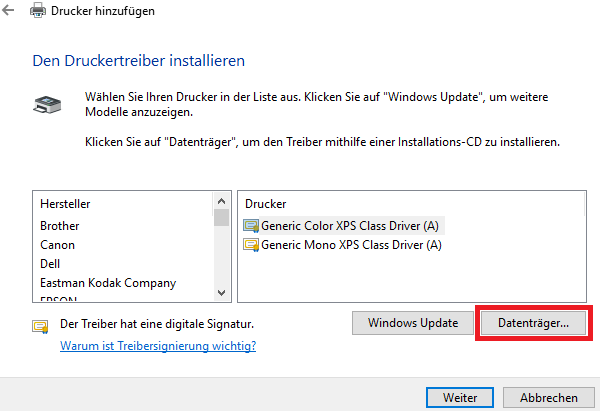
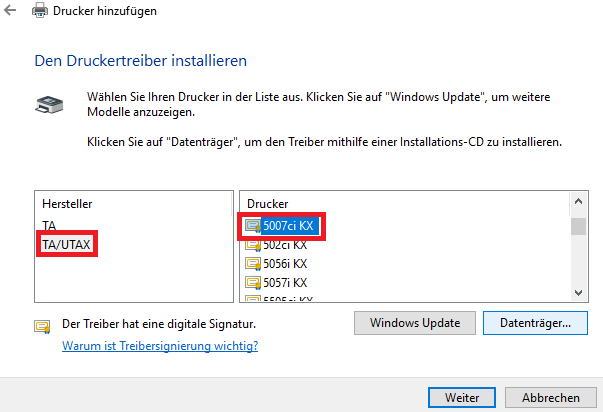
To install the public »MFGs« on your own client, you need the device driver. You can obtain the latest drivers for your operating system from here:
- Triumph Adler Download Center (product name = 5007ci)
To successfully submit a print job to the personal »FollowMe queue« of»aQrate«, an active connection with VPN is required.
Information on how to use the VPN service of the Bauhaus-Universität can be found here.
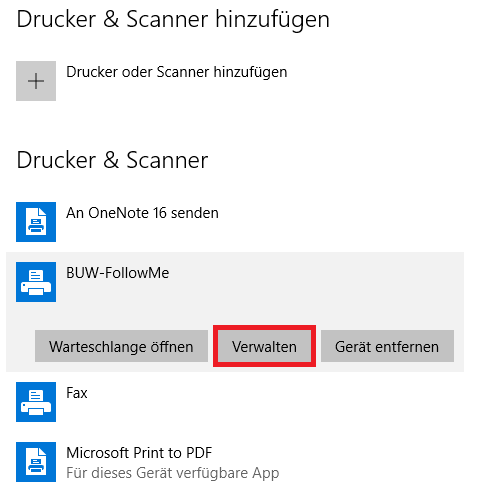
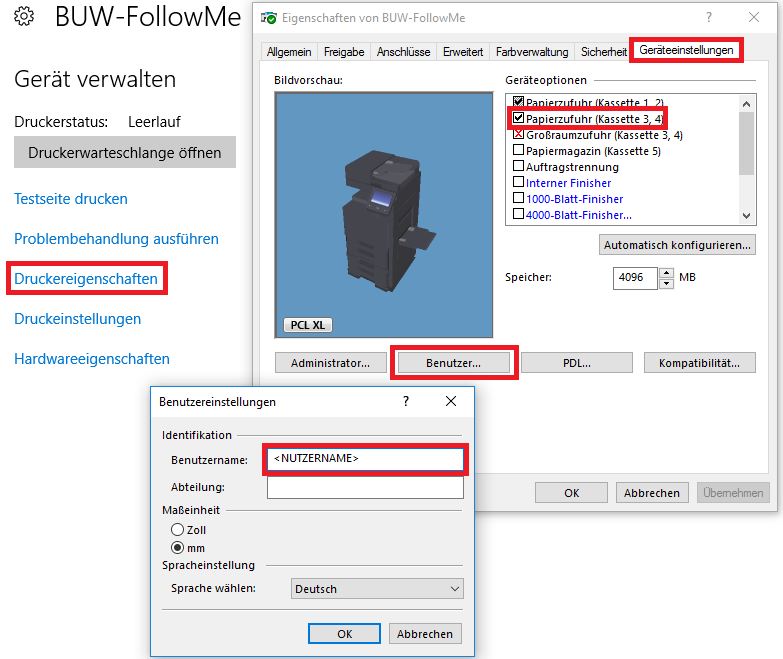
Installation instructions Windows

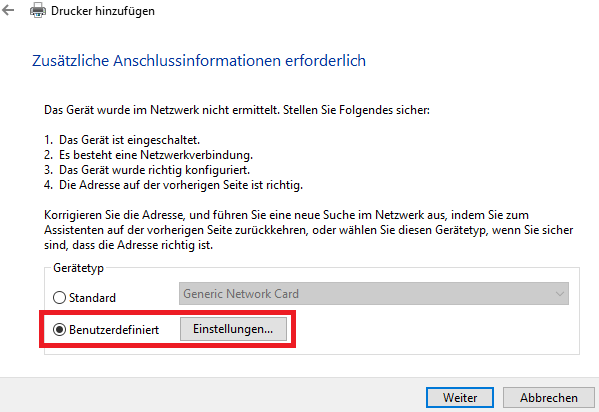
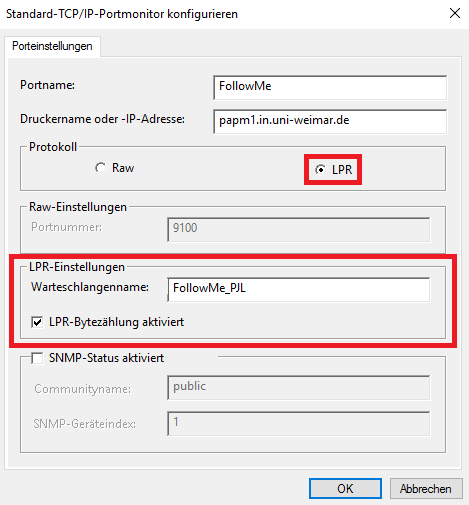
ATTENTION: Please pay attention to the spelling of the queue!

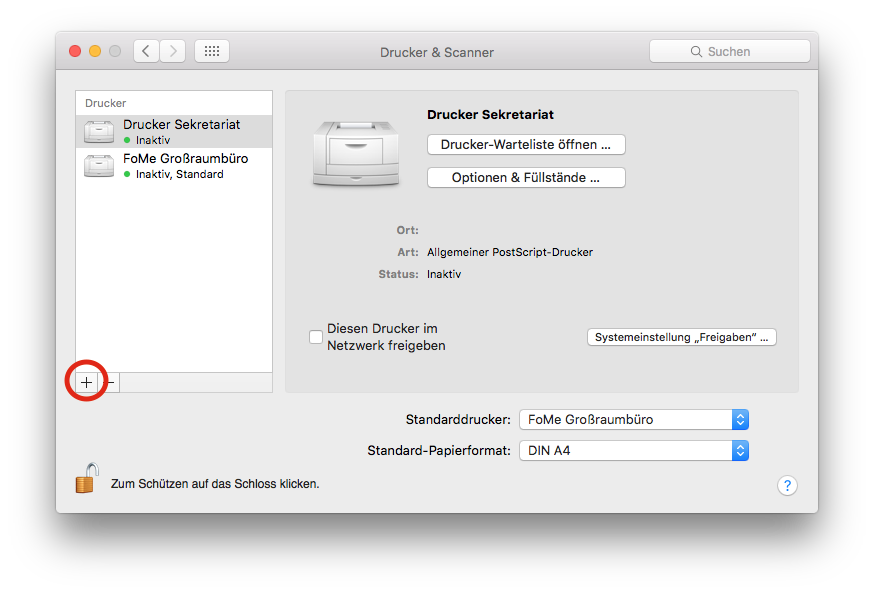
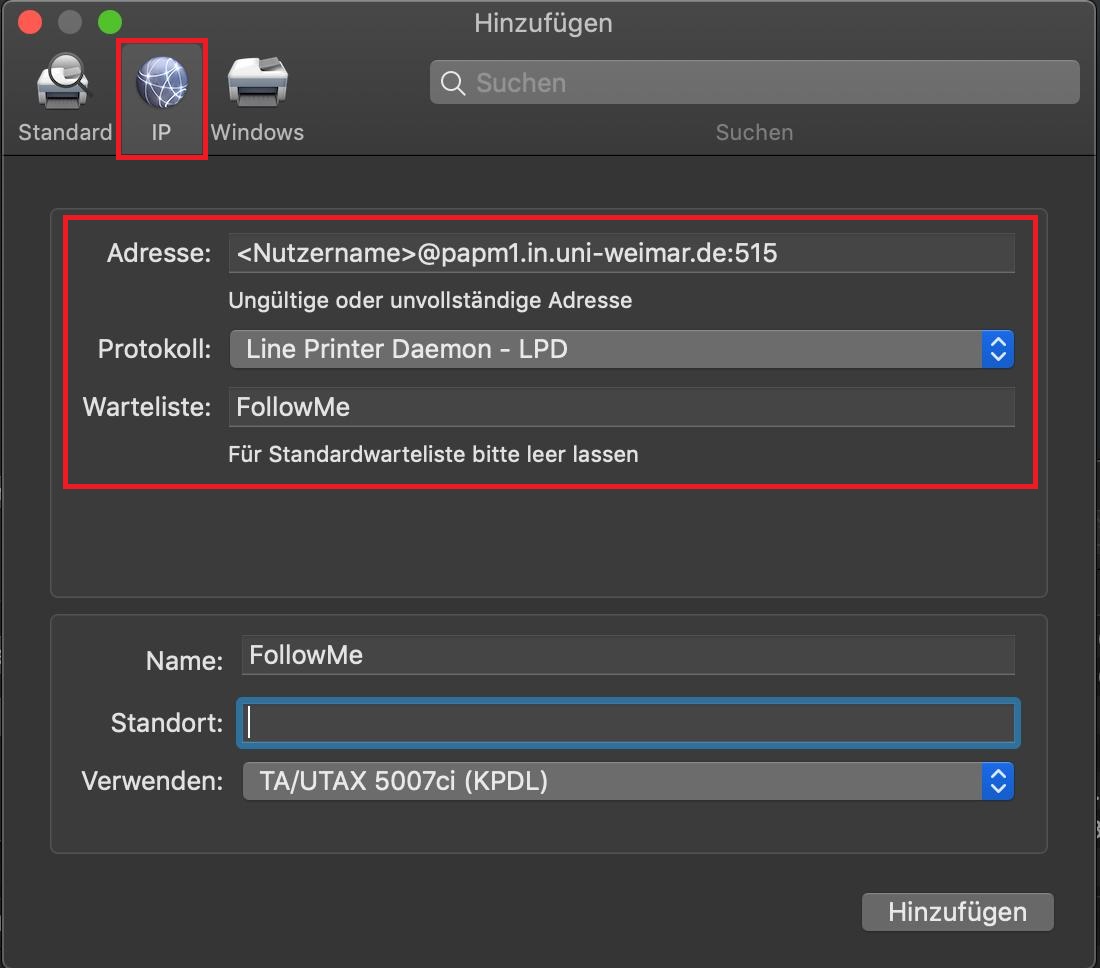
Installation instructions for Mac OSX
Installation instructions for Linux
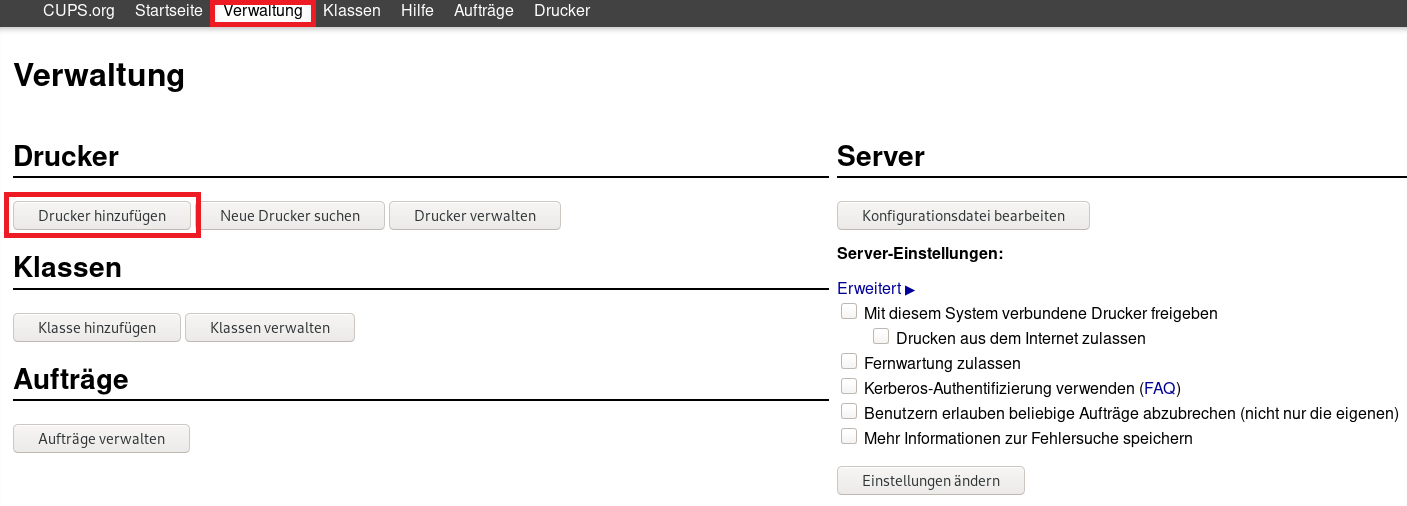
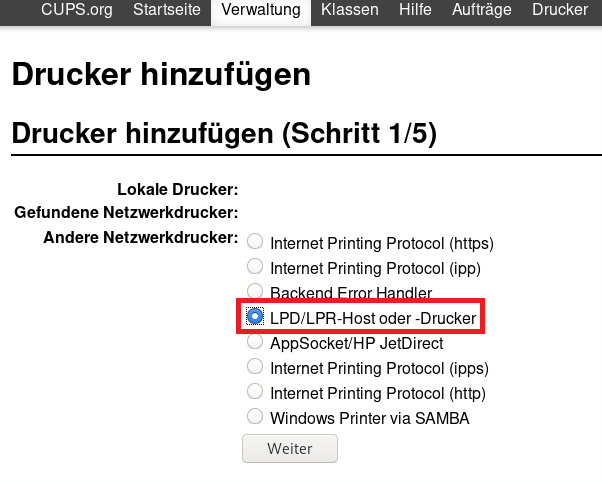
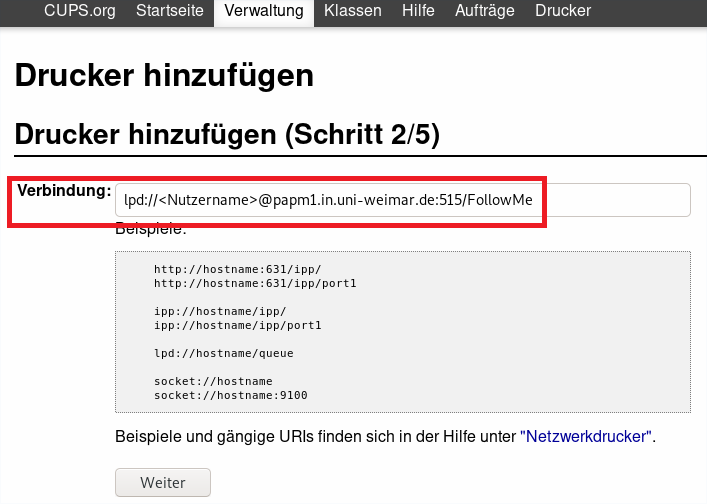
ATTENTION: Please pay attention to the spelling of the queue (FollowMe)!
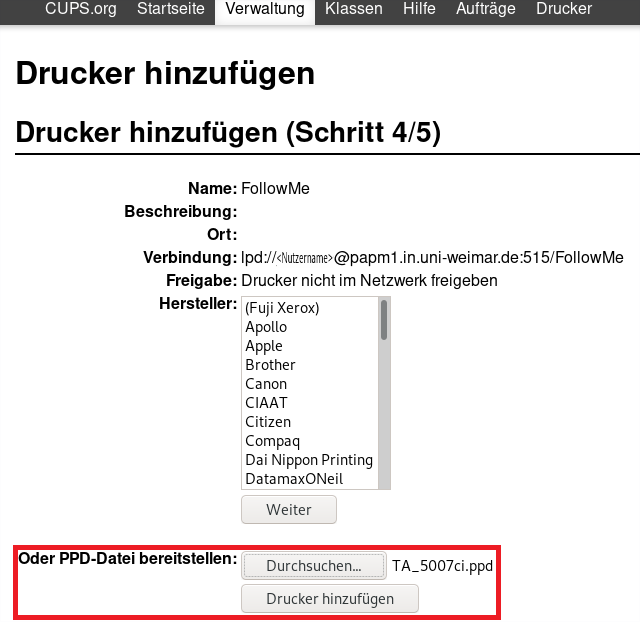
In step 5/5, device functions can be activated, here please optionally activate the "paper feed cash register 3,4".
Notes on the operation of the »aQrate« web interface
General
After login to the web interface of »aQrate« you have access to your information.
Language settings
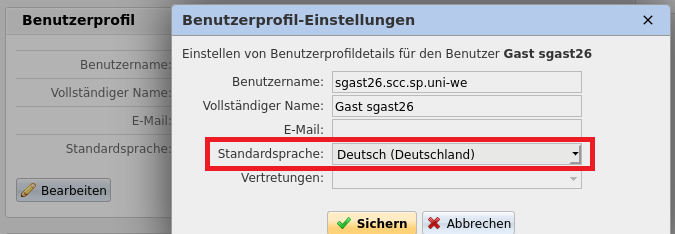
The default language can be adjusted via the user profile by selecting the desired language in the drop-down menu.
Printing via web interface
With the »Print via web interface« service, you can make files available for printing regardless of location. This means that the files can be made available from anywhere, e.g. also from the workstation at home. The files can then be printed in the SCC PC pools or on the public devices on the university campus. The following step-by-step instructions show how »printing via web interface« actually works.
Before you start, check the following requirements for successful use:
- You meet the basic requirements for using the print service.
- If you are not at your workplace at the university or using »Eduroam« when you make yourself available, you will first need a VPN connection.
- Files to be supplied must be in PDF format.
Please click on the pictures to enlarge them.
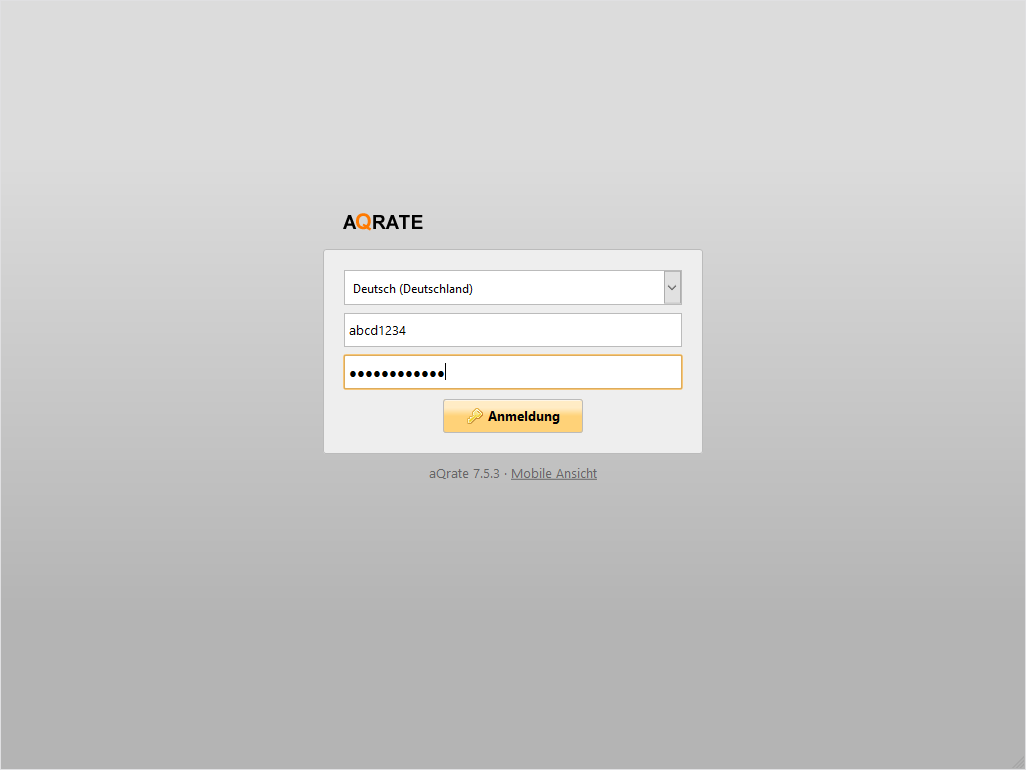
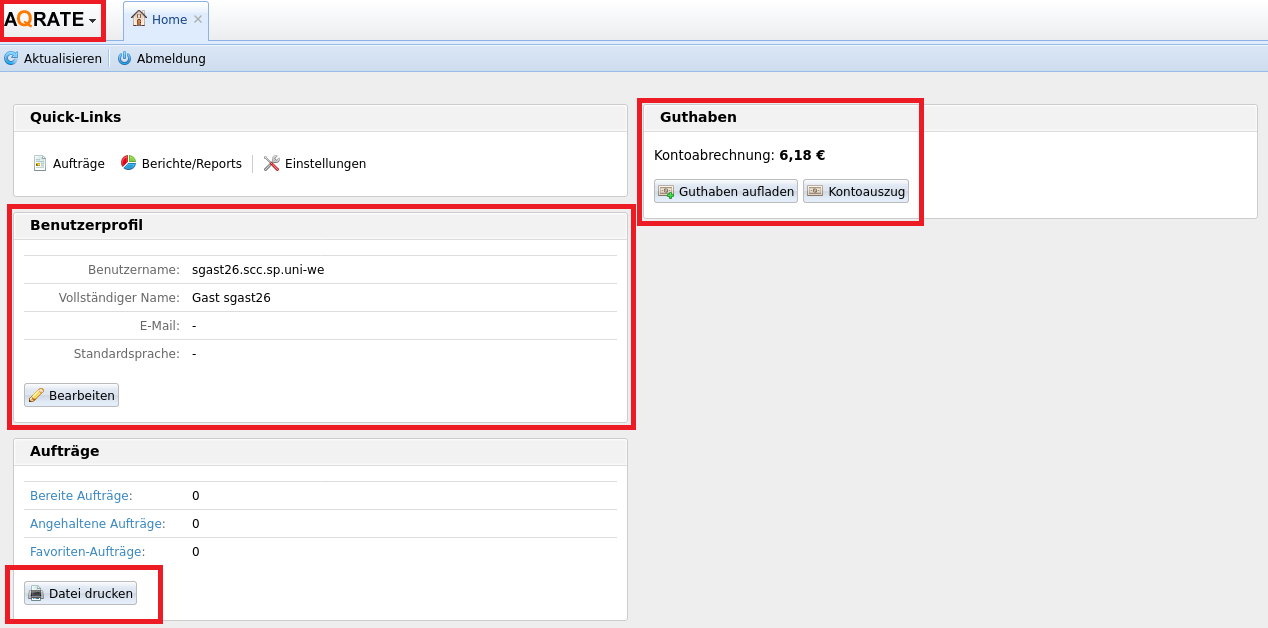
Step 1: Login to the personal print account
Log in to the »aQrate« web interface with your user ID. After successful login, the home view of your personal account appears.
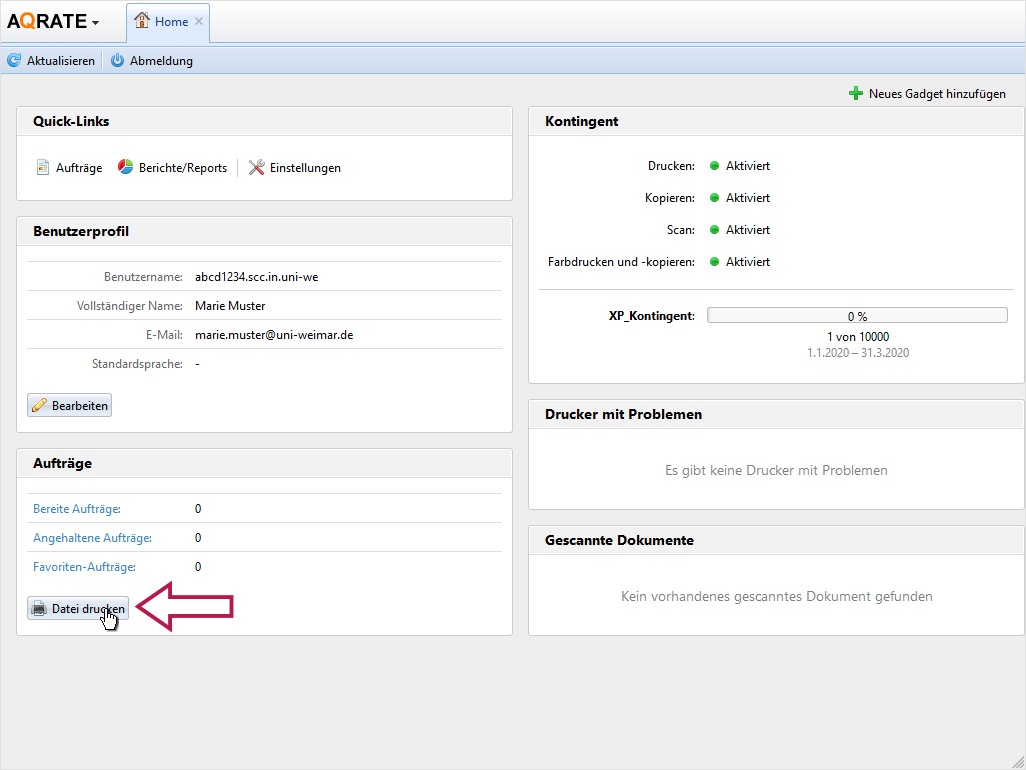
Step 2: Select files for printing ...
Now in the »Orders« area, select the »Print file« button.
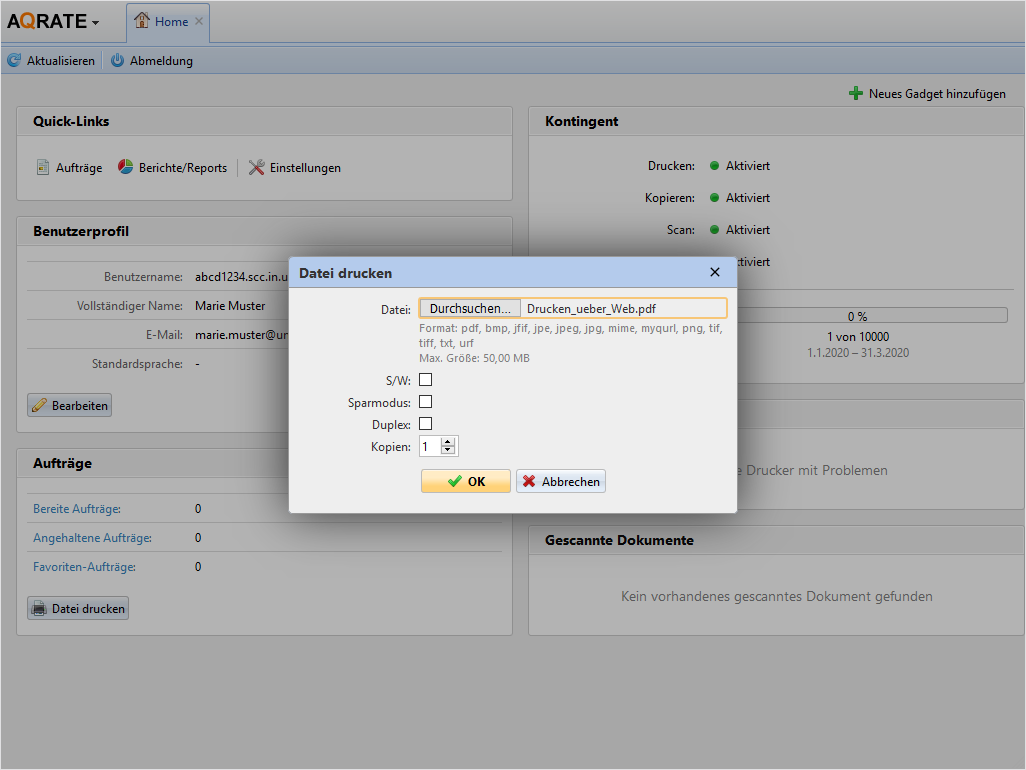
Step 3: ... and provide
A pop-up window appears. Use the »Browse« button here to select files you want to print and click »OK«.
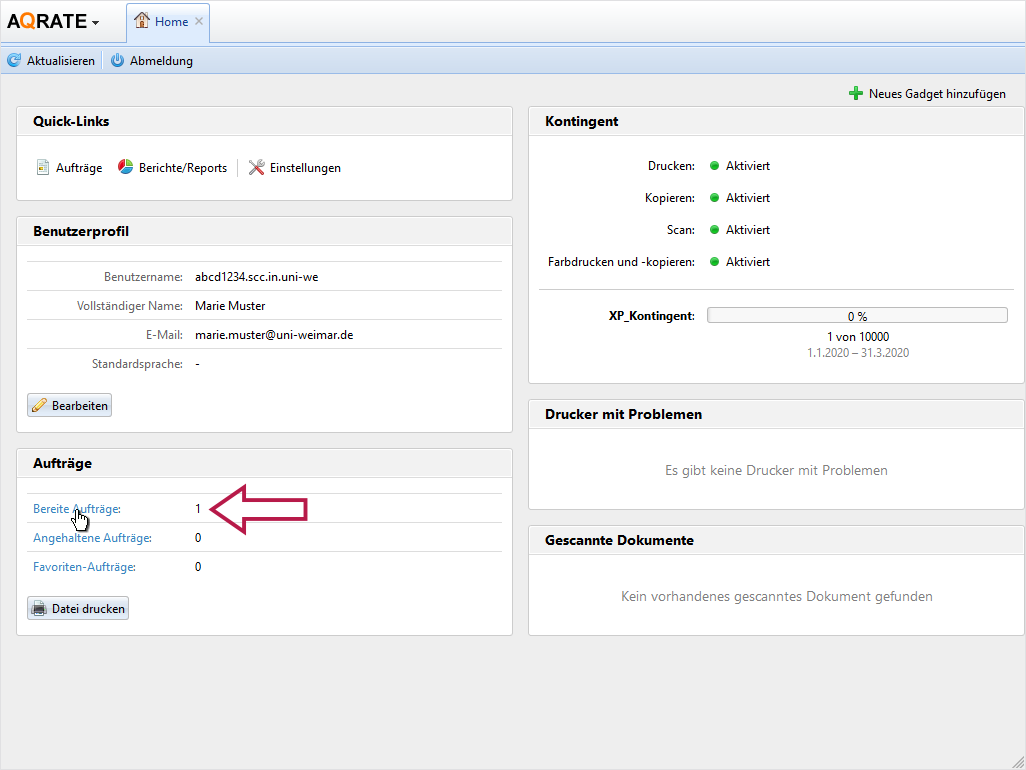
Step 4: Viewing provided files
You will automatically return to the Home view of your account and now see the number of files provided under »Jobs«. die Anzahl der bereitgestellten Dateien. In the »Orders« section, click on »Prepared orders«.
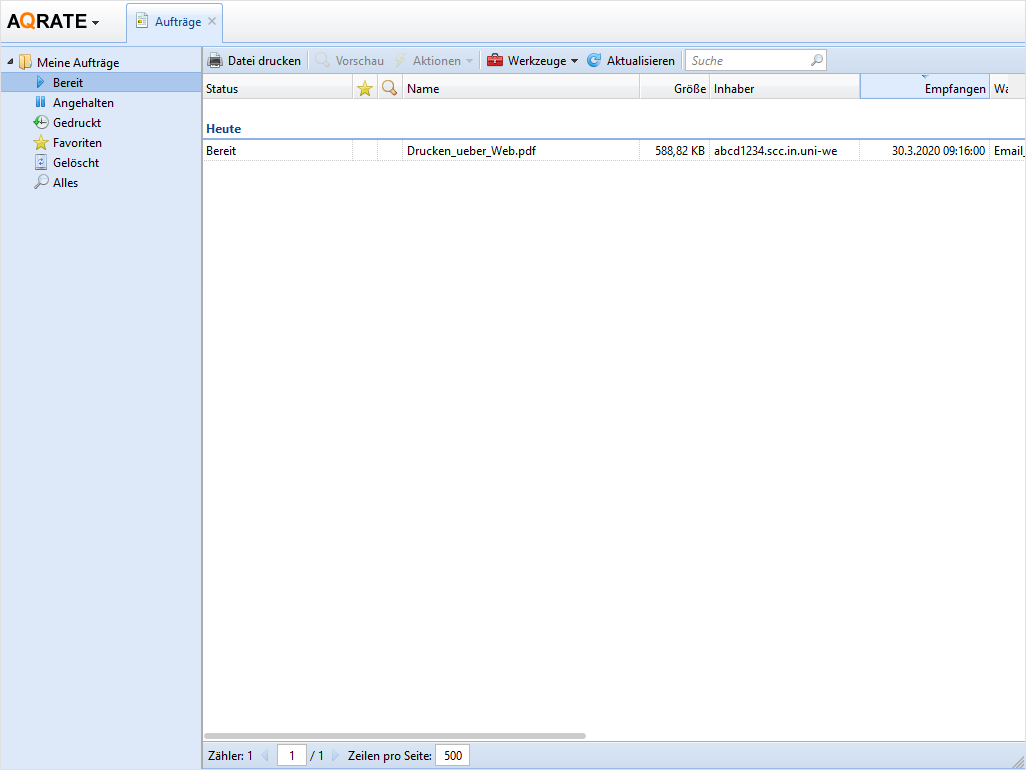
Schritt 5: Printing
You will now be taken to the »Prepared jobs« area. Here you see a list with all personal print jobs. You can trigger, stop, pause or delete the individual print jobs for printing from this point.
To do so, log in again to the personal print account with your personal user ID or your »thoska« at a location of your choice on the Campus Weimar and start the respective print jobs at the printer of your choice.
Report writing
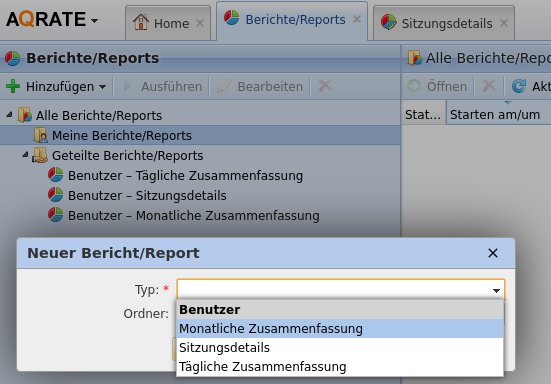
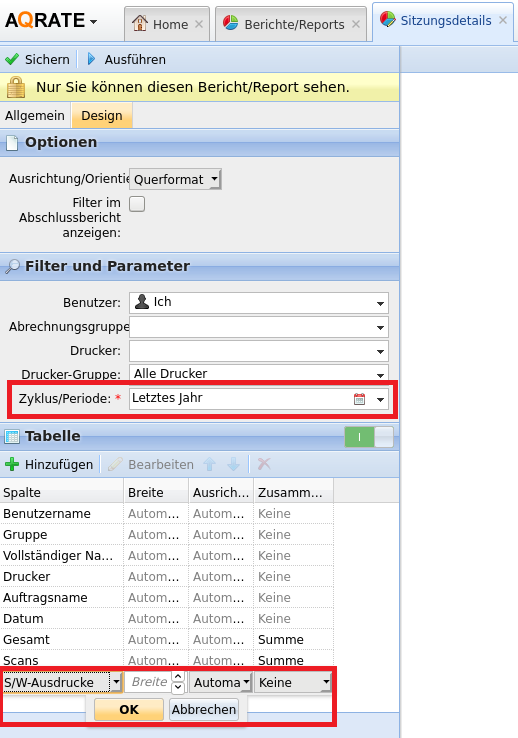
You have the option of choosing from three standard reports or clicking together your own reports via the designer.
Accounting of own print jobs
All users are charged personally for the printing costs via their own printing account. In order to be able to print, the print account must have credit. Users can load credit onto their print account at the terminals on campus and with their personal »thoska«. Further information can be found on the page »Manage print account«.
Price overview standard formats A3 and A4
| A4 | A3 | |
|---|---|---|
| B/W | 0,04€ | 0,08€ |
| Colour | 0,30€ | 0,60€ |
| *Duplex printing, counts double |